Hubstaff metrics
guide


How to Configure User Roles and Permissions in Hubstaff

In Hubstaff, roles and permissions control who can access data, manage people, and oversee work across your organization.
No matter what industry you work in, getting a handle on data access is crucial for ensuring privacy, compliance, and efficiency across your organization. Fortunately, Hubstaff roles and permissions are built to handle just that. 

With the right access levels in place, you can protect sensitive data, reduce oversight fatigue, and help your team work more independently. Assign roles thoughtfully to team members to give them access to what they need, while managers and admins maintain visibility — without micromanagement. 

In this guide, we’ll explain how providing transparency allows employees to view their own productivity data, promoting a culture of accountability, not control. You’ll learn:

  • Basic role governance
  • Why user roles and permissions matter
  • How each role works
  • How to configure them
  • Best practices for managing access as your team scales

Whether you're refining access for a small team or building a structure for a growing business, these tips will help you get it right.

Why Hubstaff roles and permissions matter

Properly configuring roles and permissions in Hubstaff can help you protect your team’s sensitive data, improve productivity, and make it easier to scale your business in the long term. 

With a specific level of access to each team member, individuals only see and interact with the data that’s relevant to their role.

This prevents:

  • Information overload
  • Reduces the risk of accidental changes
  • Strengthens data privacy across your organization

Organization manager settings

Here’s why getting roles and permissions right is so important:

  • Stronger data security. Limit access to sensitive information to only those who need it to avoid unnecessary exposure to financials, client data, or performance metrics.

  • Streamlined team management. Customize project access and time tracking settings by role, so each user has the right tools for their unique circumstances.

  • Scalable access control. As your team grows, clearly defined roles reduce confusion and help onboard new team members quickly and securely.

  • Increased accountability. Let employees view their own productivity data to promote self-evaluation, while keeping management oversight focused and efficient.

Common pitfalls to avoid:

  • Providing admin access to unnecessary parties can reduce security and operational risk.
  • Without regular reviews, permissions can become misaligned with current roles.
  • Not customizing access can expose sensitive data or grant access to the wrong users.

Overview of Hubstaff roles

Each role is designed to align access and control with a team member’s responsibilities, making workflows more efficient without sacrificing transparency.

Roles and permissions in Hubstaff Tasks and Hubstaff are divided into organization-level and project-level access:​

  • Owners and Managers handle organization-wide settings, users, and projects.
  • Members, Collaborators, and Viewers are assigned project-specific access.

In Hubstaff Tasks, advanced actions such as creating epics, editing workflows, and linking projects are also governed by role-based access controls.

Organization roles.png

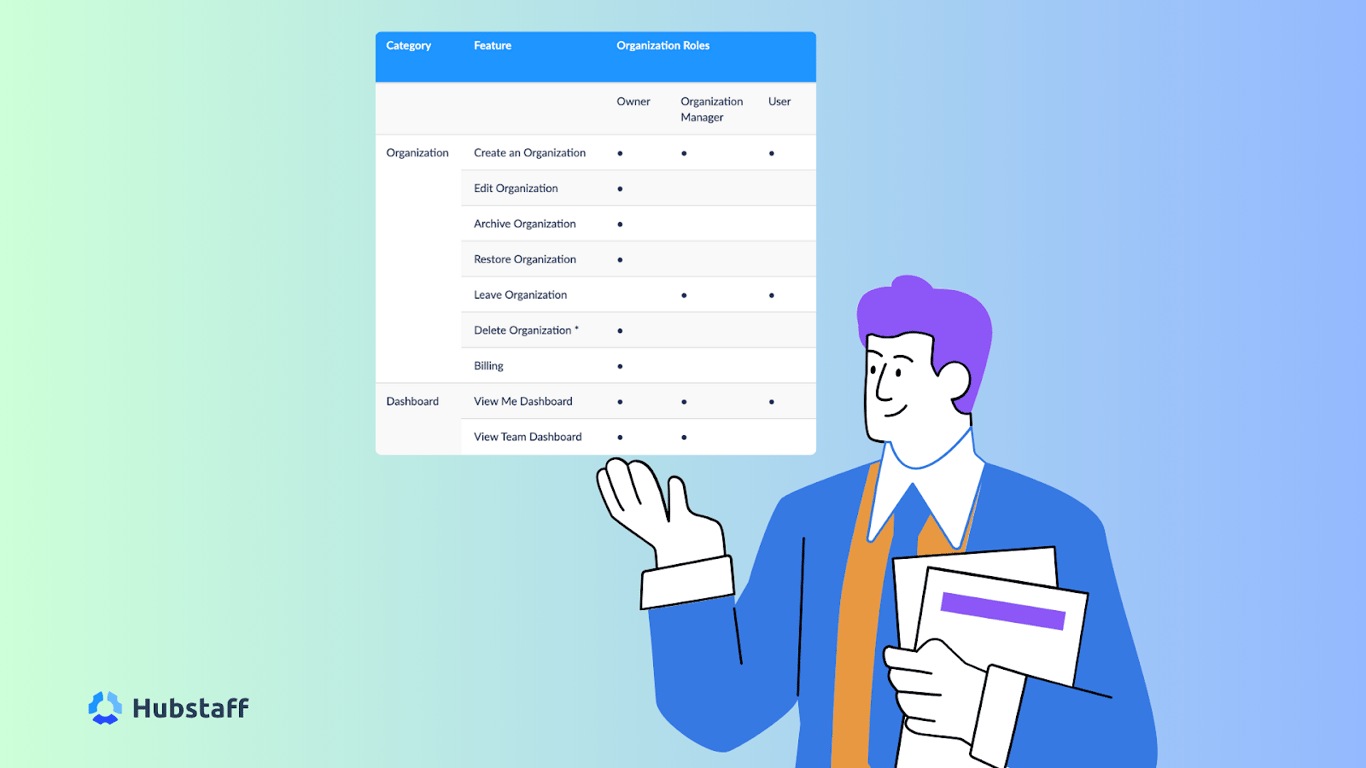
Here’s a list of Hubstaff roles and permissions you need to know:

1. Owner: Owners have full control over the organization, including settings, billing, users, projects, and reports. There can be only one owner per organization, and they cannot remove themselves.

2. Manager: Managers can access most areas of the organization. That includes managing users, assigning roles, overseeing projects and tasks, and viewing reports. However, they cannot edit organization-level settings, access billing information, delete the organization, or transfer ownership.

3. User: Users can track their own time, view their personal dashboard, manage their timesheets, and access assigned projects and tasks. They do not have permission to manage users or projects, or to access any organization-level settings or billing details.

4. Project Viewer: Project Viewers have read-only access to the projects they are assigned to. They can view project details, tasks, and reports, but cannot make any changes or track time.

5. Project Manager: Project Managers can manage all aspects of the projects they are assigned to, including tasks, schedules, budgets, and team members. They cannot access organization-wide settings, manage users outside their projects, or view billing information.

6. Team Lead (within the Teams feature): Team Leads can manage their assigned team, approve or edit timesheets, and handle invoices specific to their team. They do not have access to organization settings, billing, or users outside their assigned team.

How to configure Hubstaff roles and assign permissions

To configure roles and assign permissions in Hubstaff, you’ll need to be an Owner or Manager with the appropriate access.

Here’s a step-by-step guide on how to configure Hubstaff roles and permissions:

Step 1: Go to app.hubstaff.com and log in with your credentials. Navigate to Members or Teams.

Step 2: Click on the People or Members tab in the sidebar. In organizations that use Teams, you may also see a Teams section.

Step 3: Locate the user whose role you want to change or assign and edit the member's role.

Step 4: Select the desired role from the list (Owner, Manager, User, Project Manager, Project Viewer, Team Lead).

  • For Project Managers and Project Viewers, you may need to specify which projects they should have access to.

  • For Team Leads, assign them to the appropriate team.

Step 5: Confirm and save your changes. The member will receive the updated permissions immediately.

pasted-image-1.png

Bonus tips:

  • Remember, only owners can assign the owner role or transfer ownership.
  • Managers can assign most other roles, but cannot change organization-wide settings or billing.
  • Project roles (Project Manager and Project Viewer) are assigned to each project.
  • Team Lead roles are managed within the Teams feature.

If you need more detailed instructions or screenshots, refer to Hubstaff’s support articles on roles and permissions and on managing members for step-by-step guidance.

Best practices and governance

Before you can fully leverage Hubstaff’s flexible roles and permissions, it’s essential to establish clear governance best practices that support security, productivity, and accountability. Managers should be permitted to modify role assignments to maintain security and consistency.

Here are some of the best practices and governance for Hubstaff roles and permissions you should know about:

Hubstaff roles and permissions best practices and governance graphic.png

  • Use the Owner role sparingly: Reserve it for business owners or IT admins, as it grants full control over all organization settings.

  • Assign the Manager role to team leads: Managers are best for team leaders who need access to people and project oversight, but not billing or organization-wide settings.

  • Segment access with project-specific roles: Use Project Manager and Project Viewer roles to limit access by project and prevent permission sprawl.

  • Use the User role for contributors: Assign it to team members who only need to track time and view their own data.

  • Review roles during team or project changes: Audit and update roles when responsibilities shift to ensure access remains up to date and aligned.

  • Enable 2FA or SSO: Add an extra layer of security with 2FA or integrate SSO with SCIM support to prevent unauthorized access.

  • Remove inactive users promptly: Archive or delete accounts for employees who leave to reduce risk and keep access clean.

  • Document your internal role policy: Create a simple guide that outlines role types, who assigns them, and how access is managed.

Common pitfalls to avoid

  • Giving too many users the Owner or Manager role unnecessarily
  • Letting project access accumulate as users move between teams.
  • Failing to review and update roles periodically
  • Overlooking inactive or orphaned accounts
  • Lacking a formal roles and permissions policy

Advanced configurations and use cases

As organizations scale, team structures and workflows become more complex, and Hubstaff’s flexible roles and permissions can be configured to support that growth securely and efficiently.

pasted-image-2.png

Here are several advanced use cases and configuration examples:

  • Promoting Users to Managers: As teams grow, convert experienced Users to Managers to oversee time approvals and activity without providing full admin access.

  • Client-Based Projects: Assign a Project Manager per client. You can also give clients Project Viewer access for visibility without edit rights or sensitive data exposure.

  • High-Security Remote Teams: Limit Owner roles to one or two users (e.g., IT or Finance). Use Managers for team oversight while restricting billing and settings access.

  • Hybrid Teams (Freelancers and Full-Time): Use Project roles to separate external contributors from internal staff. Freelancers get User access only to relevant projects.

  • Regional Team Leads: Assign Managers by geography or department to decentralize oversight without expanding admin privileges.

  • Billing Access for Finance: Keep finance or legal team members as Users and share reports or exports manually or via integrations to avoid over-permissioning.

Build a smarter team with the right roles and access

Setting up roles and permissions in Hubstaff can give you the clarity and control you need to take your business to new heights. Assign the right roles to give team members access only to what they need to protect sensitive data and streamline operations.

Now that you understand the key roles, best practices, and configuration steps, you’re ready to build a more secure and efficient team structure. Log in to Hubstaff, review your team’s roles and permissions, and make the changes you need to keep your workflows up to date.

Your questions, answered

Frequently asked questions

Try Hubstaff free for 14 days

Get full access to Husbtaff's time-saving features. No credit card required. Cancel anytime.

Try Hubstaff for free