time tracking guide
guide

A Deep Dive into Hubstaff's API: Unlocking Custom Workflows

When scaling global teams, there’s no time for clunky tools or half-baked data. Engineers need real visibility, flexible integrations, and the power to automate workflows from reporting to internal — and the Hubstaff API allows for just that. 

Hubstaff is a powerful time tracking and productivity platform used by over 140k users across 150 countries. With Hubstaff’s API, you can give your team flexibility and control over how data is accessed and displayed. It allows developers to create custom workflows, plug into your existing stack, and deliver a transparent, branded experience your clients will love.

With the API, your team can:

  • Create custom workflow automation

  • Implement integration with existing tools

  • Have full control over time tracking and productivity data

  • Integrate Hubstaff with your existing tech stack

In this article, we'll cover Hubstaff’s API features, data structure, and how your dev team can get started with custom workflows and time tracking customizations to your liking.

Getting started with Hubstaff's API

The Hubstaff developer API is flexible, making it approachable for experienced dev teams and those newer to APIs.  

The Hubstaff V2 API lets your dev team read and write data to build custom portals, display activities, tasks, and notes, and tailor the interface to your brand while filtering and presenting data exactly how your clients need to see it.

Here's a quick rundown of what your team will be working with:

  • RESTful architecture: The API uses REST (Representational State Transfer) principles to create a standard and familiar interface structure that speeds up integration and reduces dev ramp-up time.

  • HTTPS encryption:All API requests are secured with HTTPS using TLS encryption.

  • JSON data format: The API uses JSON, a lightweight, widely adopted text-based data exchange format. This makes it simple for your team to debug, build, and iterate.

  • OAuth 2.0 / OpenID Connect authentication: The API authentication system is based on the authorization system in OAuth 2.0. Using industry-standard protocols, ensure secure, modern identity verification.

  • Versioned endpoints: The API endpoints are versioned to make changes without breaking existing code that depends on them. Your team can confidently build with a versioned API, knowing future updates won’t break your existing workflows.

*Note: We will notify the app's owner(s) when we release newer versions and obsolete older versions. This will be a two-step process, with a grace period to deprecate and finally obsolete older versions.

Developer onboarding tips:

To onboard developers with the Hubstaff API, focus on providing:

  • Clear, detailed authentication instructions and API documentation

  • Examples of typical use cases and workflows 

  • Information on how to authenticate using their Hubstaff account credentials

  • Instructions for how to manage their API tokens

  • Guidance on optimizing their development process with RESTful principles, versioning, and rate limits. 

In a nutshell, Hubstaff API integration features are built to work with every system. You can customize how you want data delivered to you and your team.

Understanding Hubstaff's data structure

Before diving further, here's a quick overview of the Hubstaff organization data structure, which will help you understand the correlation between key objects and entities.

The core entities

  • Organizations: Organizations are the parent structure for teams. They include users, projects, and time data.

  • Projects: Tasks or clients assigned to orgs that users track time to.

  • Users: Your team members. Each user is part of an org, and you can assign them to specific projects accordingly.

  • Time Entries: Time entries are the blocks of time that users track during their workday.

  • Activities: Data tied to time entries, such as the percentage of mouse and keyword interactions, optional screenshots, URL visits, and app usage.

The relationship between data and entities

  • First, a "User" logs time to a "Project", which belongs to an "Organization".

  • Time Entries are then attached to both users and projects.

  • Activities during a time tracking session further enrich time entries with productivity metrics.

Common API use cases for custom workflows

The Hubstaff V2 API lets your development team programmatically read and write data. This allows you to build custom workflows and display Hubstaff information exactly how you need.

For example, you could build a separate, fully branded client portal with the Hubstaff API. From there, clients can log in to view filtered activities, tasks, and notes.

The API helps provide quality developer tools to:

  • Present Hubstaff with your branding and customize the experience

  • Use various filters available to arrange the data.

  • Display data to your clients based on your preference

To help your dev team draw inspiration from these custom workflows designed using the Hubstaff API, here are some use cases of syncing your internal data with the Hubstaff platform:

1. Sync time log data to internal dashboards

The API can synchronize data between Hubstaff and other business intelligence systems with task write-back. This might include accounting software or project management tools like Jira. 

This ensures that information remains consistent across platforms and reduces manual data entry. For example, when a user tracks time for a specific Jira task, the time log data gets synced with the Hubstaff platform. 

2. Automating reports

Use the Hubstaff API to automate email delivery of weekly time and activity reports directly to your clients' inboxes. This will inform clients on time, activity, and productivity updates across teams without manual effort.

3. Overtime alerts

Use the API to trigger overtime alerts whenever users exceed 40 hours in a workweek. 

4. Custom workflow for time entry approval

Build custom time entry approval by collecting time entries through the Hubstaff API and running them through your custom business logic (e.g., time duration >15 mins, project validation, manual approval for weekend hours).

5. Filter time entries for client billing

Flag entries for auto-approval, manual review, or rejection. Use webhooks for real-time updates and export approved entries to payroll, invoicing, or reporting tools.

6. Automatic time entries

Building a custom integration makes auto-tagging entries based on task descriptions possible. For example, you can set up an integration between Hubstaff and ClickUp to automate time entries by analyzing task descriptions and assigning tags accordingly.

Hubstaff API: practical examples with code

To help you get started with the Hubstaff API, we've outlined some examples to walk you through real-world scenarios. We have a simple demo showing how to manage personal access tokens on our GitHub account.

Personal Access Token (PAT) methods 1. Node.js PAT 2. PHP PAT Demo 3. Postman Collection

  • Node.js PAT: With Personal Access Tokens (PATs), you can secure your API integration. When building personal scripts or backend apps, it’s a simpler alternative to full-fledged OAuth flows. The idea is to simplify personal access control using a unique token string to authorize requests — especially when interacting with platforms like GitHub. The Node.js PAT demo shows how to use a PAT for safer authentication. Learn how to fetch time entries for specific users or projects and confidently integrate Hubstaff’s API into your Node.js apps.

  • PHP Demo: PHP is a powerful language for web development and server-side scripting. If you need real-time data in your PHP apps, the PHP PAT demo demonstrates how to use a PAT to authenticate API requests. The quick-start script demonstrates connecting to an API, pulling organizational data, and rendering it dynamically. It’s ideal for dashboards, admin panels, or client-facing views.

  • Postman Collection: Explore Hubstaff’s public API in minutes — no code required. Postman is a popular platform for designing, building, and testing APIs collaboratively. This Postman collection lets you test endpoints, inspect responses, and prototype integrations without setting up a dev environment. It is perfect for developers who want to validate logic or build faster.

Integrating Hubstaff with other tools

Integrating Hubstaff with other tools unlocks powerful automation and workflow efficiency, helping your team streamline operations and focus on what matters most.

Here are some popular integrations to learn from:

Zapier

The Hubstaff and Zapier integration takes your productivity to the next level. Automate workflows with no code—send time entries to Google Sheets, create Jira tickets, notify Slack, and more. For example, you might want to receive notifications via Slack for late, missed, or abandoned shifts. 

You can implement Zapier in a few simple steps:

Step 1: In Zapier, you can create a Zap and connect it to Hubstaff by choosing an event as a trigger (e.g., On-time Shift, Late Shift, Missed Shift). Now, all your dev team needs to do is connect your Hubstaff account and select the organization.

Step 2: Search for Slack as the action app. Choose an action event (send a direct message or channel message), connect your Slack account, and fill in the required fields (e.g., Slack username and message text).

Step 3: Click "Test and Continue" to ensure everything works as expected, then turn on your Zap. Hubstaff will now send attendance notifications to Slack based on your selected trigger.

It’s as simple as that.

Slack

Hubstaff integrates with Slack, allowing you to trigger real-time alerts based on time events. 

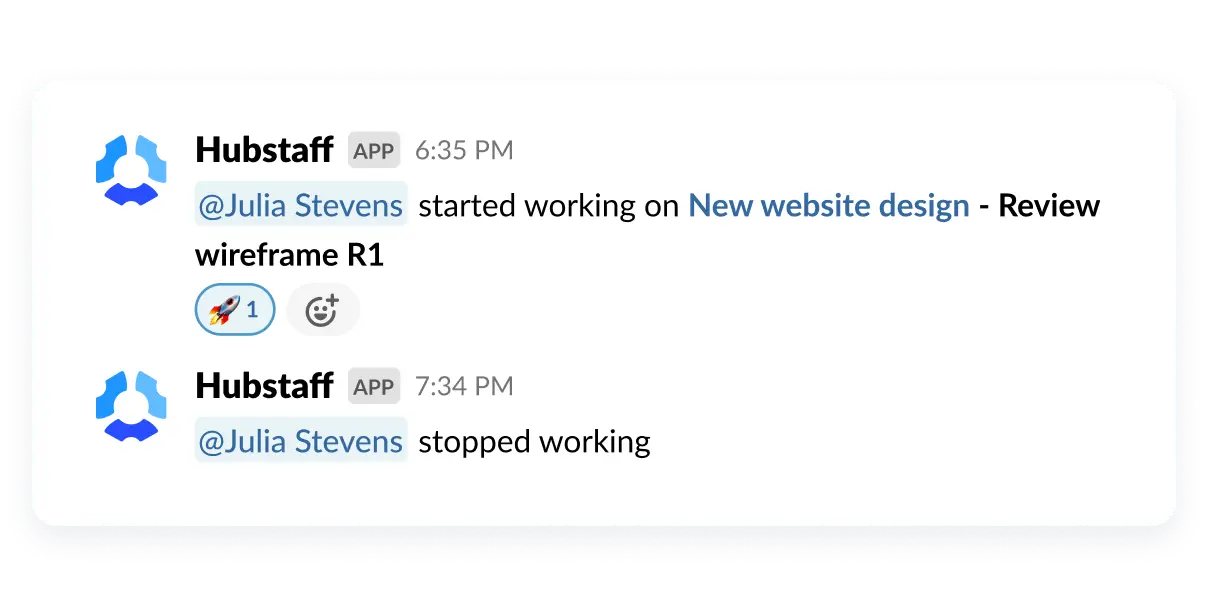
Easily connect Slack to Hubstaff to get notified when your team starts or stops tracking time to a task or when a task is completed. Set up this Integration in just a few easy steps:

Step 1: Go to Settings > Integrations, find Slack under the Communication section, and authorize Hubstaff to access your Slack workspace.

Step 2: Select the Slack channels or users (@username) where you want notifications sent. Only channels accessible by the authenticated user will appear. Ensure users are added to the appropriate channels.

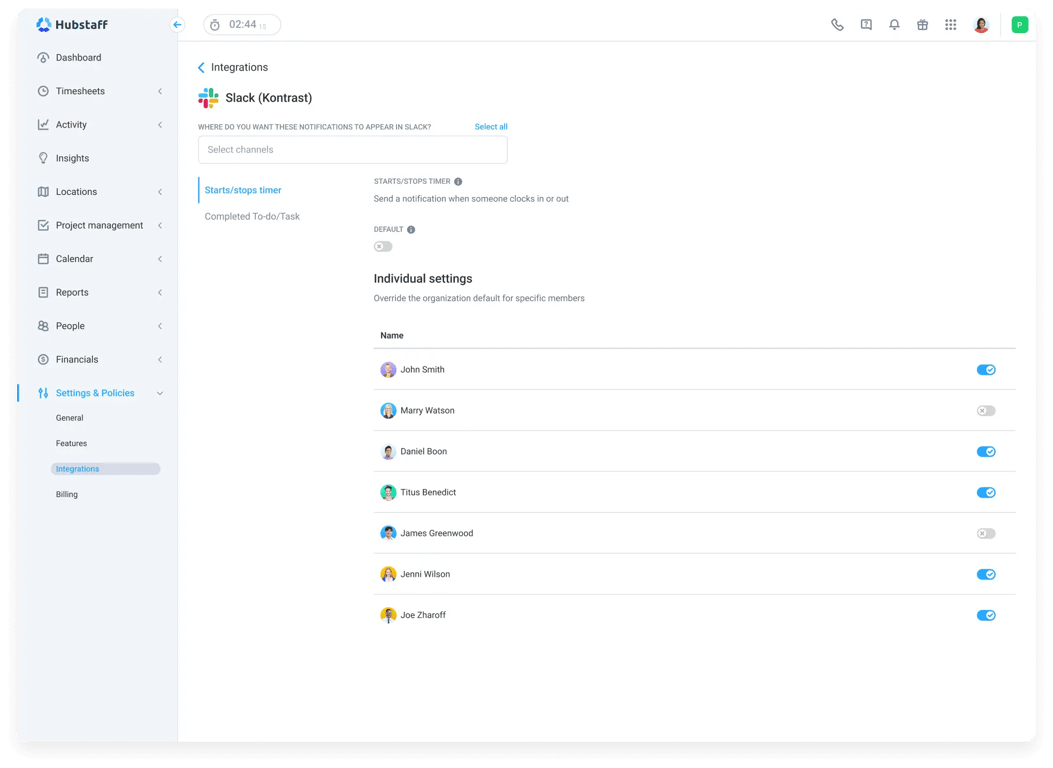
Step 3: Set up notifications for when timers start/stop and when your team has completed tasks. You can apply default settings across your org or configure them per user. Once you've done this, you'll start receiving alerts directly in Slack.

Hubstaff Slack integration showing Slack notification updates on project start and end times

Hubstaff Slack integration showing the ability to override organization settings for individual members

Google Sheets

As mentioned above, workflow automation tools like Zapier can help you implement Hubstaff and Google Sheets integrations. Use the Google Sheets integration to automate repetitive tasks and sync time and project data into spreadsheets for custom reporting, live dashboards, and data backups. 

Notification allowing user to test the trigger for Google Sheet and Hubstaff integration (via Zapier)
Here's how to set up the Integration:

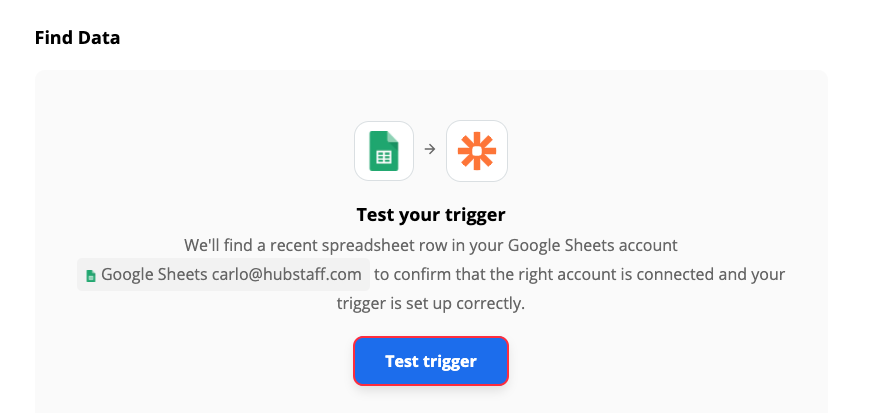
Step 1: In Zapier, choose Hubstaff as the trigger (e.g., new time entry or project).

Step 2: Choose Google Sheets as the action app. Select your sheet, define the row structure, and map the data fields you want to include.

Step 3: Test and activate the Zap. Hubstaff data will now automatically populate your spreadsheet.

GitHub

With the Hubstaff + GitHub integration, your dev team can track time directly tied to commits, branches, and pull requests, helping improve accountability and reporting. 

To enable  time tracking for GitHub issues, you need to set up GitHub with your Hubstaff account by following these steps: 

Step 1: Go to Settings > Integrations and connect your GitHub account.

Step 2: Link GitHub repositories to Hubstaff projects.

Step 3: Team members can include GitHub issue or PR numbers in time entry notes. Hubstaff will automatically associate the time tracked with the corresponding GitHub activity.

GitHub integration showing real-time updates on throughput, time to first review, review turnaround, time to merge, etc.

Jira

Hubstaff supports integrations with Jira Cloud and Jira Software Server. With the Hubstaff and Jira integration, your team can log time with Hubstaff accurately against Jira issues and automatically sync work logs back into Jira when tasks are completed.

Step 1: In Hubstaff, connect your Jira account from the integrations dashboard and authorize access.

Step 2: Select the Jira projects you want to sync, and assign issues to team members for tracking.

Step 3: Start tracking time in Hubstaff. Logged hours are synced back to Jira as worklogs linked to the correct issues.

Hubstaff timesheets and project summaries for Desktop and Mobile

With this setup, you can centralize time tracking and project updates to keep your engineering and project management teams aligned in real time.

Integration using webhooks

For real-time integrations, Hubstaff supports webhooks. Subscribe to events like:

  • New time entries

  • Project updates

  • Task completions

Resources and further reading to learn Hubstaff API integration

The powerful Hubstaff API opens endless integration possibilities. We've listed some crucial Hubstaff documentation sources for your developers to learn from:

Unleash the power of custom workflows with the Hubstaff API

The Hubstaff API is a foundation for building smarter, more connected systems that put your brand and dev team in complete control. The API gives you the autonomy and precision to tailor workflows to your needs.

Be it optimizing time tracking, syncing project data, automating reports, or delivering a branded client experience. 

With rich documentation, practical demos, and a community of builders, getting started is simple, and the potential is limitless. Explore the Hubstaff Developer Portal and start building with the API today. Share your projects, get support, and connect with fellow builders on r/hubstaff.

Track your team’s time with Hubstaff

Use Hubstaff to track your team’s time and plan projects more effectively.

Get started with Hubstaff