More than 12 million people use Slack every single day. The average Slack user spends 90 minutes a day actively using the app. That’s 45 hours spent in Slack every month. If you think that’s a lot of time, you’re right.
What could you do with 45 more hours of productive time every month? You’re about to find out, thanks to these helpful Slack tips and tricks.
Of course, you need to communicate to complete tasks and projects successfully. The time you and your team spend in Slack isn’t wasted. But the odds are you can communicate more effectively. You can use that time in Slack to get work done and move projects forward.
Want the free Slack Hacks Cheatsheet?
Boost your team’s efficiency with Hubstaff's productivity tools
15 Slack hacks and tricks to supercharge your productivity
18 Slack hacks and tricks to supercharge your productivity
Slack can be a constant distraction. It can also help you get more done in less time.
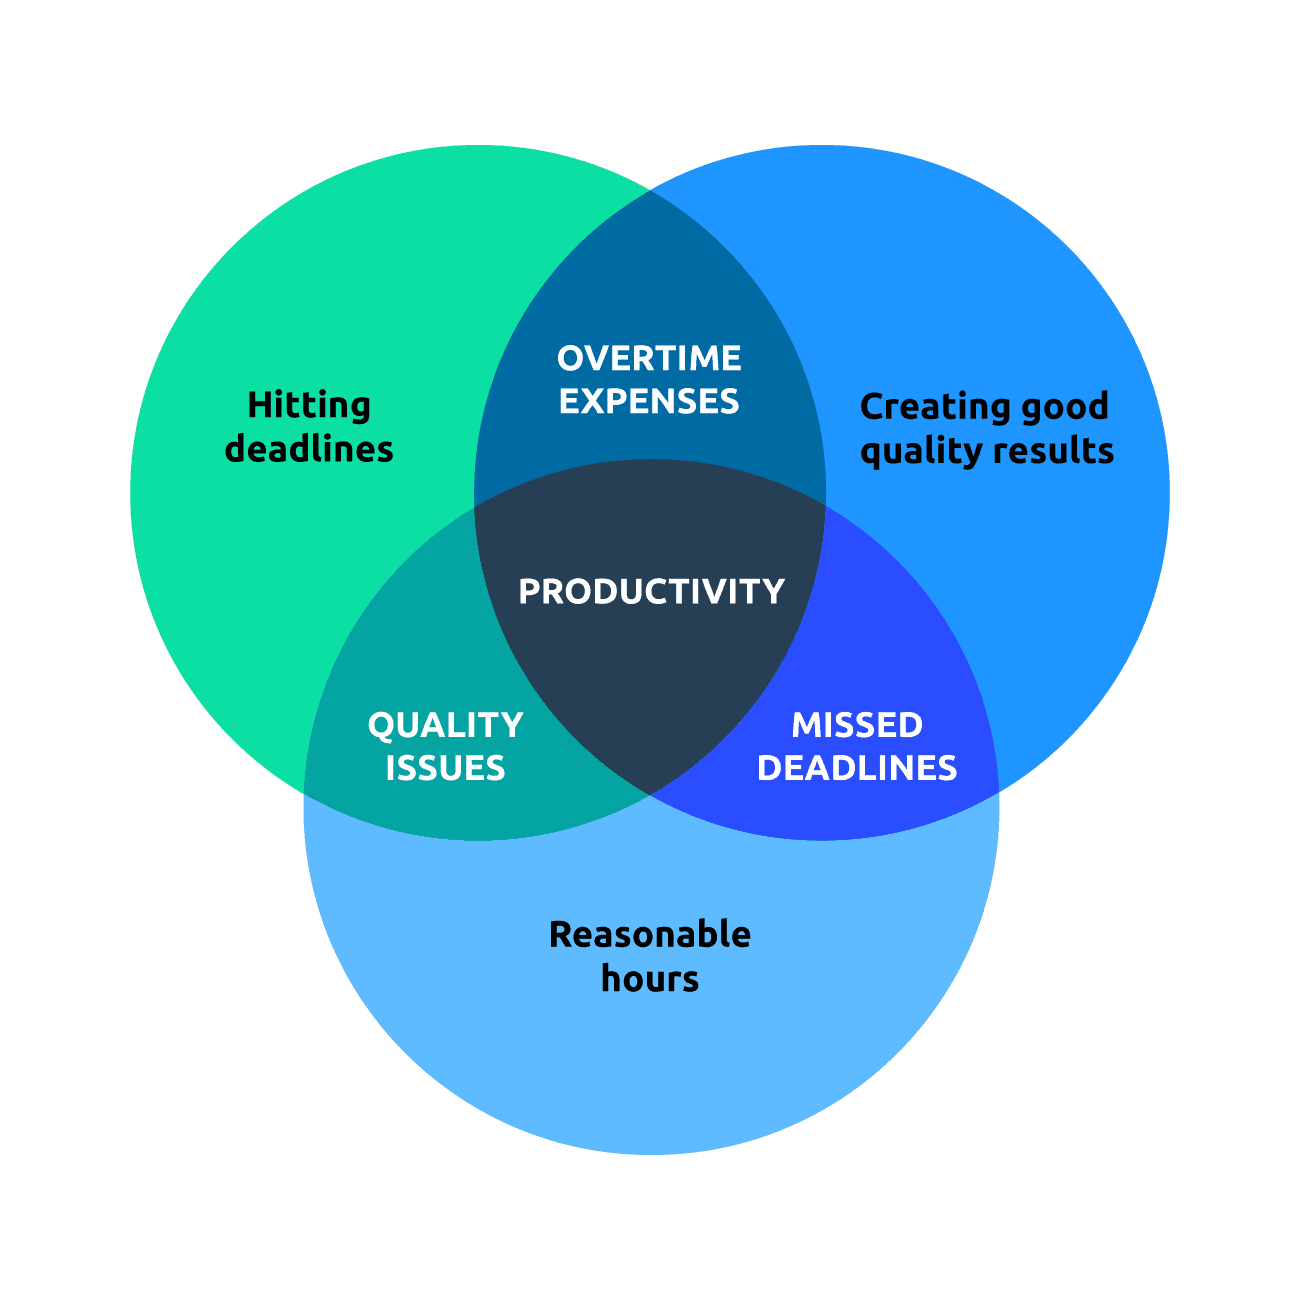
Great productivity comes from a combination of three things:
- You finish a lot of tasks
- The quality of those tasks stays high
- All of your tasks are finished efficiently, so no time is wasted
Use Slack correctly, and it can help you find the sweet spot.
Let’s talk about how to use Slack to its fullest extent to stay productive. The tips and tricks in this post help you save time, do more, and stay on top of your to-do list.
Here are our top 15 Slack productivity hacks.
1. Use shortcuts
Shortcuts save time and help you complete tasks faster. It may just be a few seconds, but those seconds add up when you use Slack daily.
Slack supports dozens of native shortcuts. Here are some of the most useful:
Messages
- Ctrl/Cmd + Shift + A – Browse all your unread messages
- Shift + Ctrl/Cmd + S – View all your starred messages
- Shift + Esc – Clear all unread messages
- Ctrl/Cmd + F – Search through messages
- Ctrl/Cmd + Shift + K – Go to direct messages
- Esc – Mark every message in a channel or conversation as read
- Up Arrow – Edit your last message
Text formatting
- Shift + Enter – Create a new line instead of sending a message
- Ctrl/Cmd + Shift + Enter – Create a new snippet
- Ctrl/Cmd + Shift + 8 – Convert selected text into a bullet list
Channels
- Alt + Shift + Up Arrow – Go to the next unread message or channel
- Ctrl/Cmd + [ – Go to the previous message or channel
- Ctrl/Cmd + Shift + T – View all threads
- Ctrl/Cmd + Shift + L – Browse all channels
- Alt + Left/Right – Go through your channel history
- Alt + Up/Down – Browse channels or direct messages
- Alt + Right – Go to the next channel in your Slack History
- Alt + Up/Down – Switch between channels
Misc
- Ctrl + Tab – Switch between teams in the desktop app
- Ctrl/Cmd + , – Open your preferences in the desktop app
- Ctrl/Cmd + Shift + Y – Set your status
- Ctrl/Cmd + U – Upload a file
This is a long list of shortcuts. You can bookmark this post to come back to it later.
Rather than remembering everything listed here, pick a couple you think you’ll use most often and test them out. When the keyboard commands become automatic, come back and pick a couple more.
2. Format messages quickly
Formatting your Slack messages makes your messages easier to read and helps team members understand you clearly. This is a crucial part of good Slack communication habits.
Slack makes it easy to format your messages quickly. You can format messages using the formatting bar displayed under the main text box or traditional shortcuts like Ctrl/Cmd+B (for bold text) and Ctrl/Cmd+I (for italic text).
You can also use markup to:
- Surround a text with stars (*) to bold it
- Use underscores to italicize text
- Put tilde signs (~) around your text to add a strikethrough effect
- Create a quote by using the greater than sign (>)
- Create a quote that spans across multiple lines by using >>>
- Start a line with a number to create a list
- Share code by adding a backtick (`) before and after your text
Good formatting means sending a single message instead of a string. Your teammates will appreciate getting one notification instead of four or five.
3. Sort channels
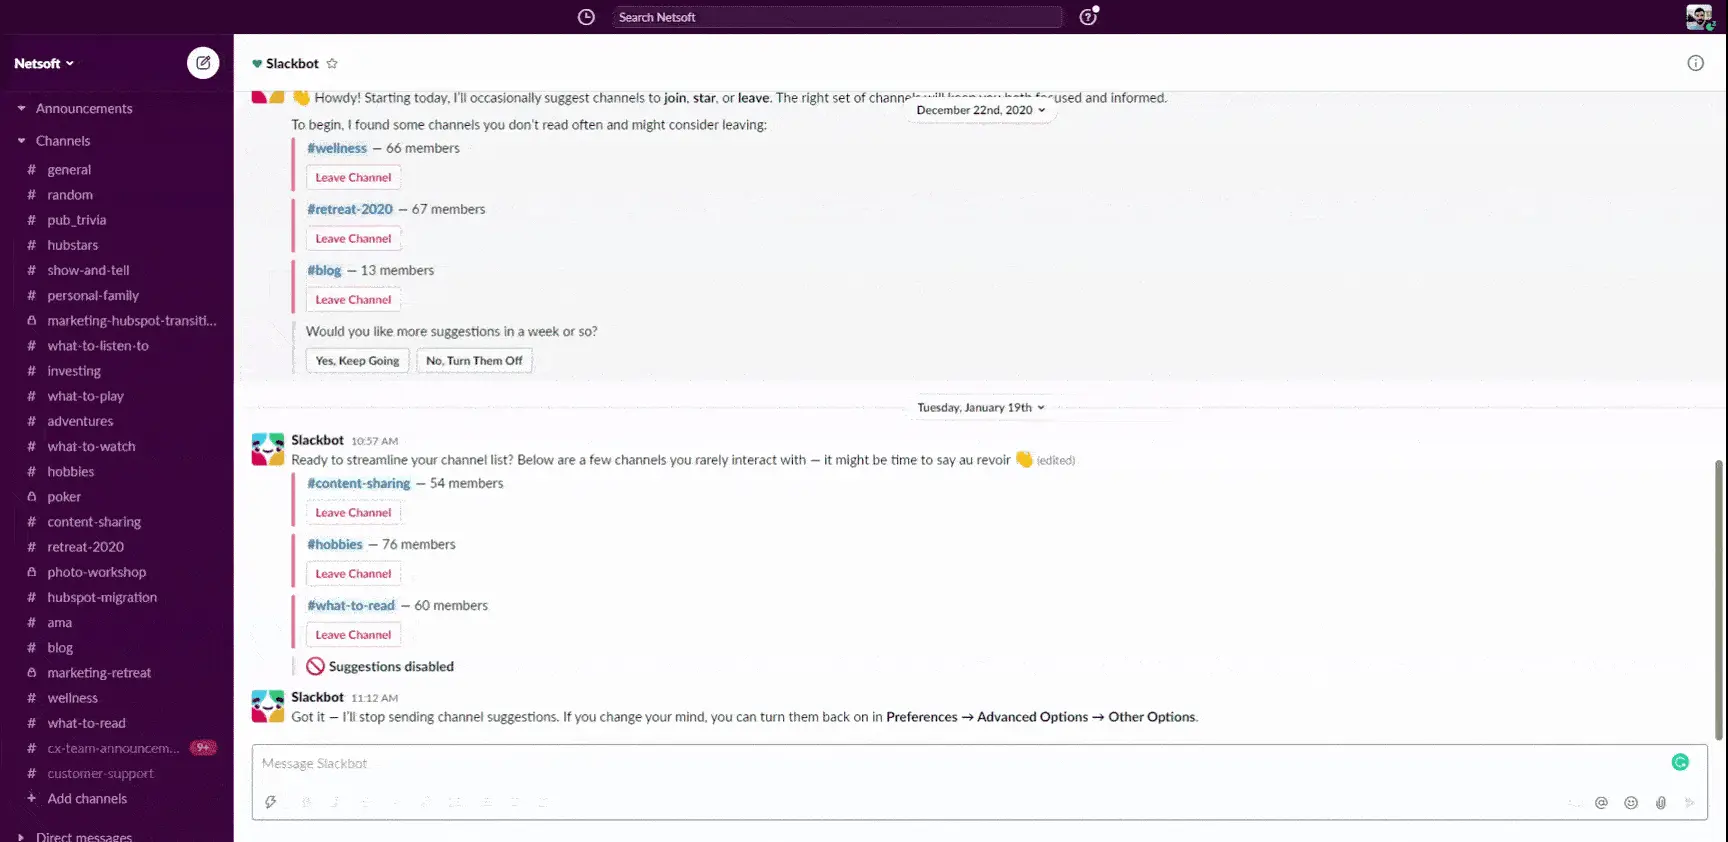
Slack channels seem to multiply. If you don’t stay on top of things, your Slack workspace will become cluttered with channels and group chats you don’t use.
The problem with channel clutter is that you waste time finding what you need. Was that link shared in #marketing, #marketing-team, or #marketing-ideas? Did you send that code snippet to Sherry and Jim or Sherry, Jim, and Siobhan?
To stay productive, cut the clutter. Archive old channels and keep conversations organized in a few key places.
When people get off topic, gently remind them to move the conversation to the right place so other people aren’t distracted. Use threads in your essential channels to keep clutter and notification spam to a minimum.
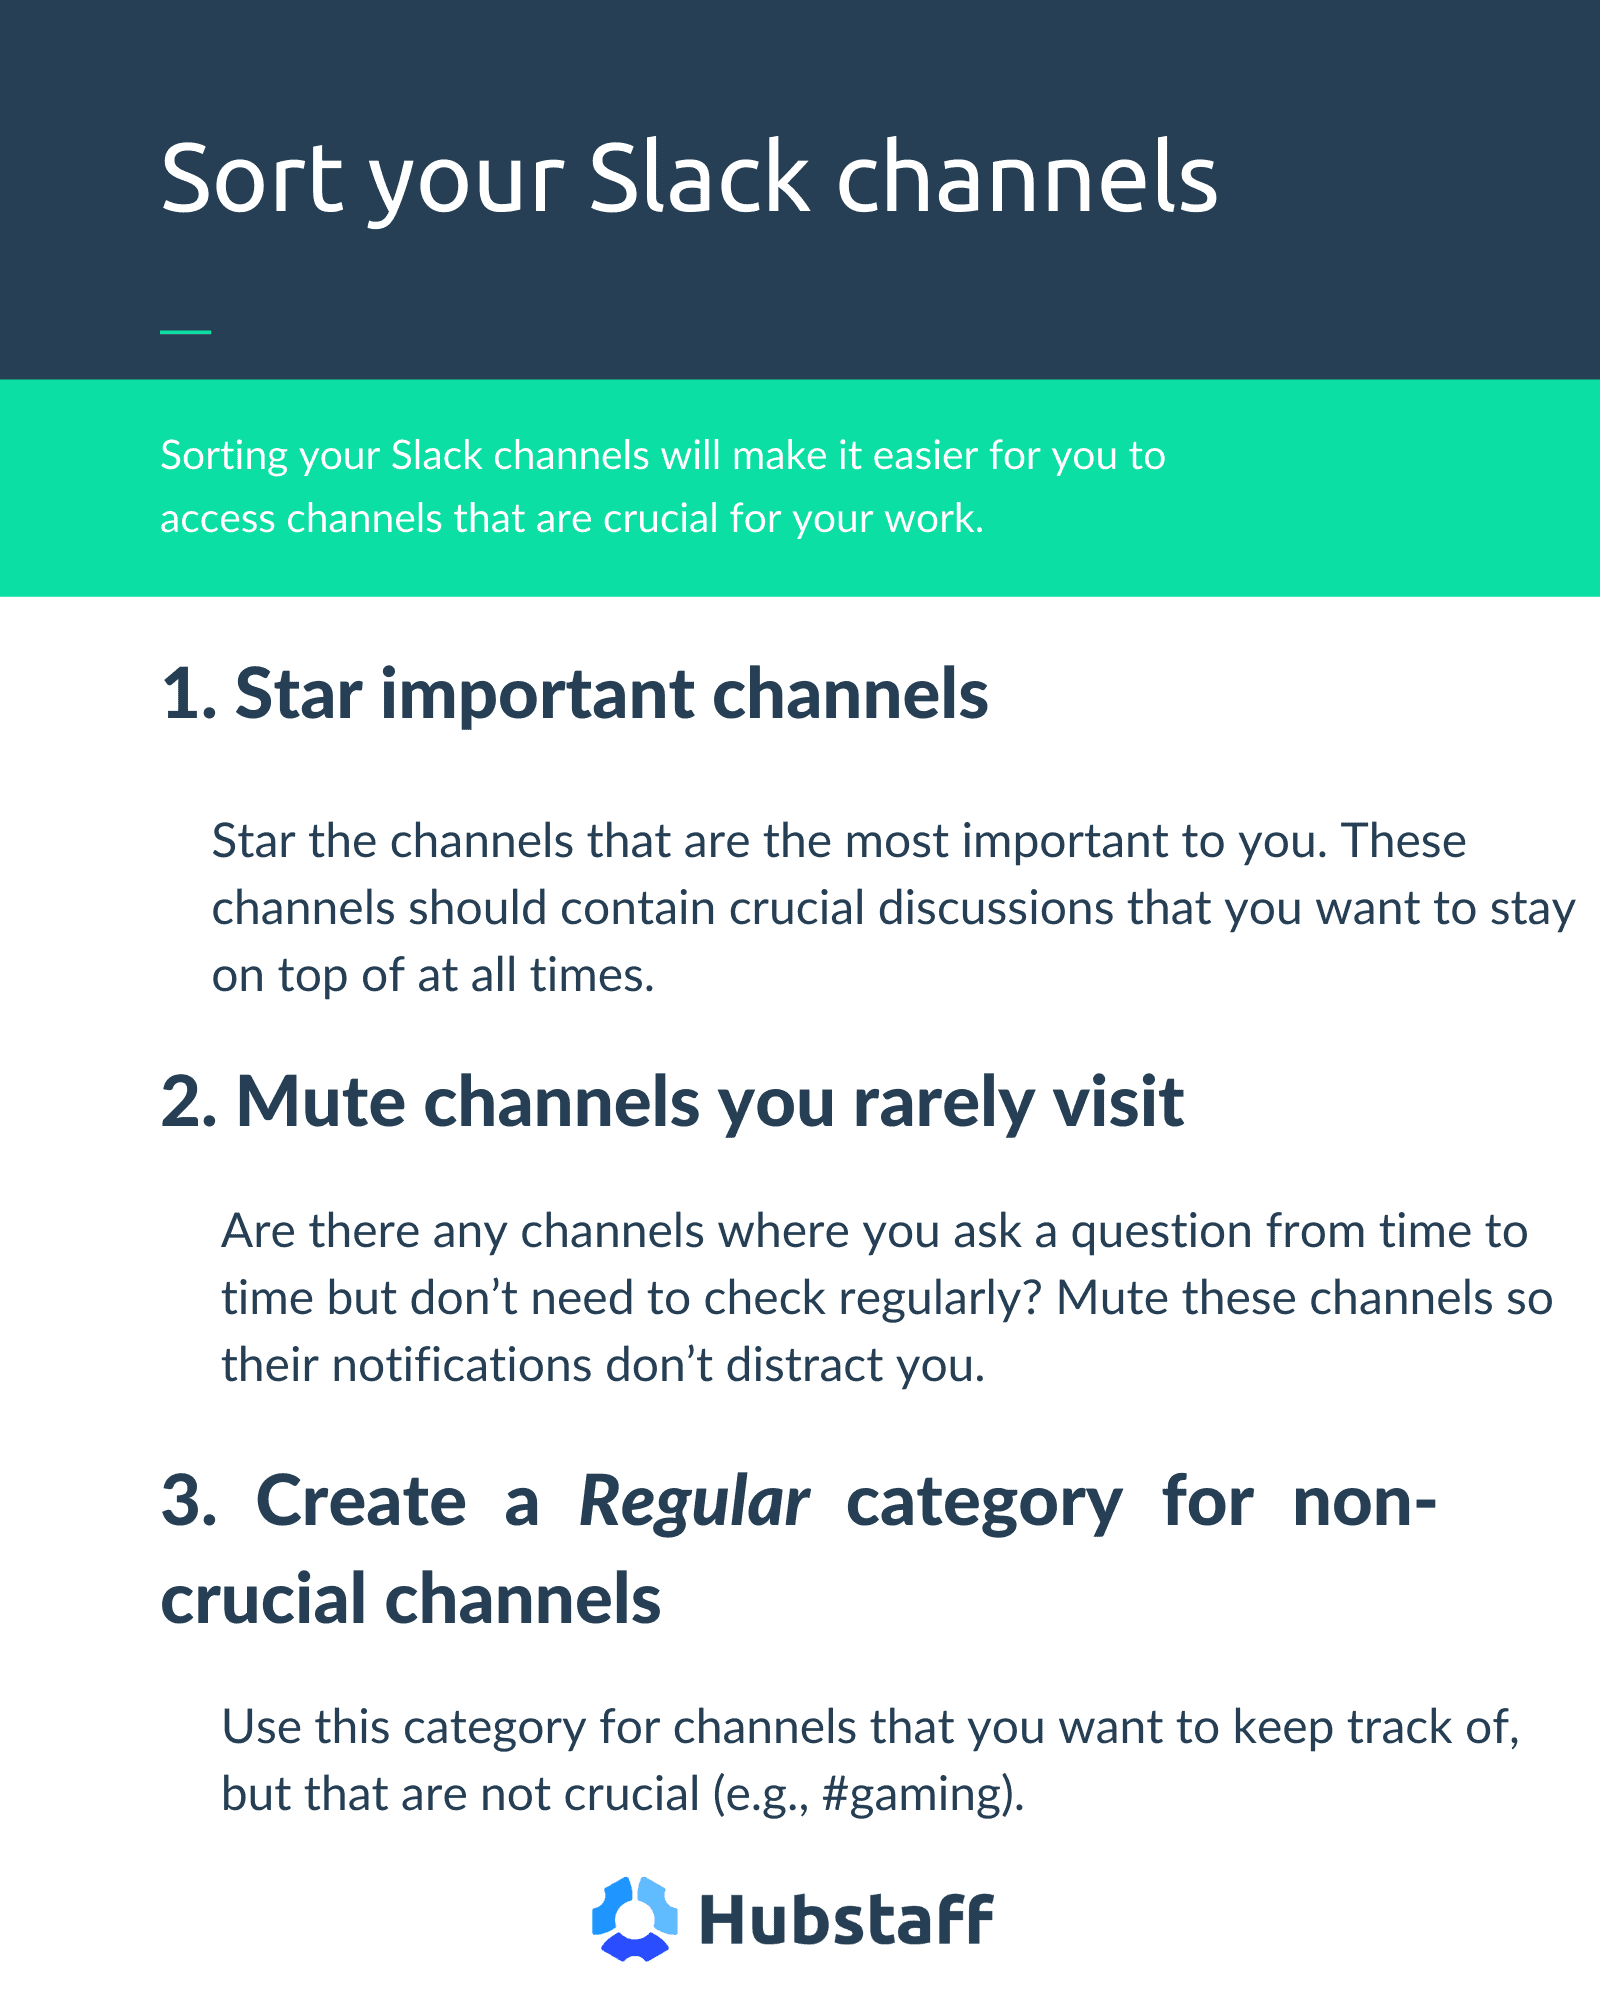
We suggest sorting channels into three categories:
- Starred – Star the channels that are the most important to you. These channels should contain crucial discussions about active projects.
- Muted – Are there any channels where you ask a question from time to time but don’t need to check regularly? You can mute channels so their notifications don’t distract you. Once muted, channels will appear at the bottom of your channel list. You can check in as needed, and people can tag you.
- Regular – Use this category for channels you want to keep track of but are not crucial (e.g., #gaming).
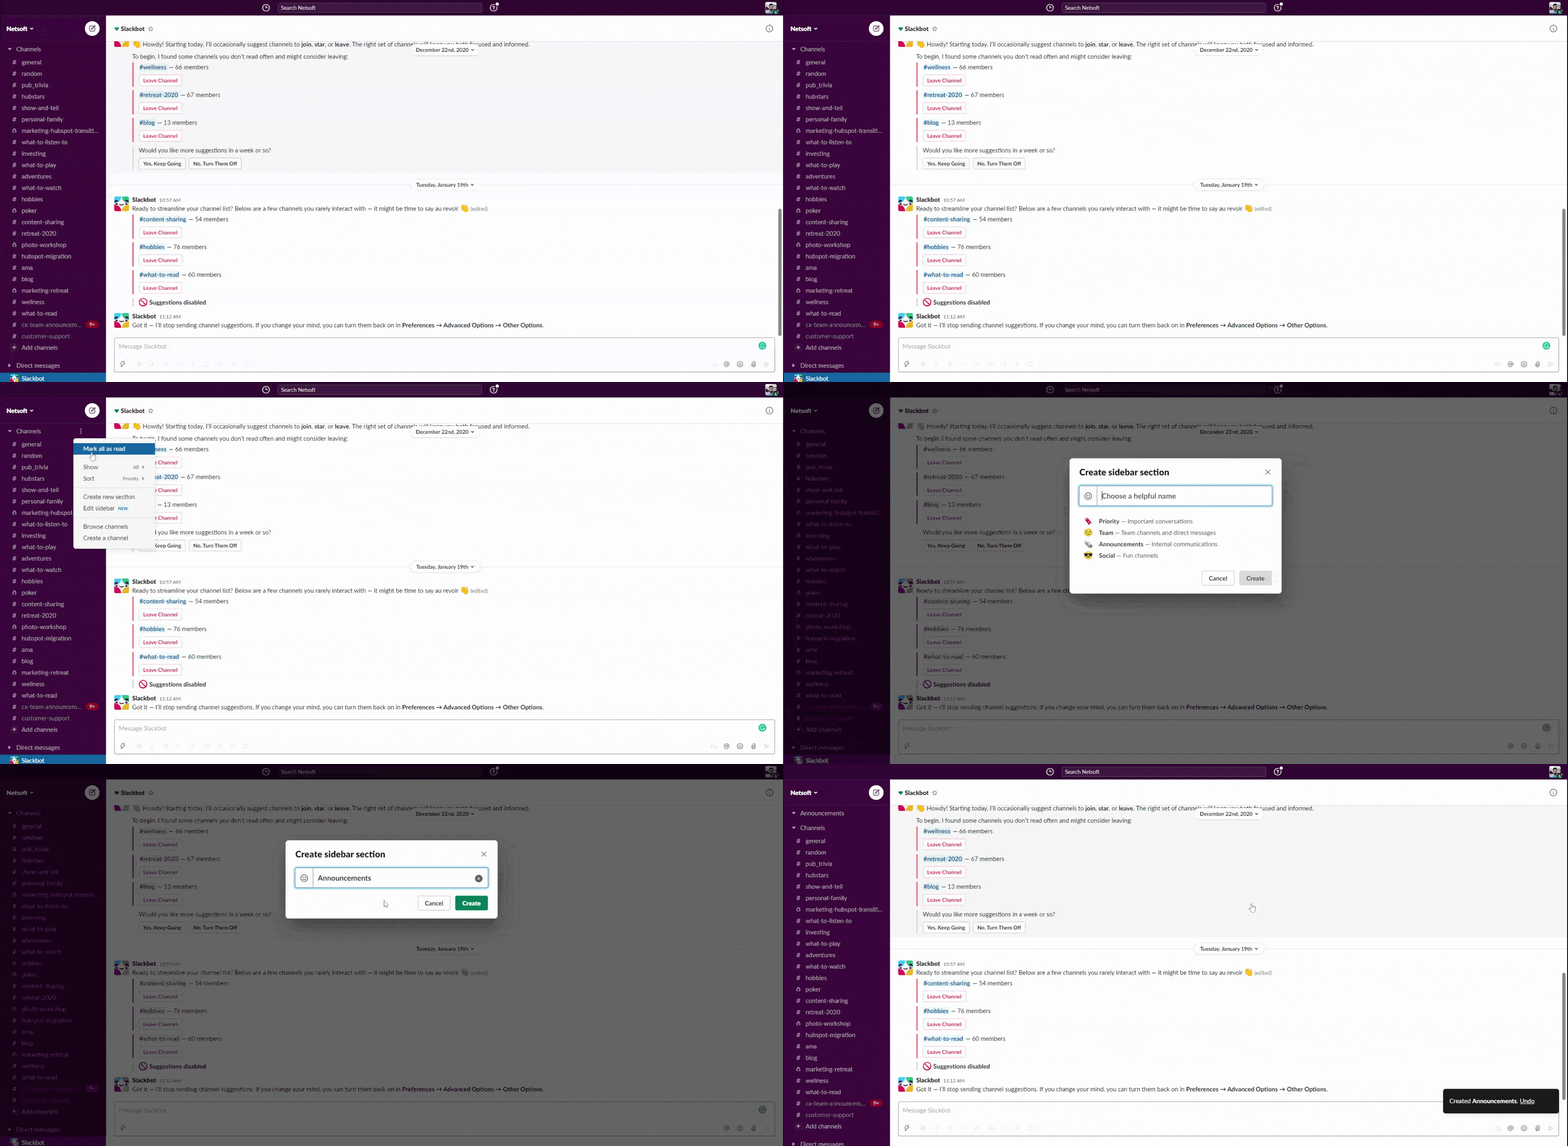
You can also create custom channel sections to group Slack channels in a way that makes sense.
Simply hover over one of the existing sections (such as Channels or Starred), click the three dots icon, and then select Create a new section. Then, choose a name and an emoji (optional) for the section, and click Create.
Slack can sort your channels alphabetically or based on priority or recent activity.
To do this, click the three dots icon next to the Channels dropdown in the sidebar, click on Sort, and choose how you want your channels sorted.
Take advantage of Slack’s built-in prefixes when naming channels to keep them organized:
- Help – For questions and assistance on a topic
- Proj – For discussions related to a particular project
- Team – For updates from a specific team or department
Add your custom prefixes by going to Settings & Administration > Workspace Settings > Menu > Customize > Channel Prefixes.
4. Pin, save, and star essential items
Slack offers multiple ways to organize messages and channels if you must remember to return to something later, learn how to pin and save messages, and star essential channels.
Pin messages
Make sure you and your team don’t miss any important messages. Pinning a message keeps it visible so it’s not buried under the group’s conversation.
If you want all members of a Slack channel to pay attention to a particular message, pin it. Hover over the message, click the three dots to open the pop-up menu, and select Pin to channel.
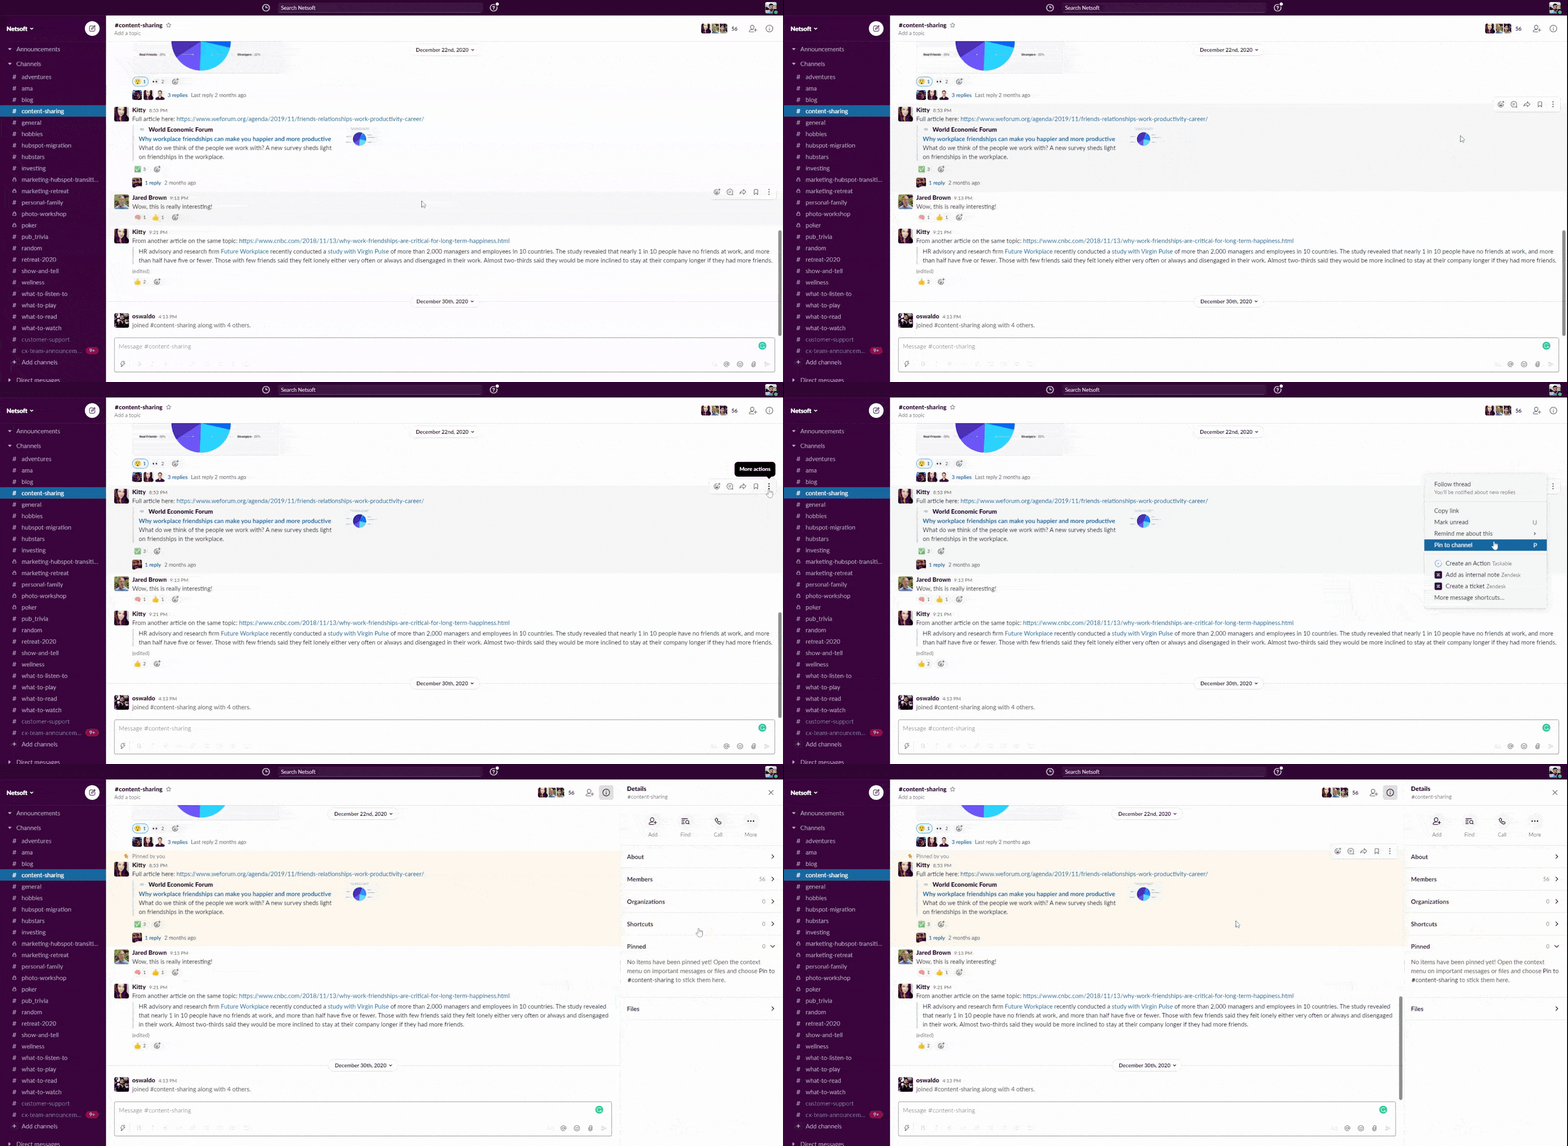
If you’re using the mobile app, just long-press on the message instead of hovering over it and select the same option.
Slack allows you to pin up to 100 messages per channel. You can view all the pinned items in a Slack channel by clicking the pin icon located under the channel’s name.
Pinned messages are helpful to save information that your team needs to reference later. It’s a big time saver because nobody has to ask you for that information a second or third time. They can quickly and easily find it on their own.
Save messages
Save messages and files that you want to review later. You can use your saved messages as Slack reminders. This is an easy way to build a to-do list in Slack.
To save a message, hover over the message and click the bookmark icon that says Add to saved items. It’s in the same menu you use to pin messages.
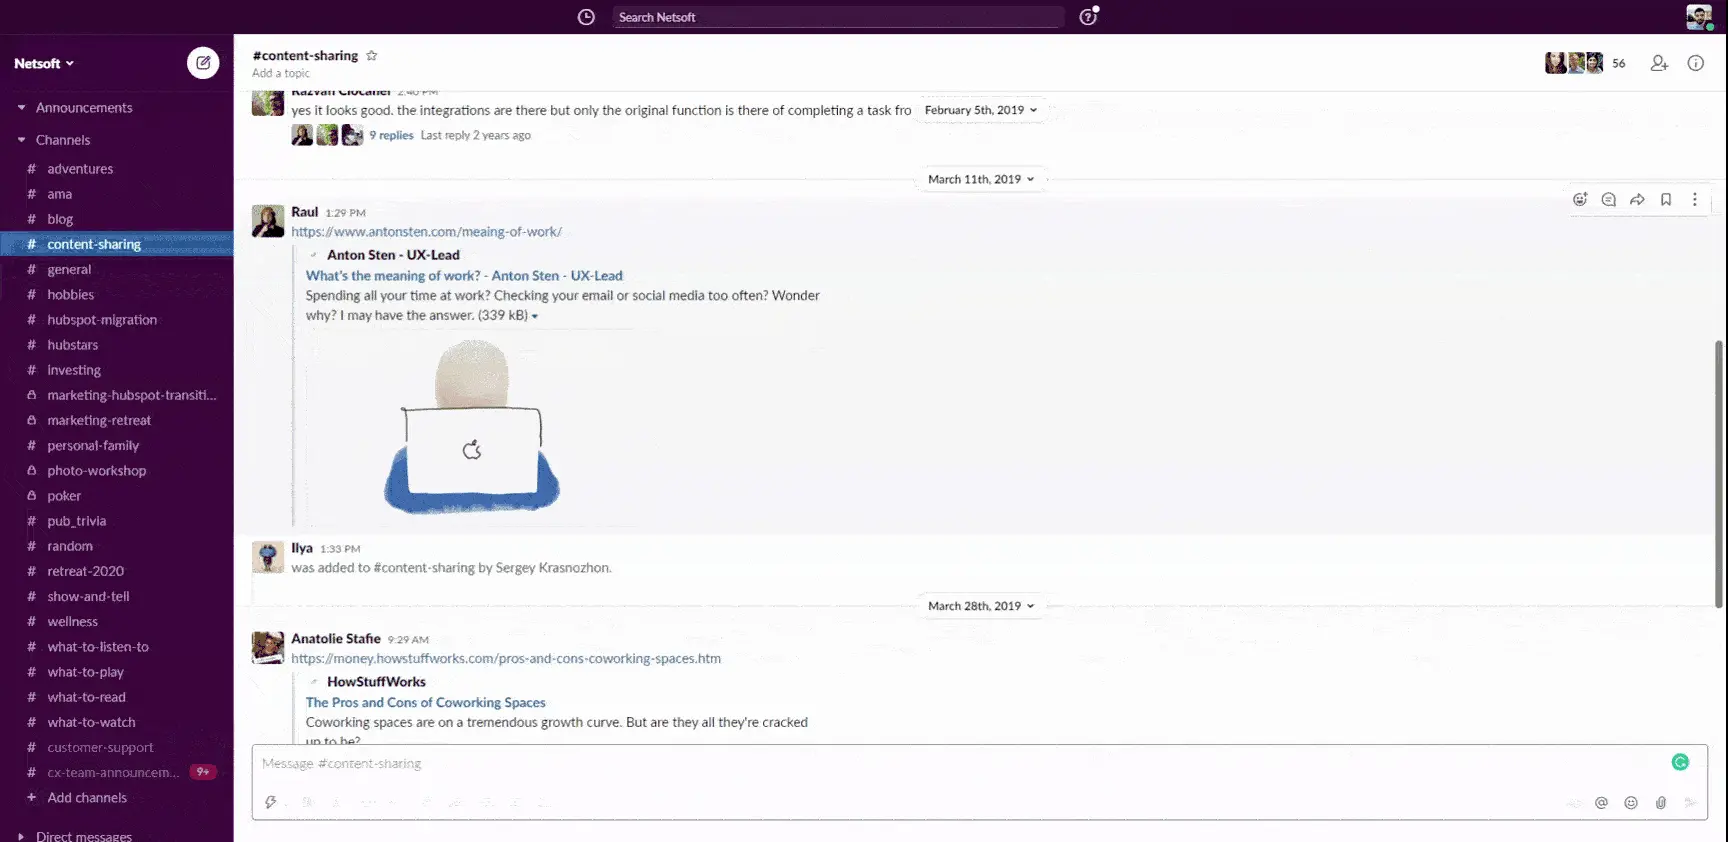
Only you can see which messages you saved. The difference between a pinned message and a saved message is that pinned messages are visible to the whole team, while saved messages are only visible to you.
Access all your saved messages by clicking on Saved items in the left-hand menu.
Save messages when you need to come back to something later. Instead of scrolling through channels to find that one message, keeping it in your saved items saves you time and headaches.
Star channels
You can star a Slack channel by clicking the star icon under its name. You can also right-click it and go to Move channel > Starred.
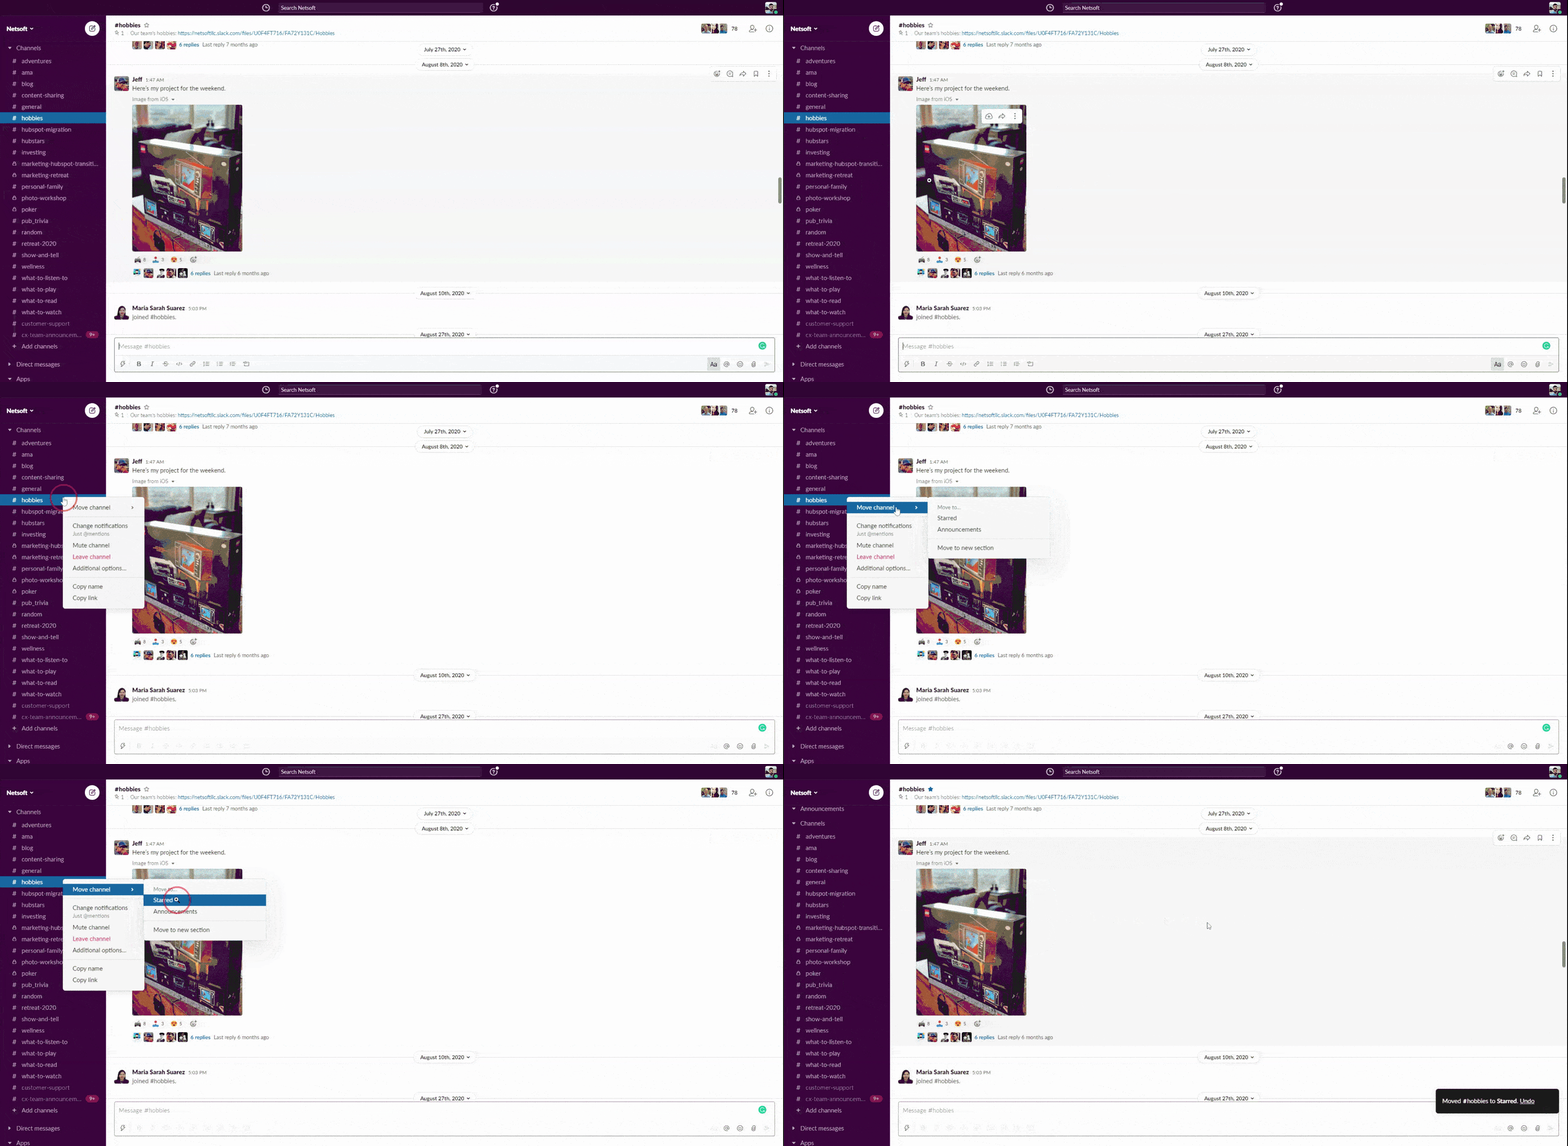
Starred channels will appear in the Starred drop-down in the left-hand menu above the main Channels drop-down. This makes them easier to find because they’re always at the top of your list.
We suggest starring channels that you regularly access to reduce distractions. This keeps the less important chatter out of your way so you can prioritize and get things done.
5. Use the Do Not Disturb mode
Though it’s useful, Slack can also be a distraction. When working on a task requiring your complete focus, use Do Not Disturb (DND) to limit interruptions.
You can also use DND to pause Slack notifications during your off-hours. Protect your work-life balance and avoid the temptation to check on work while you’re with your family and friends.
To start Do Not Disturb mode, click on your profile photo in the top right corner and select Pause notifications. Choose how long you want the DND mode to last — 30 minutes, 1 hour, 2 hours, until tomorrow, or until a custom date.
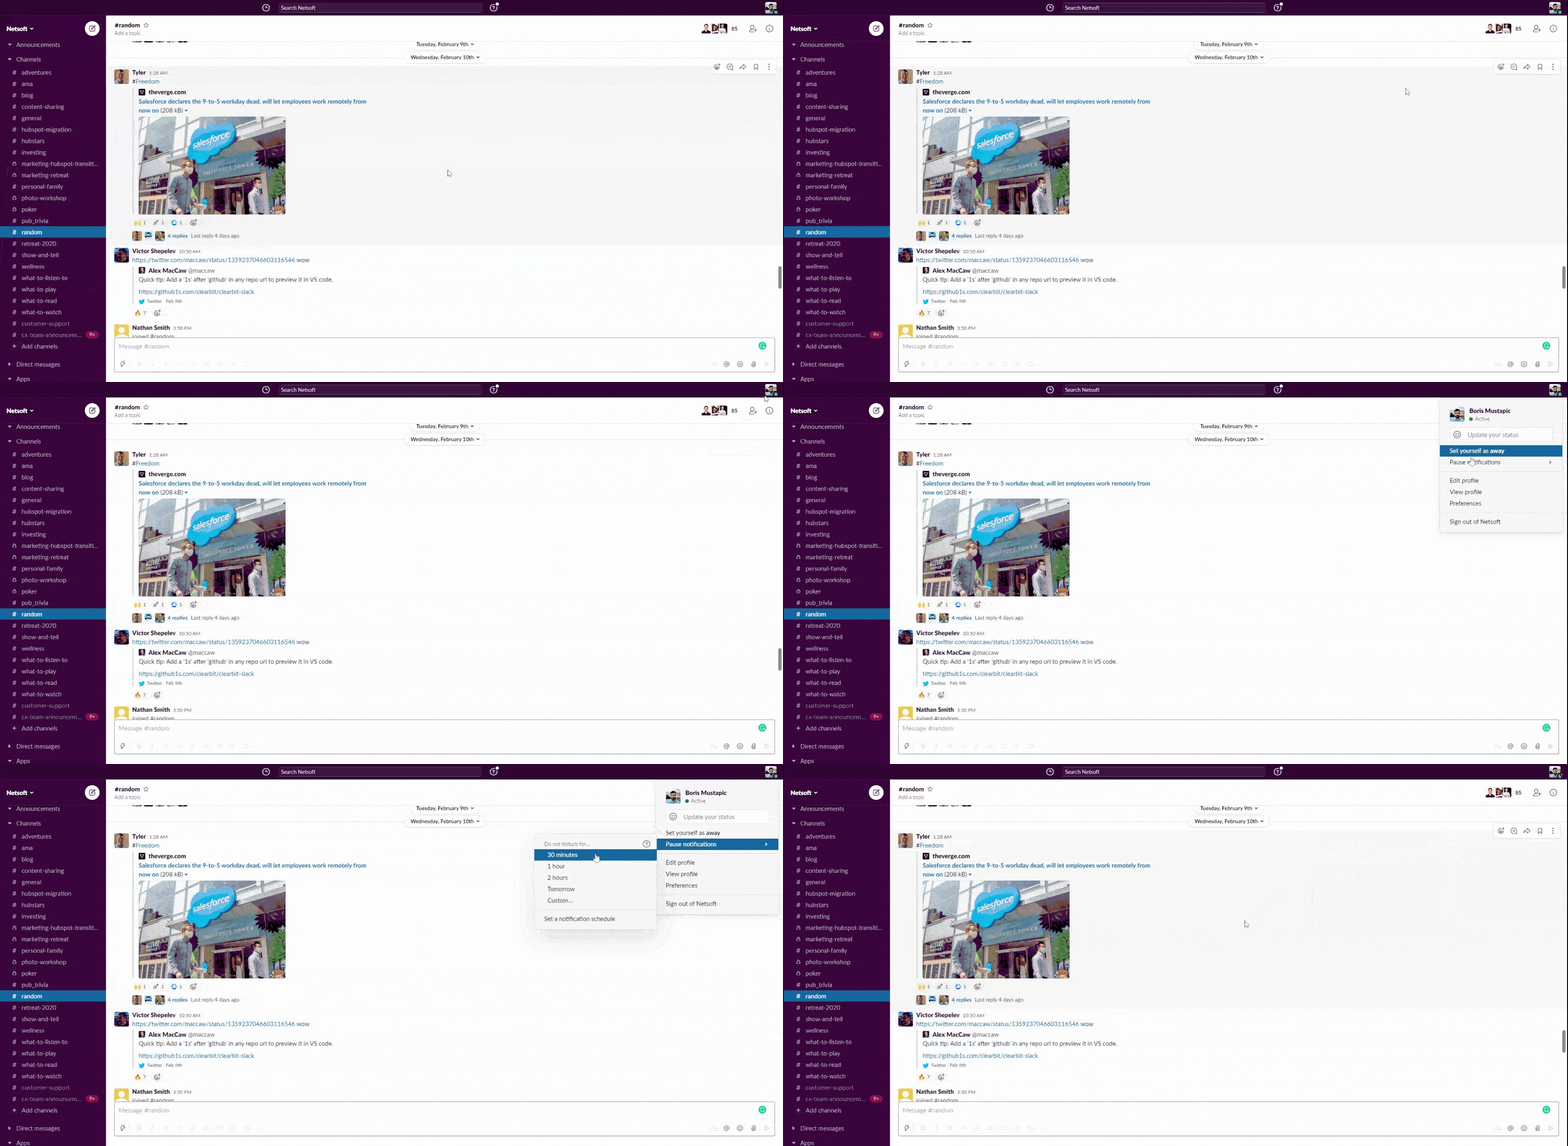
When you’re in Do Not Disturb mode, co-workers will see a “do not disturb” icon next to your name in Slack.
They will still be able to message you and mention you in channels, but they’ll be presented with a message asking whether to notify you even though you’re in Do Not Disturb mode.
This means that co-workers still get an option to notify you if they’re reaching out about something urgent. You’re still reachable in case of emergency.
Slack also lets you set a notification schedule. For example, you can set it to send you notifications only between 9 AM and 5 PM, Monday to Friday. To do this, click on your profile photo, and then go to Pause notifications > Set a notification schedule.
Once there, choose during which times you’d like to receive notifications.
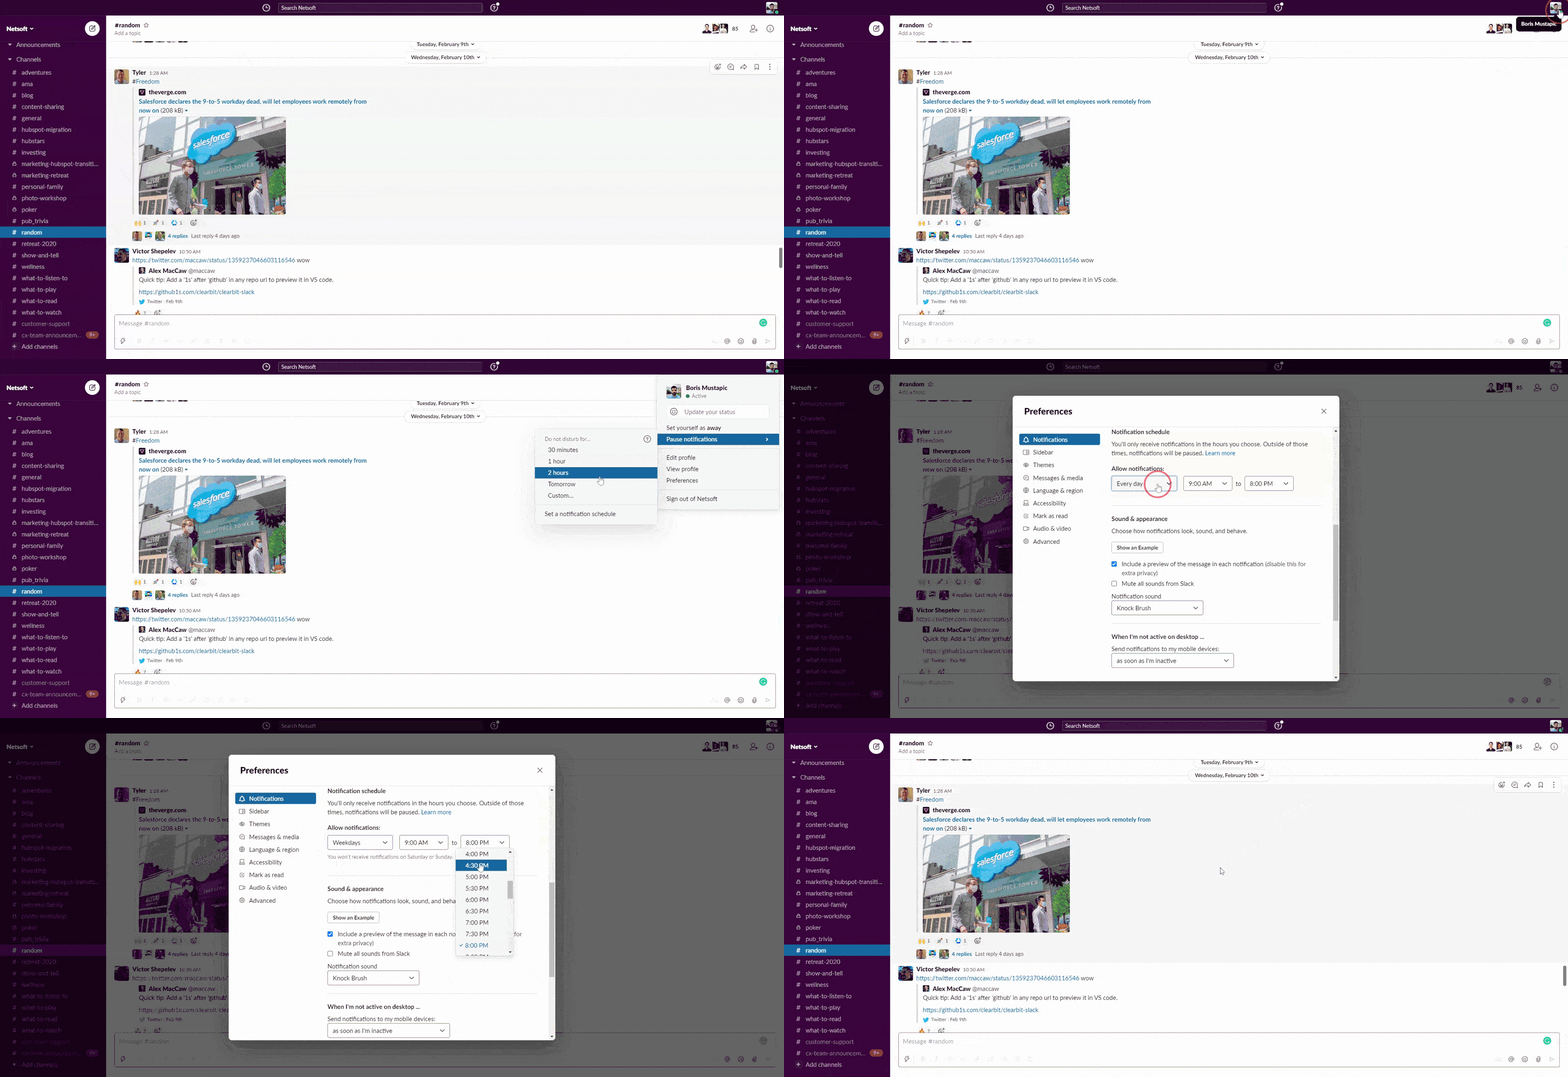
If your team works remotely, use notification schedules and DND to help prevent burnout. Working from home can sometimes feel like living at work, so it’s wise to set limits. Make sure people can completely step away from work when they’re done for the day.
6. Set reminders
You can use Slack to remind yourself or your co-workers to do something. If you want to set a reminder for yourself, type /remind me, followed by the reminder.
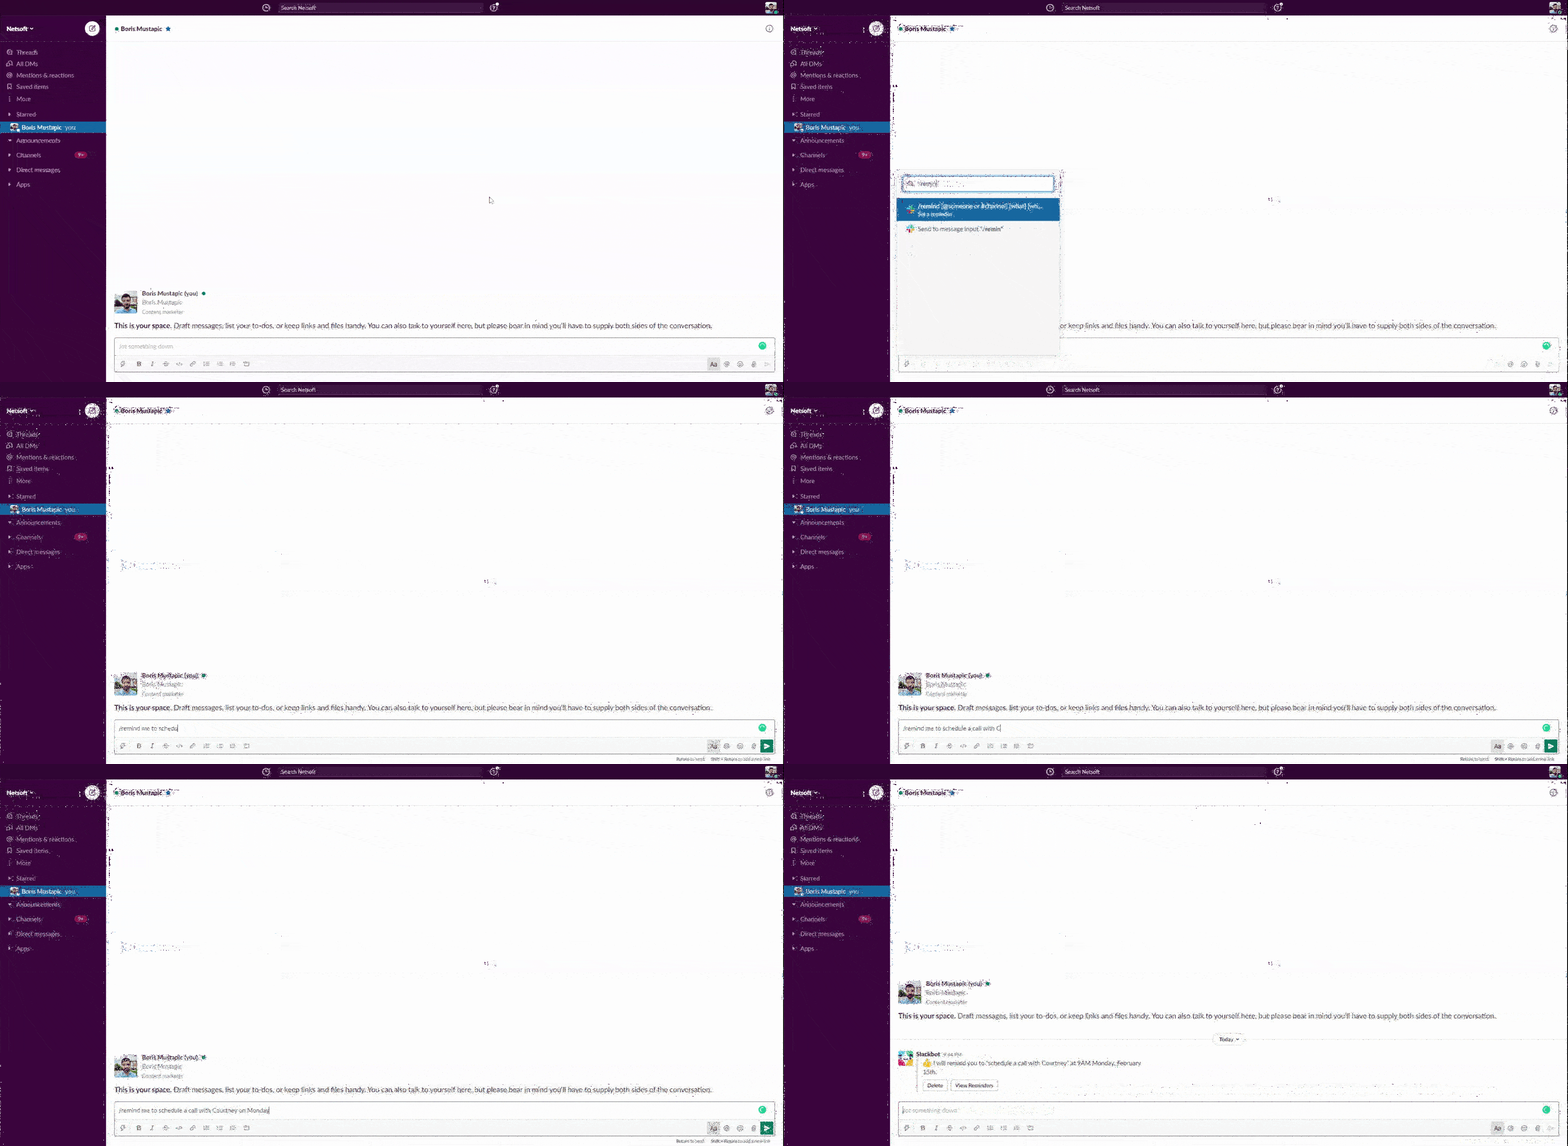
You can create reminders for co-workers:
Or for an entire channel:
You can even set recurring reminders. Remind a channel to turn in their reports every Friday, or set a recurring reminder for yourself to approve timesheets every Monday morning.
You can easily set reminders about messages you’ve received. Hover over the message, click the three dots, and select Remind me about this. It’s similar to saving a message, except the reminder sends you another message when it’s time to come back to it. Use this when you want to return to something, but it’s time-sensitive.
If you want to see all your created reminders, just type /remind list. Slack displays a list of all your reminders so you can view and manage them.
7. Search like a pro
You’ve probably used Slack’s search feature already. Use the search bar at the top of the desktop app’s screen or the Ctrl/Cmd + F keyboard shortcut.
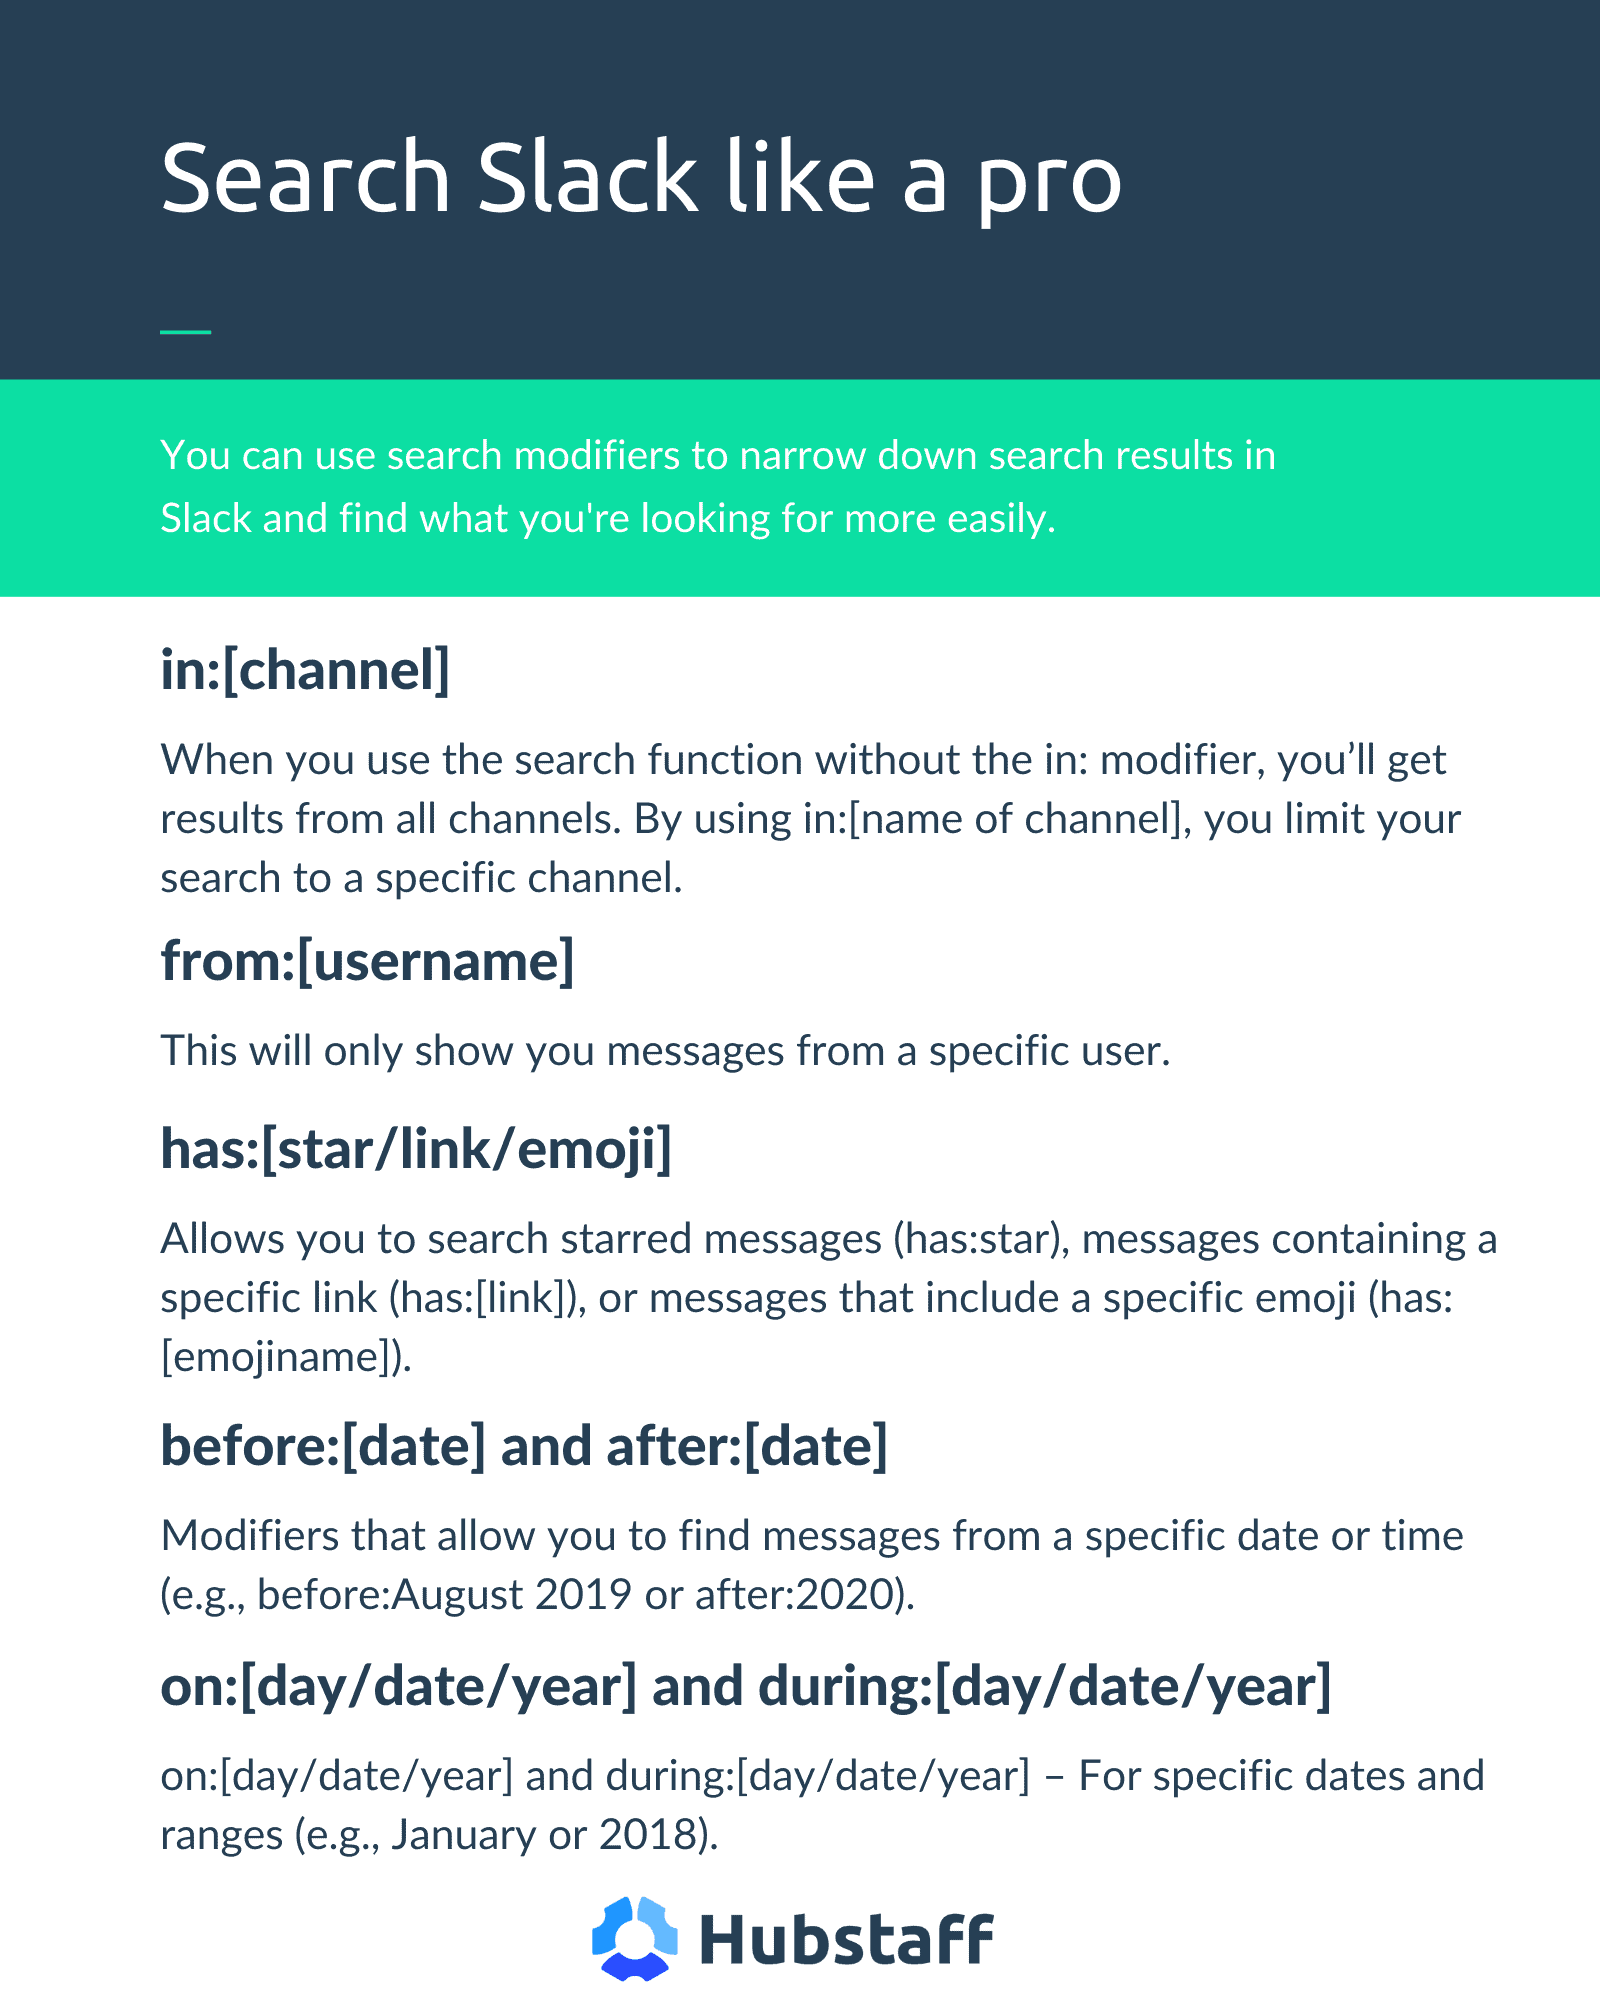
Did you know you can narrow down search results to find what you’re looking for more easily? Just use one or more of the following modifiers:
- in:[channel] – You’ll get results from all channels when you use the search function without the in: modifier. By using in:[name of channel], you limit your search to a specific channel.
Note: You can permanently exclude specific channels from showing up in your search results. This can be useful if, for example, you work in the marketing department and don’t have much use for anything posted in the customer support channel.
You can do this by going to Preferences > Advanced and adding the channels you want to exclude under the Search options section.
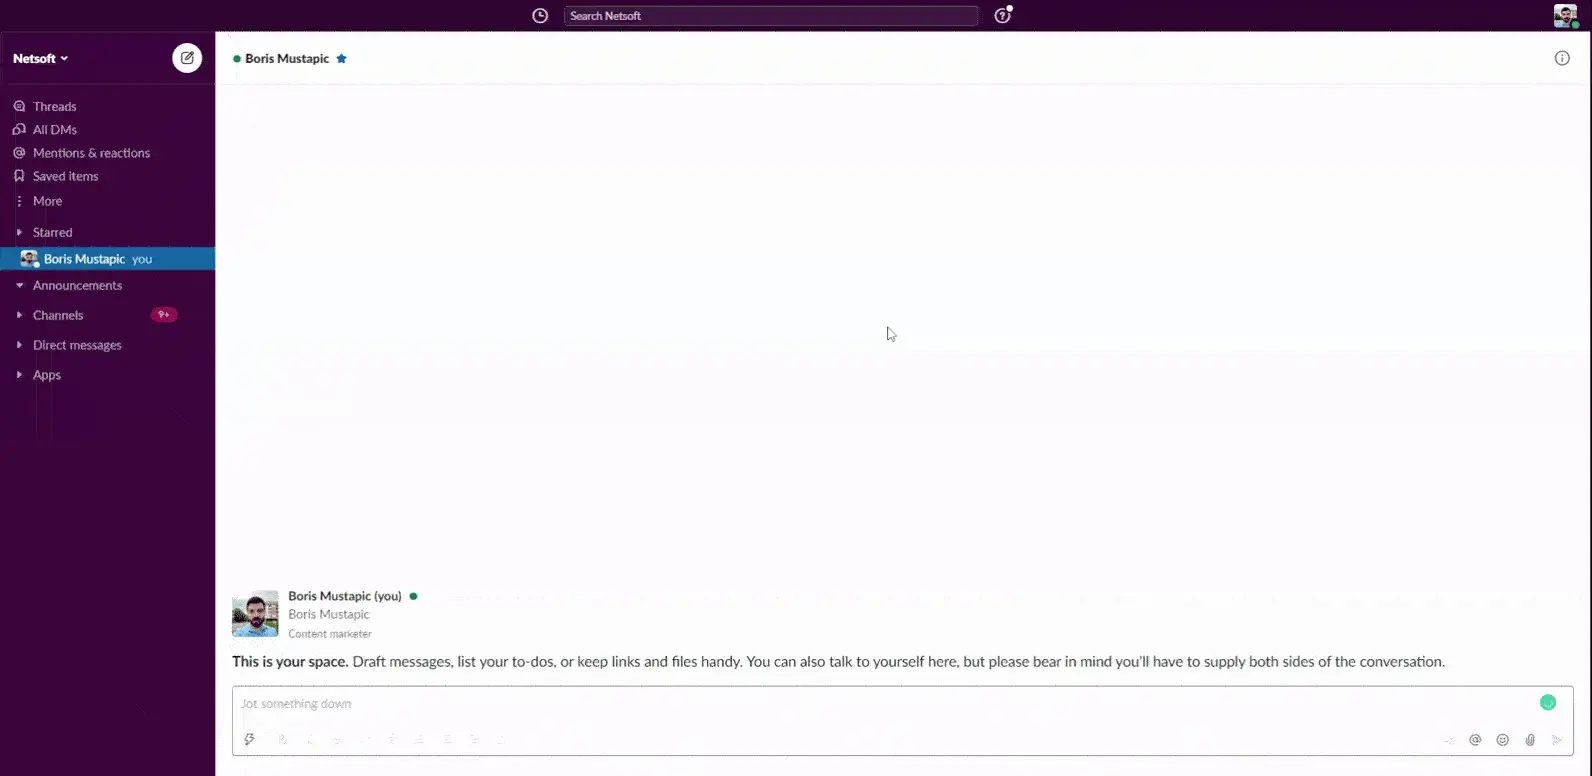
- from:[username] – This will only show you messages from a specific user in any channel.
- has:[star/link/emoji] – Allows you to search starred messages (has:star), messages containing a specific link (has:[link]), or messages that include a specific emoji (has:[emojiname]).
- before:Fri, 08 Mar 2024 20:37:11 +0000 and after:Fri, 08 Mar 2024 20:37:11 +0000 – Modifiers that allow you to find messages from a specific date or time (e.g., before:August 2019 or after:2020).
- on:[day/date/year] and during:[day/date/year] – For specific dates and ranges (e.g., January or 2018).
8. Do things faster with Slash commands
Slash commands are a quick way to perform specific actions in Slack. For example, you can use Slash commands to set your status, activate Do Not Disturb mode, or join a channel.
Slack comes with these built-in Slash commands:
Messaging
- /dm – Sends a direct message to someone
- /collapse – Collapse all the images and files in a channel
- /expand – Expands all the photos and files in a channel
- /me [text] – Sends a message to a channel in italics
- /msg [#channel] – Send a message to a channel
- /star – Star the current message or thread
Channels
- /mute – Mutes all the messages in a channel
- /invite [@username] [#channel] – Invites a team member to a specific channel
- /who – Lists out members of the channel
- /open – Open or join a channel
- /topic – Set channel topic
- /join [#channel] – Join a channel
- /leave [#channel] – Leave a channel
- /mute [#channel] – Stop receiving notifications from a particular channel
Status
- /away – Toggles your Away status
- /dnd [time] – Starts Do Not Disturb mode (e.g., /dnd for 30 minutes)
- /status – Set your status
Misc
- /pref – Opens the preferences menu
- /shortcuts – Opens the keyboard shortcuts menu
- /search [keyword] – Performs a search
- /shortcuts – Displays all available shortcuts
Installing Slack apps allows you access to additional, app-specific Slash commands as well.
9. Schedule messages
Scheduling messages in Slack is a helpful feature for planning your communication and ensuring that your messages are delivered at the most reasonable times. Here’s how to schedule a message in Slack:
- Compose your message: Start by composing the message you want to schedule in the message input field.
- Click on the calendar icon: Look for the calendar icon located near the message input area. This icon represents the scheduling feature.
- Choose a date and time: Click on the calendar icon, and a scheduling window will appear. Select the date and time when you want your message to be sent.
- Confirm and schedule: After choosing the desired date and time, click the “Schedule Message” button or equivalent. Slack will then schedule your message for delivery at the specified time.
- View and manage scheduled messages: You can view and manage your scheduled messages in the “Scheduled” section, usually found in the channel or direct message’s ellipsis menu (three dots). Here, you can edit or delete scheduled messages as needed.
Scheduling messages in Slack lets you plan your communication strategy, ensuring that critical information reaches your team or colleagues at the most appropriate times.
10. Use custom statuses
You might have noticed the little green circle next to your name on Slack. That’s Slack’s way of showing people you’re online and active. It can work a bit differently depending on the device you’re using:
- Desktop app – Your status is active if you’re using your computer. If you’re away from the computer for 30 minutes, your status will automatically be updated to Away.
- Web app – Status is shown as active when you’re using Slack. It’s updated to Away if you’re not using your browser for 30 minutes.
- Mobile apps – Your status is shown as active when you’re using the Slack app. If you close the app, switch to another app, or lock your device’s screen, your status will be updated to Away.
You can also set a custom status to let your co-workers know what you’re doing. If you’re at lunch or focusing on deep work, your team can see that and decide whether or not they should interrupt.
To set your status in the desktop app, click on your profile image in the top right corner and then on the Update your status box.
Once there, you can create your own status or use one of the default ones set by your company. At Hubstaff, we have default statuses for meetings, deep work mode, sick days, personal tasks, and exercise.
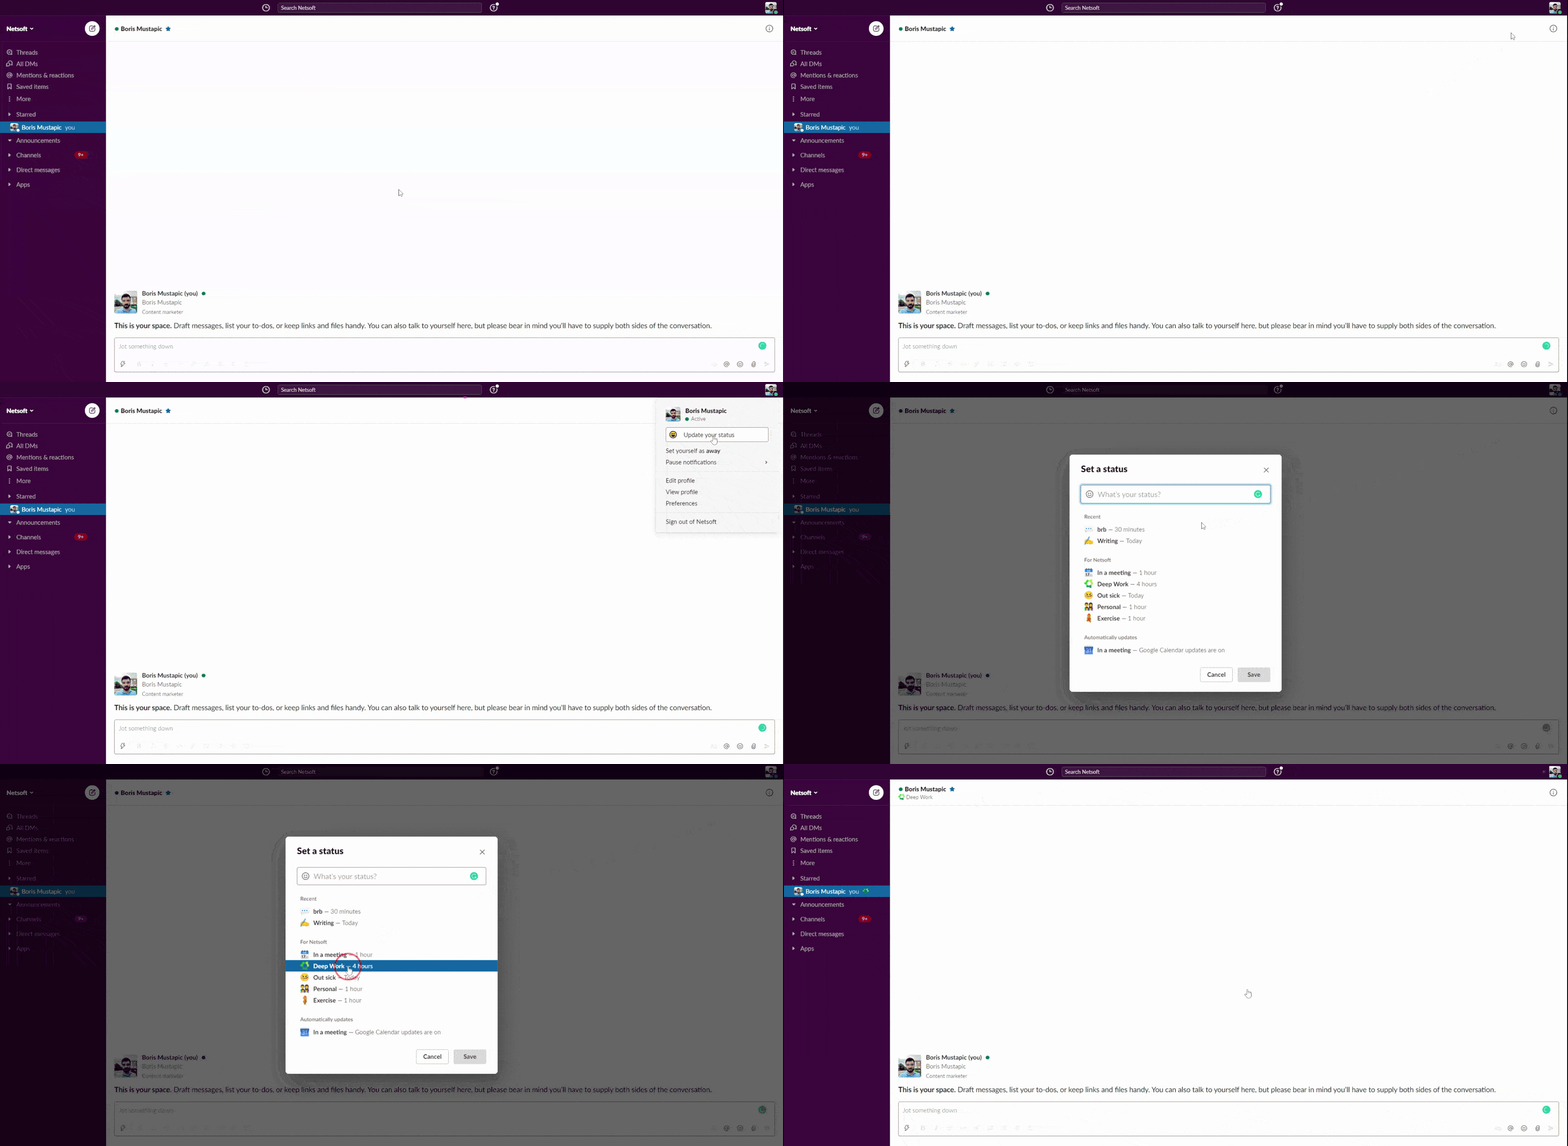
Did you know you can integrate Slack with Google Calendar to sync your status with your calendar?
By default, your status will clear automatically at the end of the day. You can also set your status to clear after 30 minutes, 1 hour, 4 hours, at the end of the week, or on a custom date and time.
11. Set up automatic Slackbot responses
Do you find yourself or your team members asking the same questions over and over again? Slack can help your team stop wasting time writing out the same answers daily.
You can use Slack’s built-in bot, Slackbot, to create and deliver automated responses. Here’s how it works: you set up trigger words or phrases and then add a custom response that will be displayed after someone uses a particular trigger word or phrase.
How you will use automated responses depends on your team’s needs. Here are some ideas:
- Set up an “FAQ” trigger phrase that lists answers to your company’s most frequently asked questions. This is useful for things like “Are we off on Memorial Day?” or “When will the company retreat be this year?”
- Create an automated response containing login details for all the online software your team shares.
- Add a custom response that lists the link to your employee handbook so team members can access it more easily.
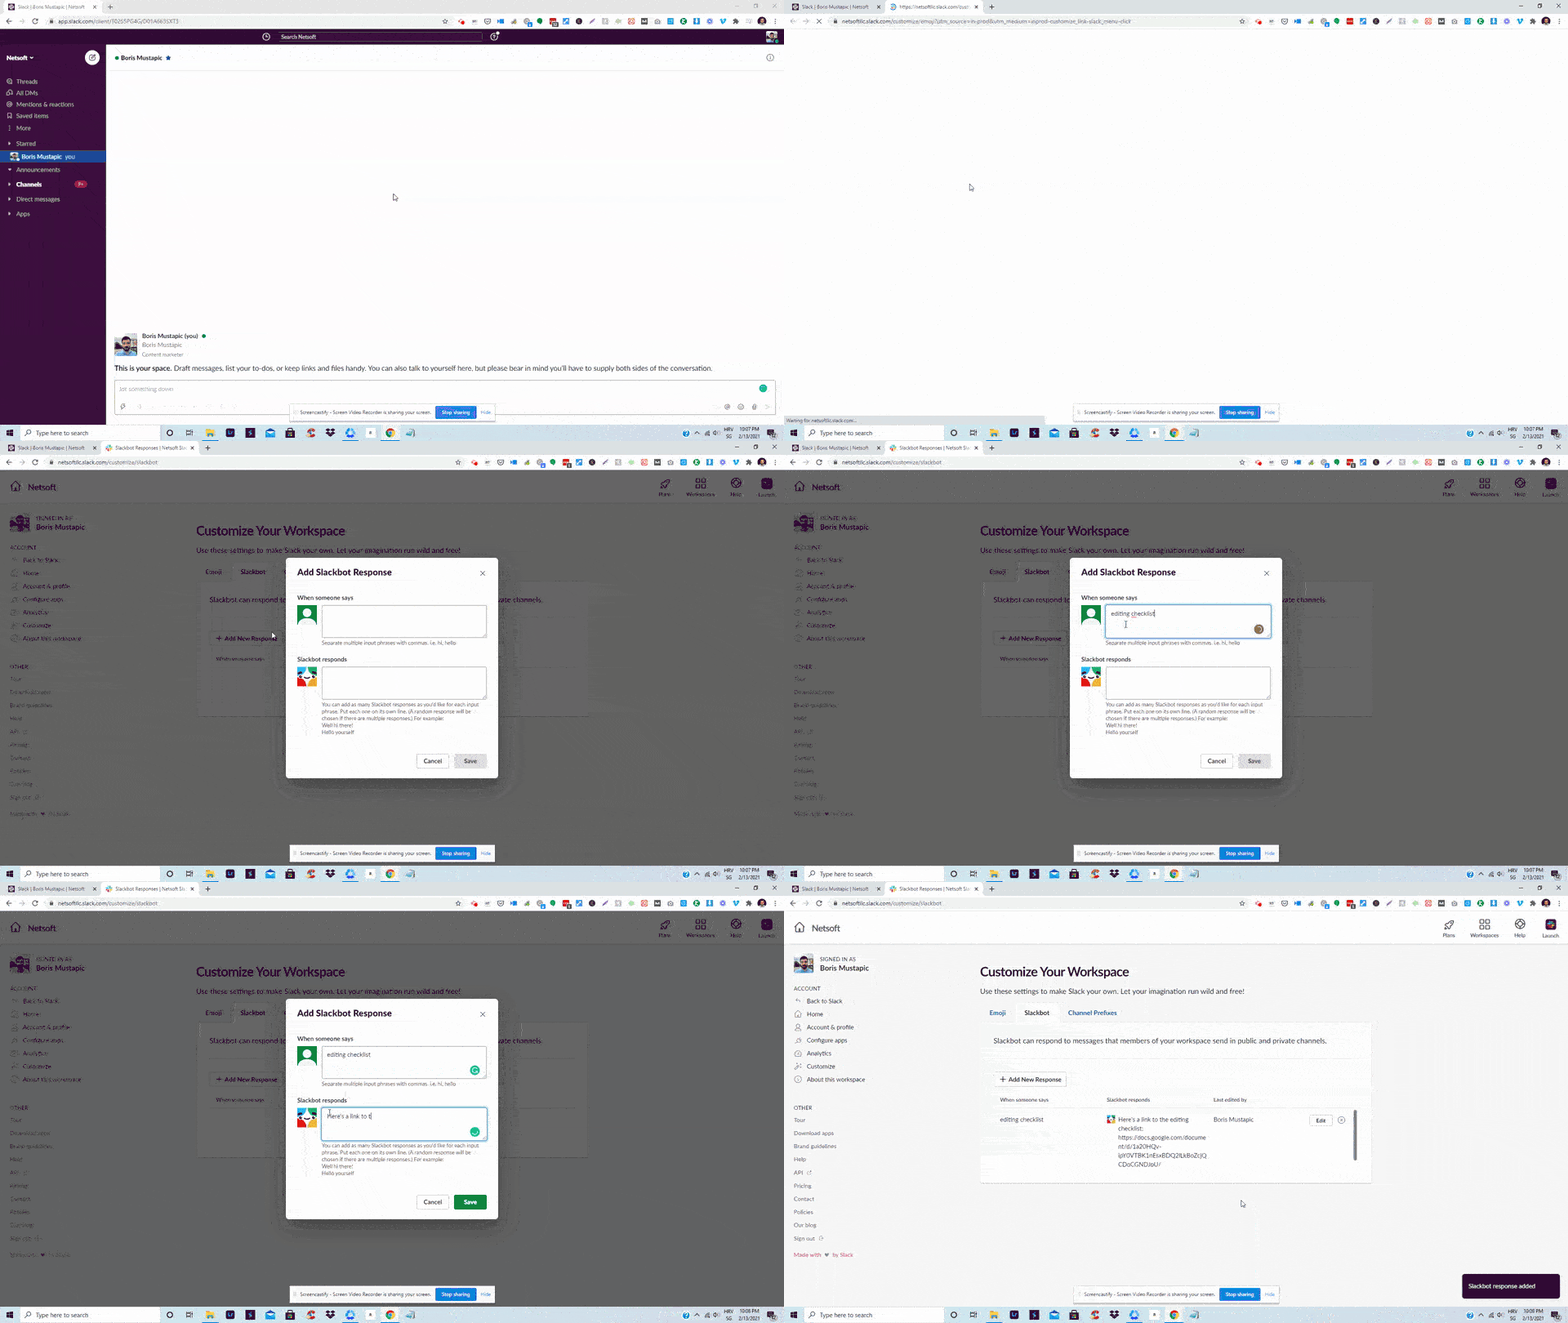
To set up a custom response, click on your workspace’s name in the upper left corner of the screen and then go to Administration > Customize.
This will lead you to the Customize your Workspace screen. Once there, click on the Slackbot tab and then on + Add New Response.
Type in the trigger words or phrases in the What someone says box and the automated response in the Slackbot responds box. Your response can include text, images, links, and emojis.
Be careful when setting up trigger phrases. If you use a generic phrase that comes up often in regular conversations, you risk flooding your channels with Slackbot responses.
On the other hand, using trigger phrases that are too specific might result in team members forgetting them and not bothering to use them.
12. Mark a message as unread
In Slack, marking a message as unread is a handy feature for keeping track of important conversations that may require follow-up. To mark a message as unread, follow these steps:
- Hover over the message you want to mark as unread.
- Right-click the message (or long-press, depending on your device).
- From the context menu that appears, select “Mark Unread.”
- Alternatively, you can mark all messages in a channel or direct message as unread. Right-click on the channel or direct message in the sidebar, and from the context menu, choose “Mark unread.” This is useful when you want to revisit and respond to multiple messages later. You can easily find these unread channels by using the shortcuts above.
By using the “Mark Unread” feature, you can maintain better organization and ensure that crucial messages don’t get overlooked in the fast-paced communication environment of Slack.
13. Customize notifications
Slack notifications can get overwhelming. Slack allows you to customize what, when, and how you receive notifications.
Click on your profile photo in the upper right corner of the web app and go to Preferences > Notifications. Choose which notifications you want to receive. You can select different sounds for different kinds of messages.
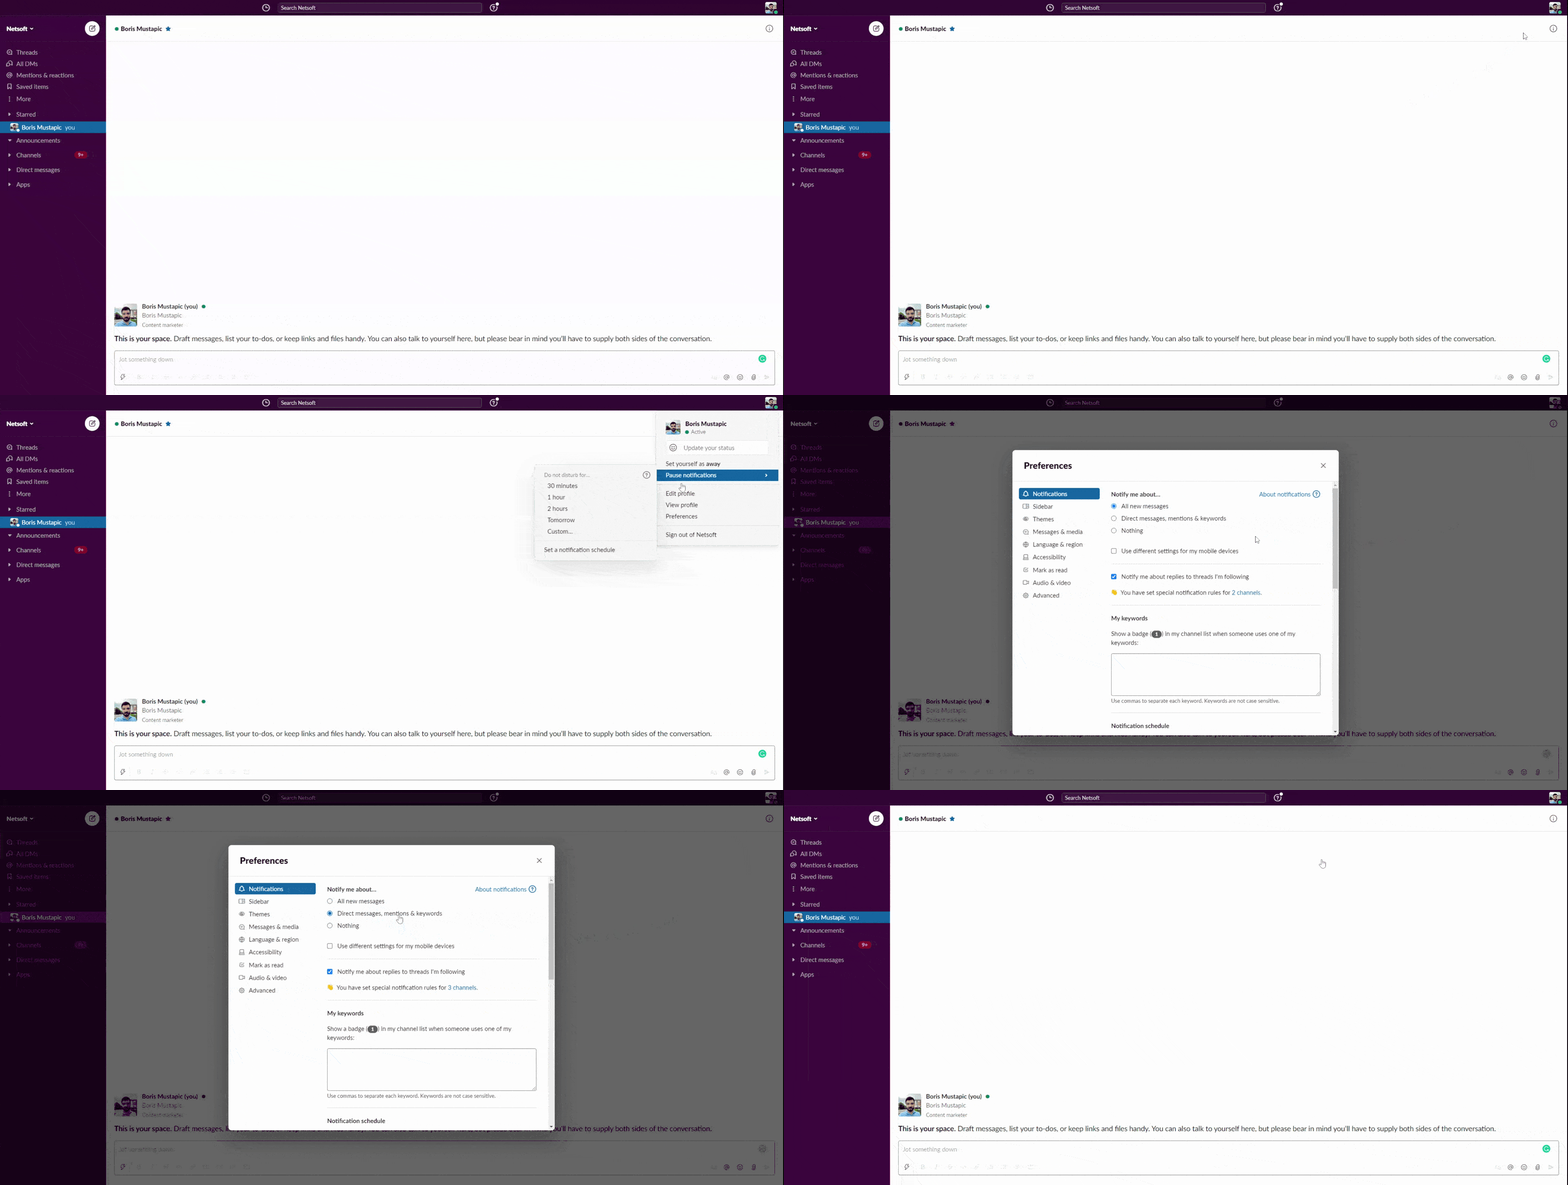
Slack gives you the option to notify you about:
- All new messages
- Direct messages, mentions, and keywords
- Nothing
You can also set up Slack to notify you when someone mentions a particular word or phrase. This is useful for keeping tabs on different tasks and projects. For example, you can set up keywords for:
- Topics
- Project names
- Customers
- Accounts
You can even set up your own name as a keyword. This is useful when people mention you without tagging you in their messages.
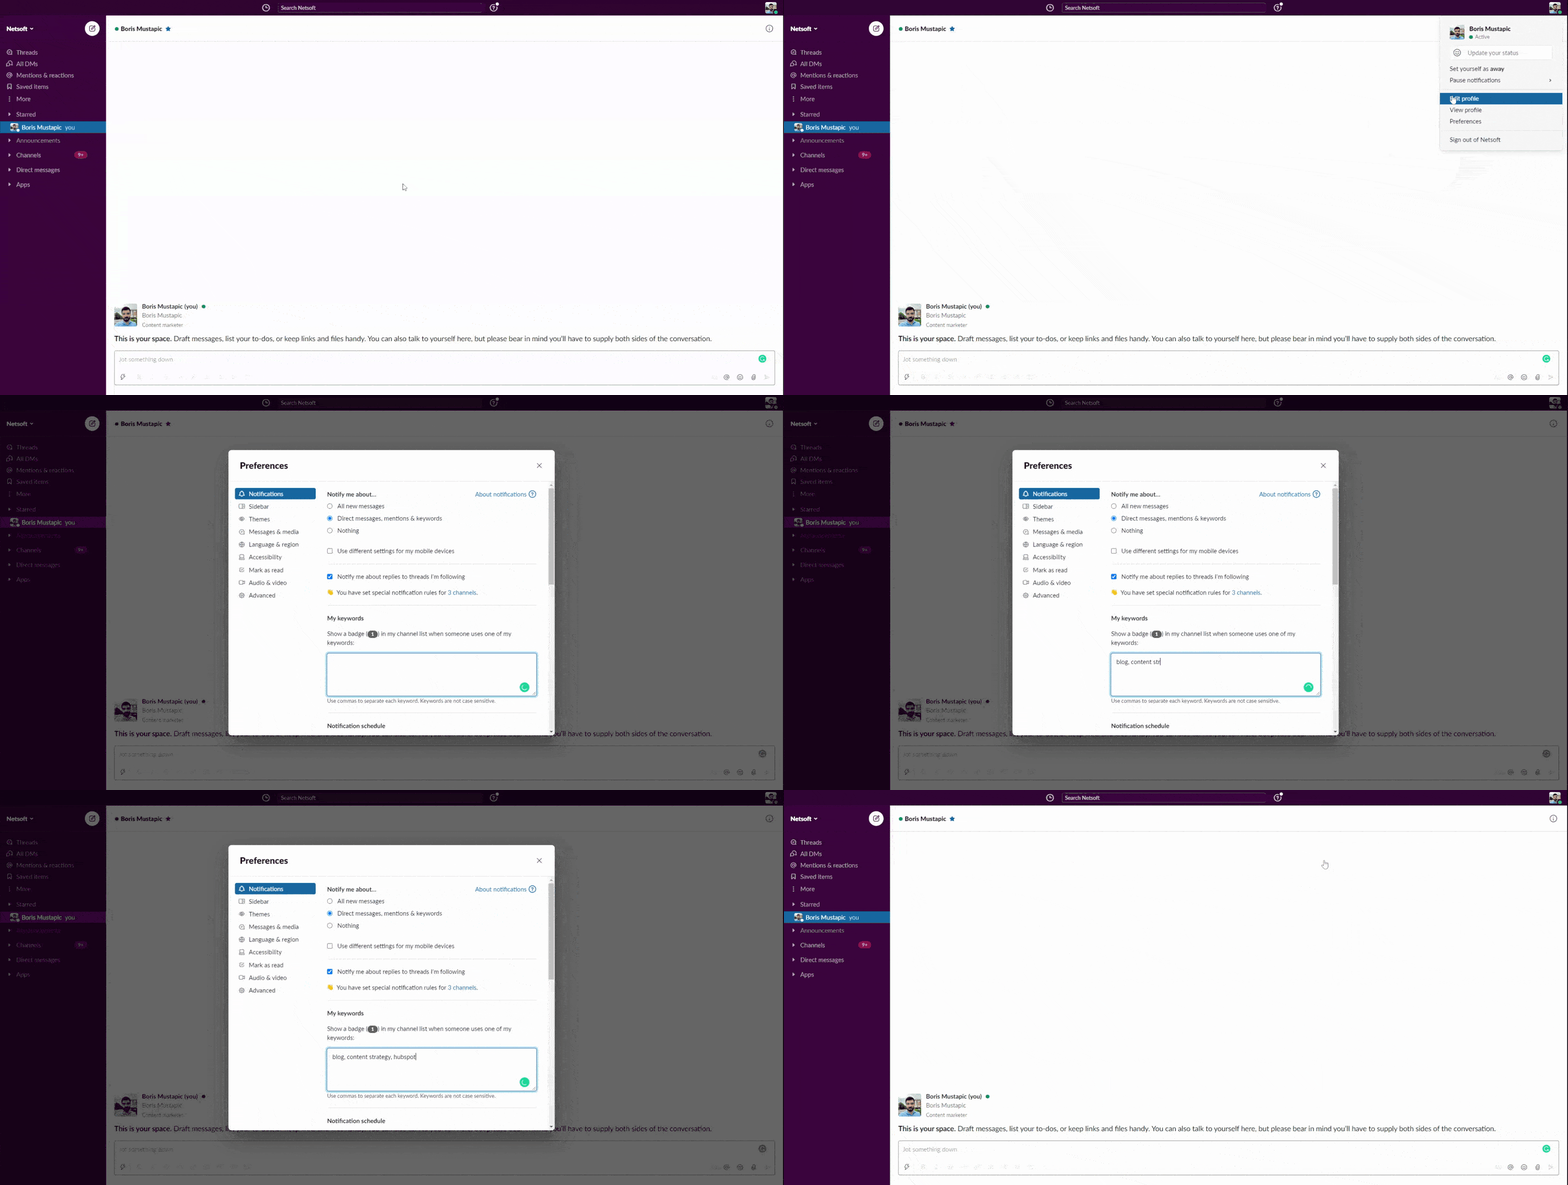
To set up keywords, go to Preferences > Notifications and add your keywords in the My Keywords section.
There’s also the option of setting a notification schedule to ensure you’ll receive notifications only when appropriate.
You can create different settings for your mobile devices as well. For example, you might want to receive notifications on your mobile device only when you’re not active in the desktop or web apps.
14. Save time with emojis and reactions
Emojis might not seem like a productivity tool. But when used wisely, they save time and energy.
Using emoji reactions allows you to acknowledge other people’s messages without typing out a reply. For example, you can use the :clap: emoji instead of typing “congratulations” or “great job.”
This saves time, simplifies conversations, and reduces the noise in your Slack channels. Your teammates know that you saw a message without needing you to reply.
To react to a message, hover over it, click the Add a Reaction icon, and choose an appropriate emoji.
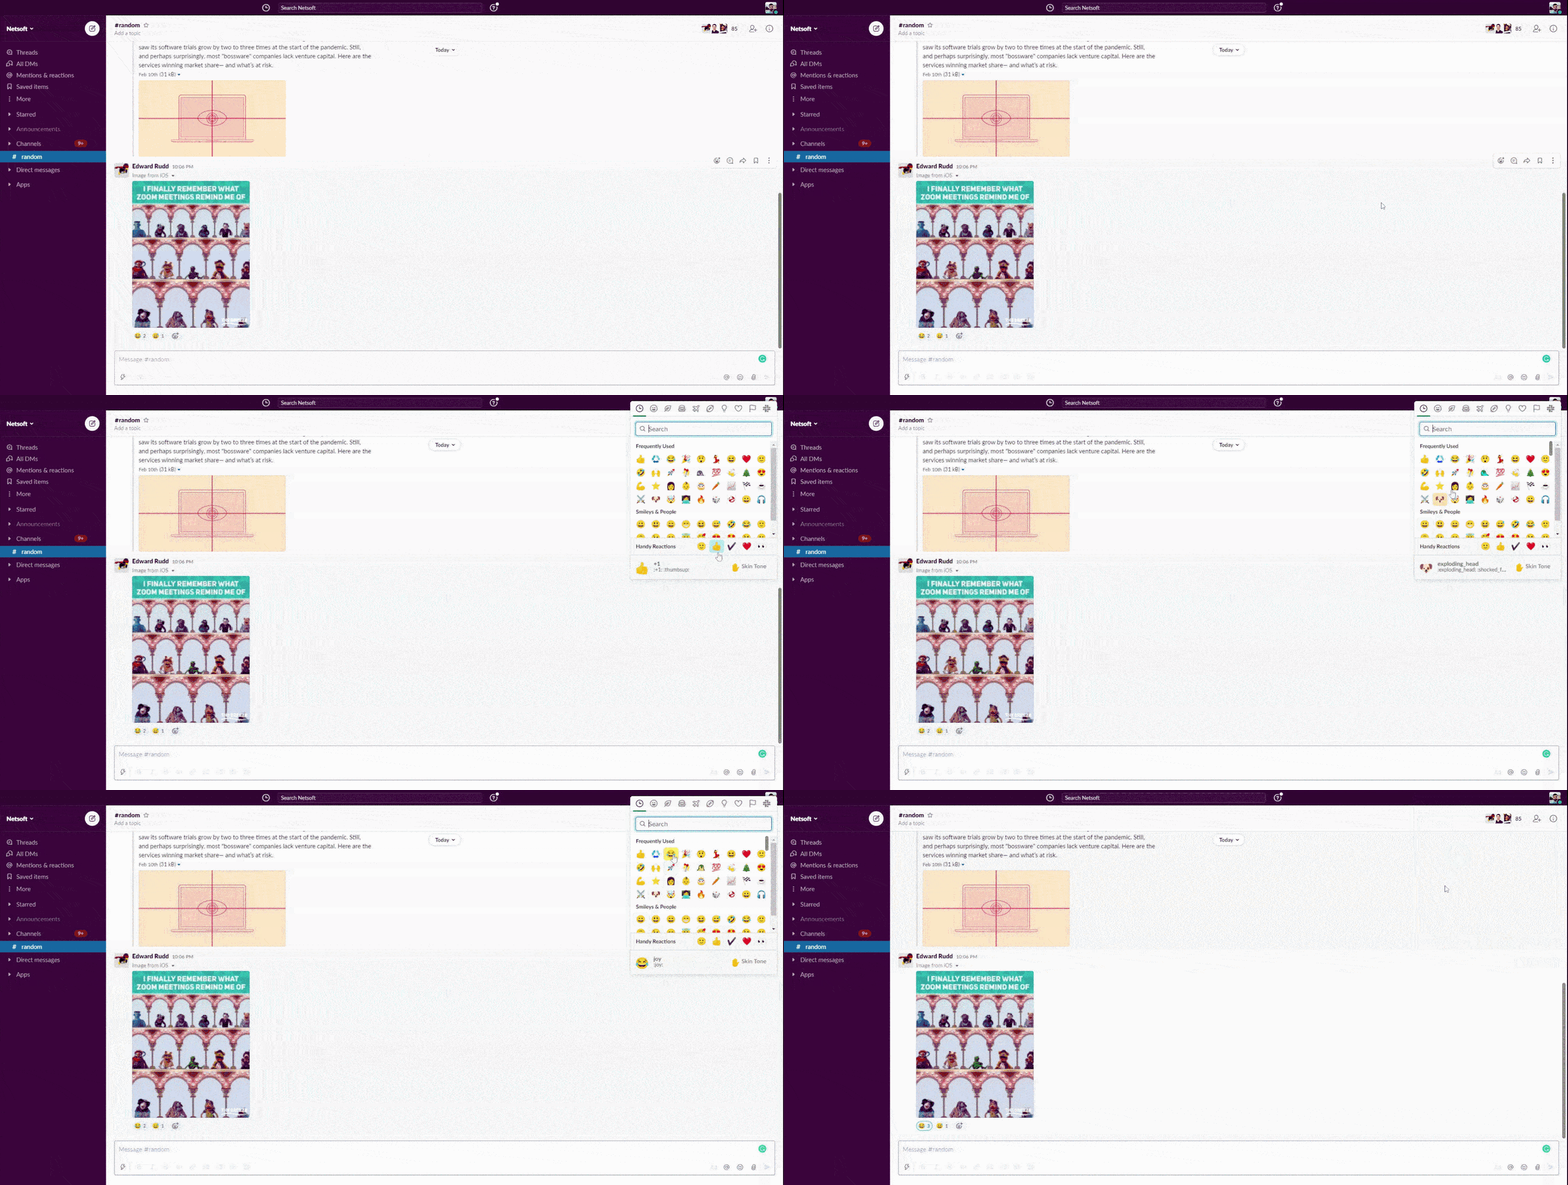
You can also set up one-click reactions by going to Preferences > Messages & media and then checking the box that says Show one-click reactions on messages.
Once you do that, you can choose three default emojis shown when you hover over a message, making it easier for you to react to messages quickly.
If you’ve reacted to a message by mistake, you can remove the reaction by clicking on the icon under the message.
You can also use emojis to:
- Document critical information – You can assign a different emoji to each project and then use it when discussing a particular project. This will allow you to find all the messages related to a specific project by searching for the emoji assigned to it.
- Conduct polls – You can use emojis to conduct polls in Slack. Simply type out your question and assign an emoji for each answer. This will allow team members to vote by reacting to your message with an emoji corresponding to their answer.
When using emojis and reactions, it’s essential to make sure you understand what an emoji means before you use it. This will prevent misunderstandings and awkward situations.
It’s best if the entire team is aligned on the meaning behind specific emojis to avoid misunderstandings.
15. Share code with snippets
Slack allows you to create snippets for pieces of code or text your team uses repeatedly. Snippets are an easy way for developers to share their code, fix bugs, and suggest improvements.
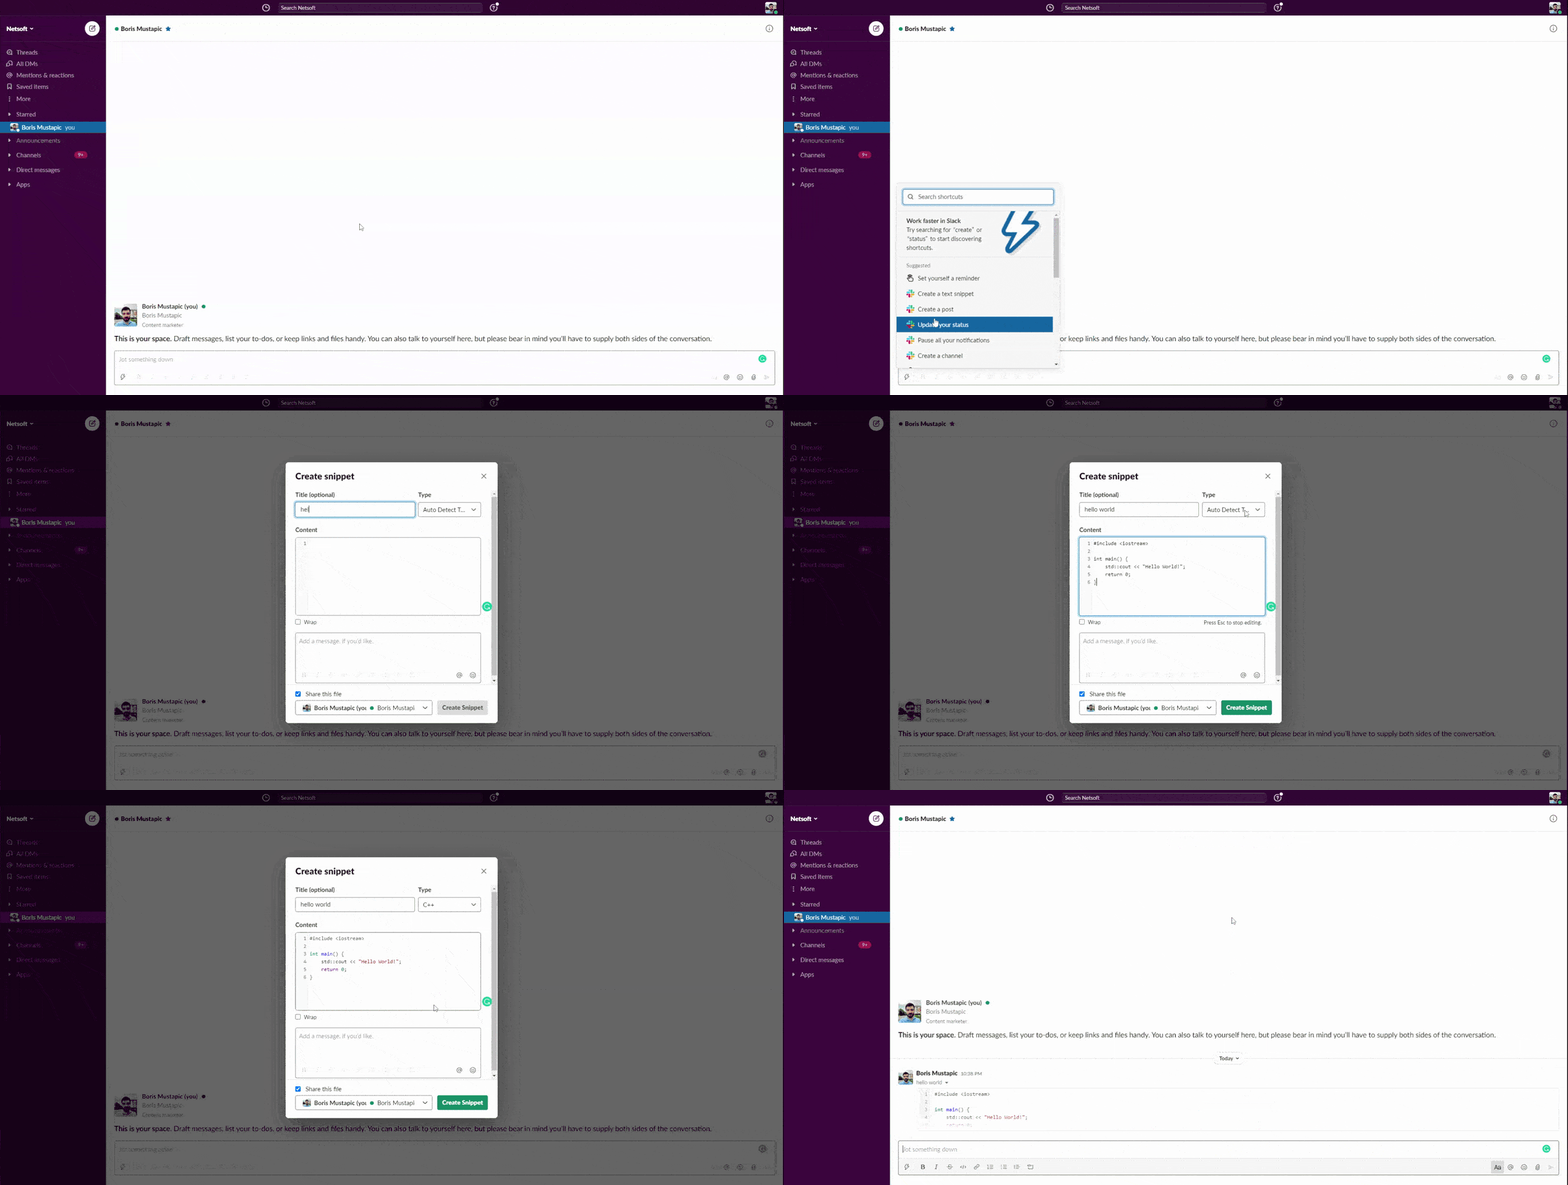
To create a snippet, click the lightning bolt icon under the main message box and select Create a text snippet. Give your snippet a name, choose your programming language, and add the code.
You can include an optional message to go along with the snippet. Share it with team members immediately or save it for later.
Once you’re done, click on Create Snippet.
You can also format code to appear as a snippet by using backticks. For a single line of code, add a backtick (`) at the beginning and end of your code.
To create a code block, you’ll need to wrap it in three backticks (“`).
16. Take advantage of Slack apps and integrations
The Slack App directory houses hundreds of apps across 19 different categories. By taking advantage of Slack integrations, you won’t have to switch between so many tabs and apps throughout the day, which will reduce context switching and help you be more productive.
Some of our favorite Slack apps and integrations include:
- Google Calendar – Sync your calendar to update your Slack status and create events within Slack automatically. Receive event notifications and respond to invitations directly from Slack.
- Google Drive – Create and preview documents from within Slack. The app also makes it easier to share documents with your team and reply to comments in documents.
- Statsbot – This app can update you on all your essential metrics from Google Analytics and Mixpanel. It’s a huge timesaver.
- Zoom – Start and join meetings from Slack. To start a meeting, all you need to do is type /zoom into a channel, and all the people in the channel can join the call with the automatically generated link.
- Tettra – Create a knowledge base within Slack. Use Slash commands to create new Tettra pages and search through existing pages.
- Zapier – With Zapier, you can connect Slack with thousands of apps, such as Hubstaff, that don’t have native Slack integrations. Zapier can help you automate repetitive tasks like welcoming new workspace members and cross-posting messages between channels.
- HubSpot – Does your team use HubSpot? Speed up your workflow by turning Slack conversations into tasks in HubSpot, assigning tasks and tickets to team members, and getting HubSpot notifications in Slack.
17. Collapsible sidebar sections
Collapsible Sidebar Sections in Slack provide a streamlined way to organize your channels and direct messages. You can collapse group messages, channels, or a private Slack channel.
To utilize this feature, hover over the “Channels” or “Direct Messages” section on the left sidebar. A small toggle icon will appear, allowing you to collapse or expand the entire section.
Once collapsed, you will be able to reopen channels like a drop down menu.
This is especially useful for users who want to focus on specific conversations without distraction. It helps maintain a tidy workspace, making it easier to navigate and locate the channels that matter most.
This feature enhances overall efficiency by allowing users to customize their Slack interface based on their preferences and priorities.
18. Use the Hubstaff + Slack integration to understand how your team spends their time at work
Slack + Hubstaff time integration helps you manage your team’s workload more efficiently and stay on top of tasks and projects that are currently in progress. You can use it to:
Get alerts when employees start and stop tracking time – Get alerts whenever employees start or stop tracking their time.
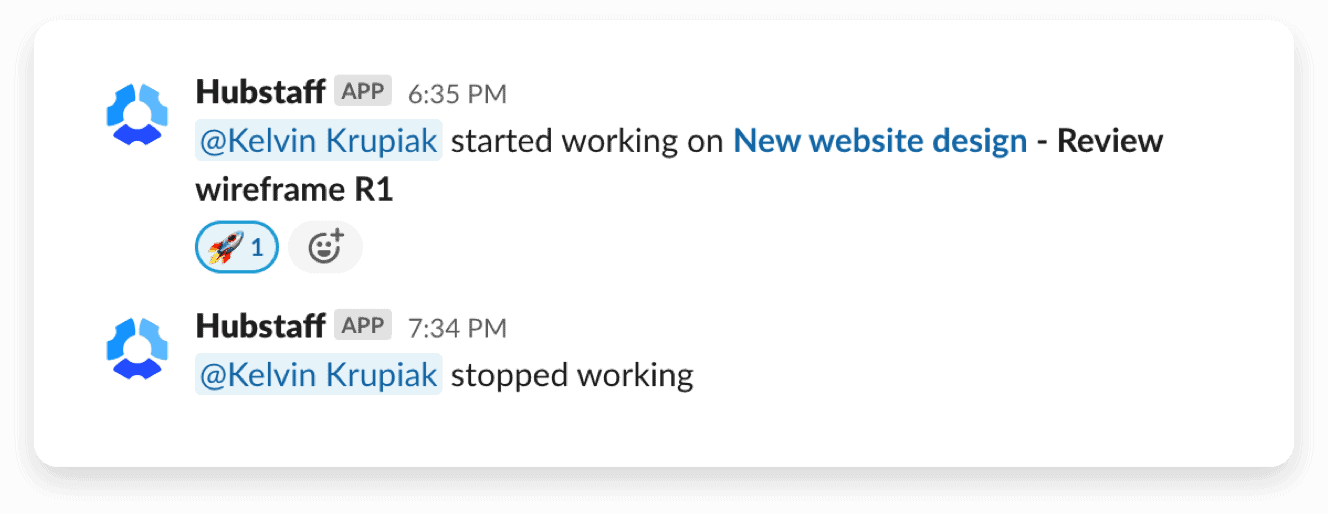
See when team members are working and what they’re working on. See when a team member starts working on specific tasks so you can stay in the loop without breaking their concentration by asking for updates.
When your team juggles multiple tasks and projects, interruptions can make work take a lot longer. The Hubstaff + Slack integration allows you to collaborate more efficiently, even in different offices or time zones.
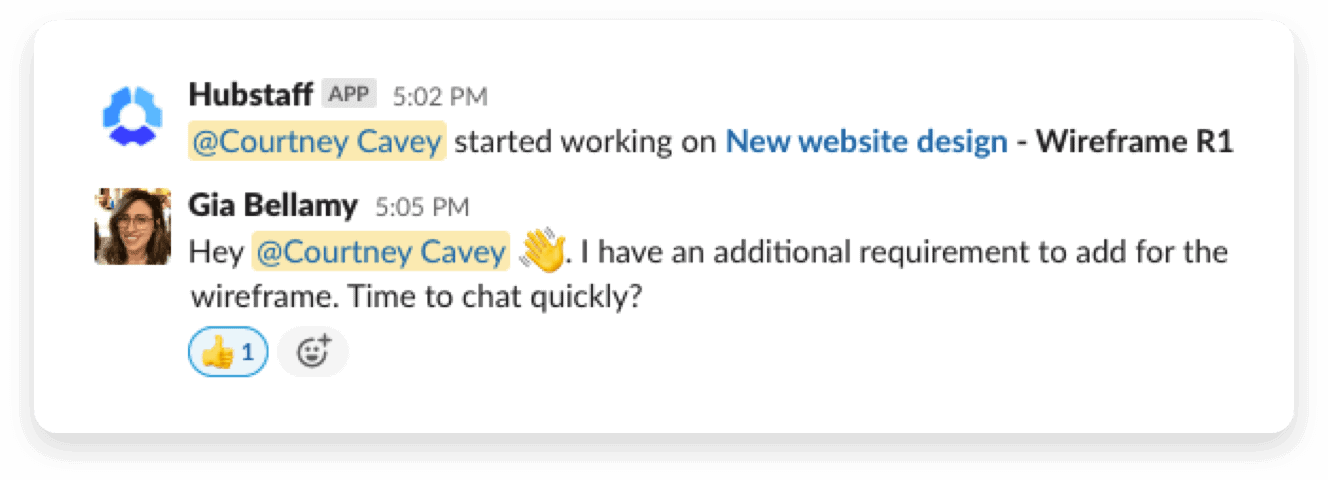
Get notifications when team members complete tasks. Do you want to monitor team members’ workload or the status of a particular task? Use the Hubstaff app to get a Slack message when team members complete tasks.
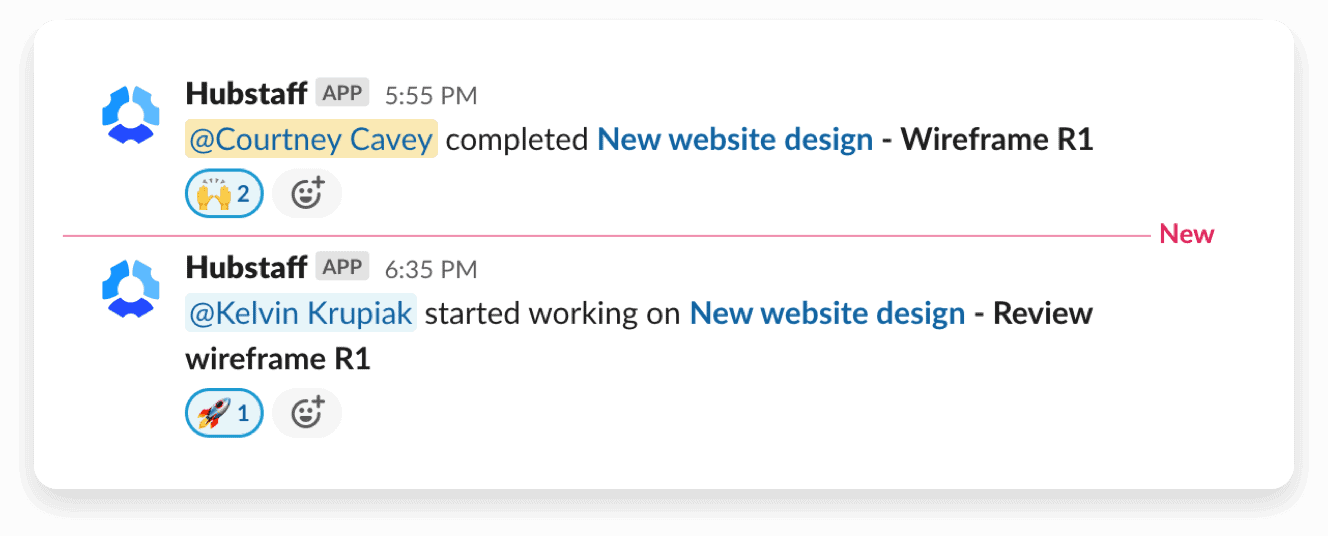
This integration was one of the most requested upgrades from Hubstaff customers. It’s a smart way to stay connected to your team without interrupting productive work time to ask for updates.
Next steps: Start using these Slack tips
Now you’re a Slack whiz, right?
Just kidding. This is a lot of information, and you don’t have to remember everything all at once. Choose one or two Slack shortcuts to incorporate into your workspace and start learning them.
After mastering those things, return to this article and choose another efficiency hack. Bookmark this post so you can easily find it again.
Are you looking for more efficiency tips? Check out this article to learn the biggest time wasters at work and what to do about them.
This post was originally published in November 2015 and was updated in March 2024.
Subscribe to the Hubstaff blog for more posts like this
Most popular
The Fundamentals of Employee Goal Setting
Employee goal setting is crucial for reaching broader business goals, but a lot of us struggle to know where to start. American...
Data-Driven Productivity with Hubstaff Insights: Webinar Recap
In our recent webinar, the product team provided a deep overview of the Hubstaff Insights add-on, a powerful productivity measurem...
The Critical Role of Employee Monitoring and Workplace Security
Why do we need employee monitoring and workplace security? Companies had to adapt fast when the world shifted to remote work...
15 Ways to Use AI in the Workforce
Whether through AI-powered project management, strategic planning, or simply automating simple admin work, we’ve seen a dramatic...


