How to Create a Project Timeline: A Practical Guide
- Project timelines, plans, and WBS each serve distinct purposes — timelines focus on visual scheduling, plans define goals and scope, and WBS breaks tasks into hierarchical structures.
- Publishing your timeline in a read-only, accessible format for all stakeholders drives accountability and keeps project managers consistent — turning visibility into a built-in quality control mechanism.
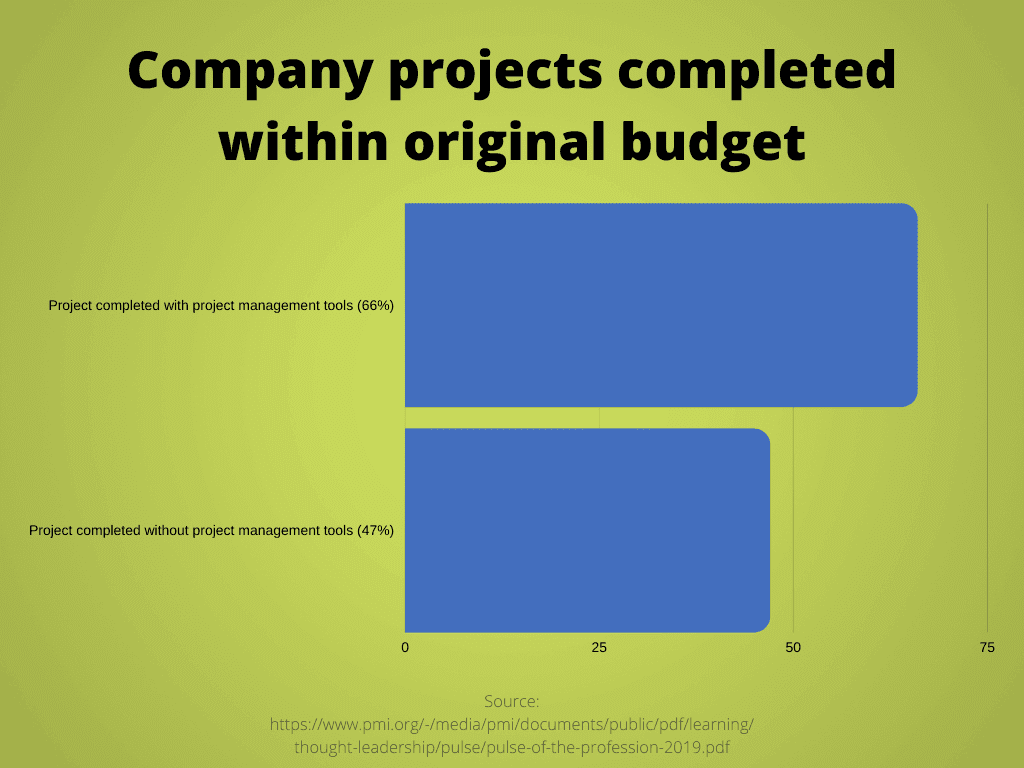
- 66% of organizations using project management software complete projects within budget, making dedicated tools a smarter choice than manual scheduling for teams serious about hitting deadlines.

Crafting a well-structured project timeline is a crucial aspect of project management, providing a roadmap that guides your team toward successful completion.
It often includes information about cost and anticipated timeframes, as well.
Also known as a project schedule, a reasonable project timeline is in-depth but easy to interpret. It encourages teamwork without removing accountability. And it streamlines a project manager’s duties without oversimplifying them.
In this comprehensive guide, we will look at:
- What is a project timeline (and what it is not)
- The benefits of creating a project timeline
- Different project timeline types
- How to create a project timeline in 10 practical steps
Boost your team’s efficiency with Hubstaff's productivity tools
What is a project timeline?
Let’s begin by defining the main deliverables of any project: project plan, work breakdown structures (WBS), and project timelines.
These are often confused. In fact, they are unique entities, each with their own purpose to enable project success. They are also dependent on each other.
Project plan vs. work breakdown structure vs. project timeline
The project plan formally outlines the project goals, stakeholders, scope, responsibilities, and schedule.
That sounds like everything, right?
As you will discover in this article, each element mentioned is substantive. You must break many of them down further into subtasks that may only be relevant to some stakeholders.
Instead, the project plan timeline is a single document for key project figures to refer to when they need the essential overview.
Project managers can produce the work breakdown structure (WBS) from the project plan. This is a hierarchical representation of the tasks teams must complete throughout the project lifecycle. The WBS does not detail how the tasks are completed, just that they are essential for successful project delivery.
Want to create your own Work Breakdown Structure?
Get the free template here.
The benefits of creating a project timeline
Creating a project timeline offers numerous benefits for effective project management. Here are the key advantages:
- Creating a clear roadmap: A successful project timeline provides a visual roadmap, outlining tasks, milestones, and deadlines. It offers a clear overview of the project’s progression.
- Enhanced planning: It facilitates comprehensive planning by breaking down the project into manageable tasks, allowing teams to allocate resources efficiently.
- Improved communication: A timeline is a communication tool, ensuring the entire team understands the project’s scope, deadlines, and individual responsibilities.
- Resource allocation: Helps in allocating resources judiciously by highlighting periods of high activity and potential resource constraints, preventing overallocation or burnout.
- Efficient time management: Enables effective time management by providing a schedule that helps teams prioritize tasks, reducing the likelihood of delays.
- Risk identification: A timeline aids in identifying potential risks and bottlenecks early in the project, allowing for proactive problem-solving and risk mitigation.
A well-crafted project timeline is a cornerstone of successful project management, providing structure, clarity, and efficiency throughout the project lifecycle.
5 different project timeline types
There are several types of project timelines, each tailored to meet specific project management needs.
Here are five key project timeline types:
- Gantt chart: A Gantt chart visualizes a project schedule that illustrates tasks, milestones, and dependencies over time. It provides a comprehensive view of the project’s timeline, making it a popular choice for complex projects.
- Milestone chart: A milestone chart highlights critical milestones and their deadlines throughout the project. It offers a simplified view, emphasizing significant achievements and deadlines rather than detailed task breakdowns.
- Kanban board: While not a traditional timeline, a Kanban board visualizes tasks on cards moving through different stages of completion. It provides a dynamic, real-time view of the project’s progress and is particularly effective for agile project management.
- Pert chart: Program Evaluation Review Technique (PERT) charts visualize tasks, milestones, and the relationships between them. PERT charts use arrows to represent task dependencies and critical paths, offering insights into project sequencing and potential bottlenecks.
- Chronology-based timeline: This timeline presents tasks and milestones chronologically, typically displayed as a horizontal bar with dates along one axis. It provides a straightforward visual representation of when each task is scheduled to occur.
Each project timeline caters to different project management approaches and preferences. The choice depends on factors such as project complexity, the need for detailed task tracking, and the preferred visual representation for communication within the project team and stakeholders.
Now that you understand the crucial components required to deliver a project successfully, different project types, and why a project timeline is helpful, it is time to create it.
10 steps to create a project timeline
1. Write and approve a project plan
Project plans can be basic or detailed, but you should have one, no matter what. It forces you to ask essential questions, the answers to which will help you to plan the timeline and mitigate risk.
To complete your project plan, you should sit down with any essential stakeholders to answer the “who, what, why, when, and how” questions. For example:
- Who…
- …will gain from the project outcome?
- …are the key stakeholders?
- …else wants the project to succeed?
- What…
- …will the outcome look like?
- …is included in the project? What is not?
- …is the budget?
- …expertise do you need to ensure success?
- …happens if the project is delayed/canceled?
- …other projects can your business complete at the same time?
- Why…
- …is the deliverable necessary?
- …complete the project now?
- When…
- …does the deliverable need to be ready, and is this date flexible or fixed?
- How…
- …will the deliverable benefit the business/employees/customers?
Depending on your industry and project, you may have other questions to include here. And you may want to implement project estimation techniques to predict your resources, costs, and timeline more accurately.
The main reason to ask these questions is not only to secure stakeholder approval. You also achieve the following early on in the project lifecycle:
- Attainable goals
Learning that the project goals are unrealistic or impossible later wastes resources.
- Project scope
By understanding a project’s goals and budget, you can mitigate against scope creep. This is when gradual changes alter a project’s outcome from its original vision.
- Ensure key project leaders, including you, understand why the project is desirable
By understanding the benefits and objectives of a project, you are better equipped to answer questions and make decisions.
Also, you will inspire confidence in your teams if you can show that you comprehend the project well.
Securing approval for the project plan and publishing it for everyone to see is crucial.
You can still revise the document later. But it serves as a reference point for everyone to understand the objectives.
In other words, it means everyone is on the same page!
2. Generate a work breakdown structure
It is time to identify the smaller deliverables. This is your work breakdown structure. Do not worry about how long these tasks will take or how they relate to others around them. Just write them down.
3. Create specific project tasks
Then, go even further.
Break those deliverables down into smaller subtasks. We recommend using a Kanban board to structure them in a hierarchy.
The goal here is to glimpse at a logical layout of all the required tasks and see how they fit together.
4. Determine task ownership and resource availability

Next, assign owners to each subtask you identified in step 3.
You have probably already discussed who will handle each job. But this step ensures you do not overlook this.
Once you have assigned owners to each task, it is time to invite each resource specialist and team leader into your discussion.
There are a few reasons why you should do this.
- It gives task owners an early opportunity to see the WBS and to flag if something is missing.
- It establishes your trust in your team and their expertise, which is an effective project management trend in 2020.
- It encourages a culture of communication and feedback (more on this later).
- You should call on their expertise for the next steps.
5. Sequence steps and estimate time required
Depending on your experience, you can sequence the steps of your project management timeline alone. However, it is still a good idea to call on your team leaders and specialists to help you and ensure nothing is missed.
While the previous step tells you which resources you will need to deliver the project, this step will tell you when you need them and for how long.
6. Identify dependencies and bottlenecks
Often, this step is completed in parallel with step 5. While sequencing your project steps, you will identify which ones require other tasks to be finished before another can start.
Also, you will note which tasks can only be completed on their own or by one person. These are called bottlenecks, and they might exist because of resource availability or because the work is fundamental to later tasks.
You must identify all dependencies and bottlenecks in your timeline to ensure efficient use of time and resources. For example, realizing you have a bottleneck too late will lead to project delays and confusion.
Even if you think you have identified all dependencies and bottlenecks in step 5, we recommend reviewing them again before moving on.
7. Choose your project timeline software
How you construct your project timeline depends on the methodology you and your stakeholders want to use. For example, do you prefer a Waterfall-style Gantt chart, suitable for more rigid project deliveries?
Or do you favor flexibility, iteration, and communication? In this case, an Agile approach like Kanban is more appropriate.
The style most suitable to your teams and the entire project needs will inform the software you choose to create and manage your timeline.
Of course, it is possible to construct a working project timeline in Excel. However, many specialist project timeline tools are available that make creating and managing a project more efficient.
When factoring in which tool to use, think not only about the essentials to create a project timeline but also what extra functions would make your job easier.
8. Construct your project timeline
Whether you are using a spreadsheet or a project management tool, begin by listing all WBS deliverables and subtasks in your timeline.
Add the respective task owner to each one. Next, add the timeframe (this may be in hours, days, or both).
Then, use notes, a color-coding system, or your chosen program’s functions to assign dependencies between tasks.
If you want to see an example of how to build an Agile project timeline, skip ahead to how to create a project timeline in Hubstaff Tasks.
9. Assign milestones
You now have a functioning project timeline.
You can see all the steps needed to deliver the project, who owns which one, and how long it will take to complete them.
Now, you want to ensure you can track project progress as easily as possible.
To do this, group tasks together and create project checkpoints throughout the project lifecycle.
In Agile PM tools, you can group several jobs into an “Epic.”
The checkpoints throughout your project are called “milestones.”
Milestones offer three key advantages:
- Key stakeholders can quickly see how the project is progressing without viewing the more detailed project timeline.
- They serve as essential review points in the project lifecycle, where you, your team, and the stakeholders can consider how things are progressing and if any changes are needed.
- You and your team will feel motivated whenever you successfully hit a milestone.
10. Share the project timeline with the stakeholders and team
Finally, publish the project timeline somewhere your stakeholders and teams can access it.
They should not be able to edit the timeline, but ensuring others can see it creates accountability.
As a result, you will feel a greater responsibility to use the timeline daily and keep it as up-to-date as possible. This is the key to maintaining and operating a highly effective project timeline.
And that’s it! You have a project timeline to guide you and your team to deliver your project objectives.
How to create a project timeline in Hubstaff Tasks
So, now you know how to make a project timeline in theory. Next, let’s look at how to create one in practice. Planning is easy with project timeline templates.
In this example, imagine you are the project manager for a globally distributed business with a small team. Your teams must be flexible, and individuals should focus on efficiency and productivity.
Consider using a Kanban management tool like Hubstaff with the Tasks add-on for such a project. So, we will use this project management software to show you how to build your project timeline.
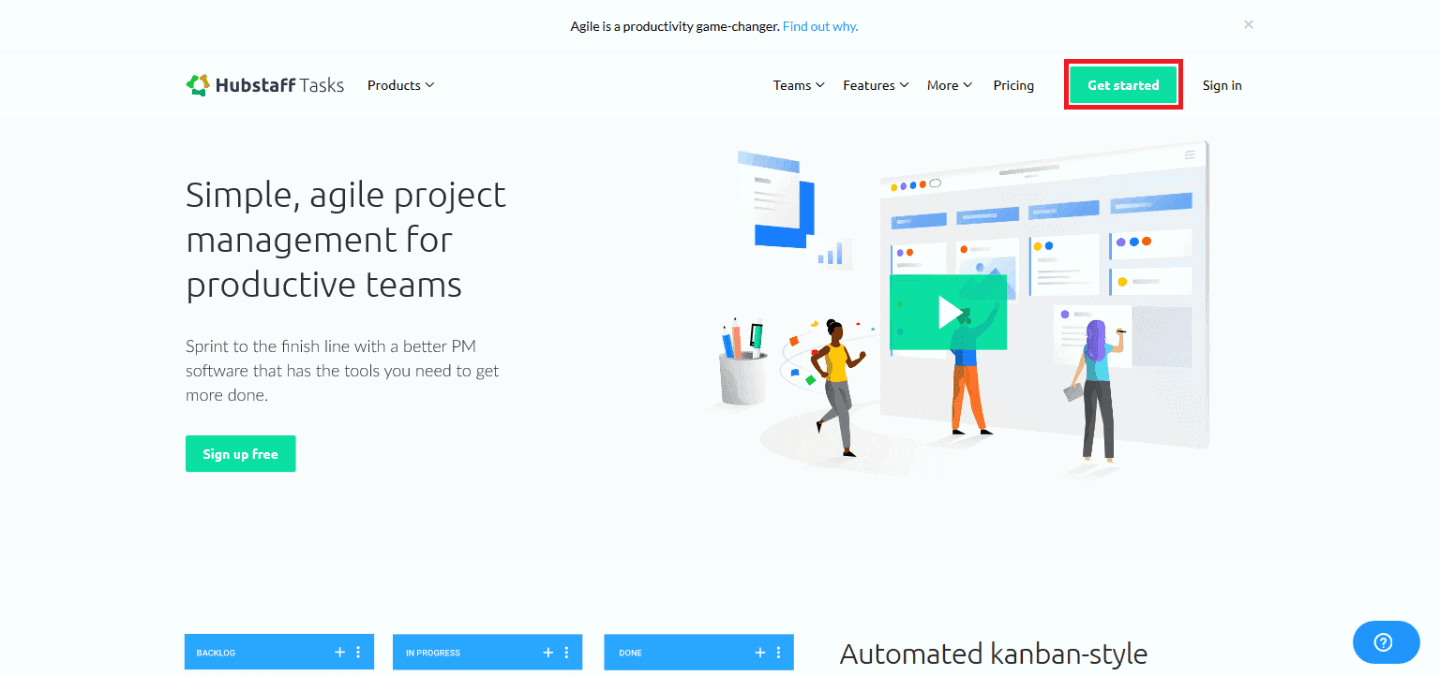
1. Create an account
Head to Hubstaff and click “Get Started” to create a free account for a single user. To work with your team, add the Tasks add-on starting at $3 per user/month.
For this demonstration, we will create an account for the fictional web design company called WebDyno.
2. Begin a project
From the Dashboard, click “New Project.”
Select the Blank template to build a project timeline from zero.
Hubstaff Tasks has almost 40 free templates to use for different objectives. You can see a description of each template by clicking each one.
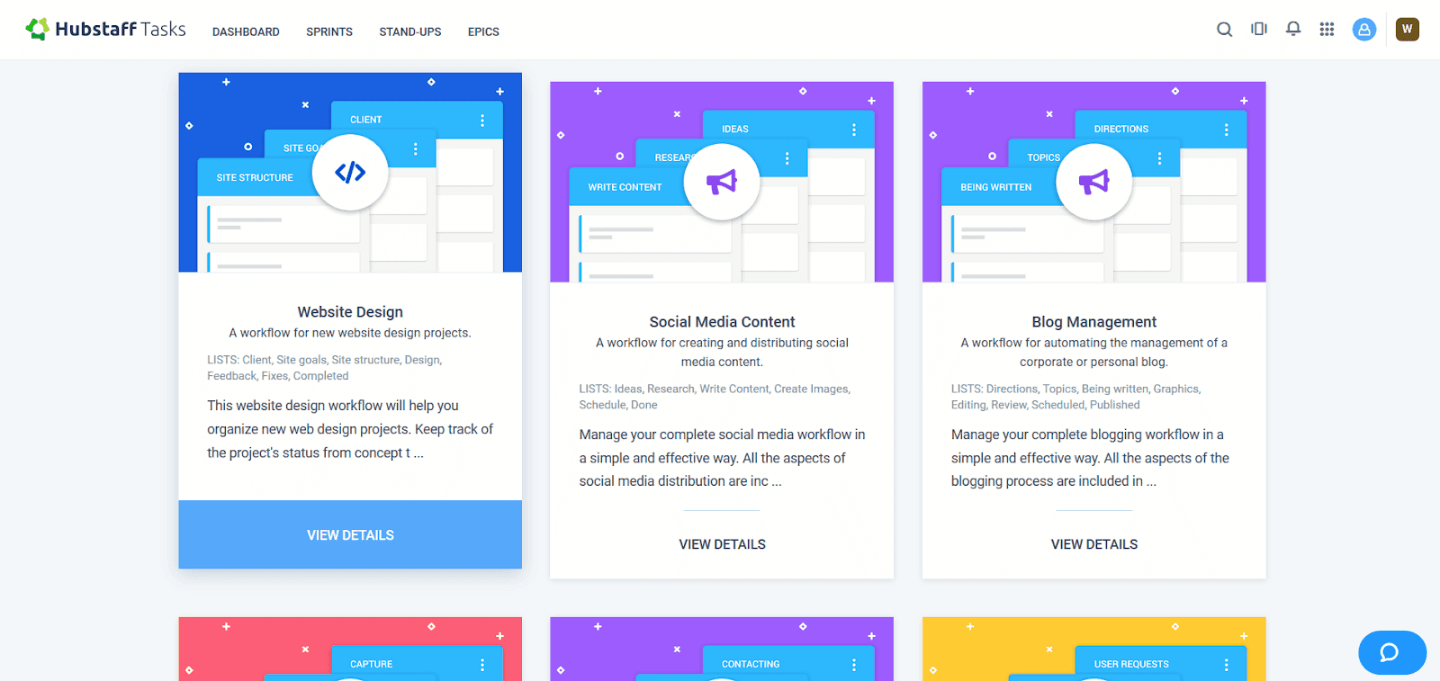
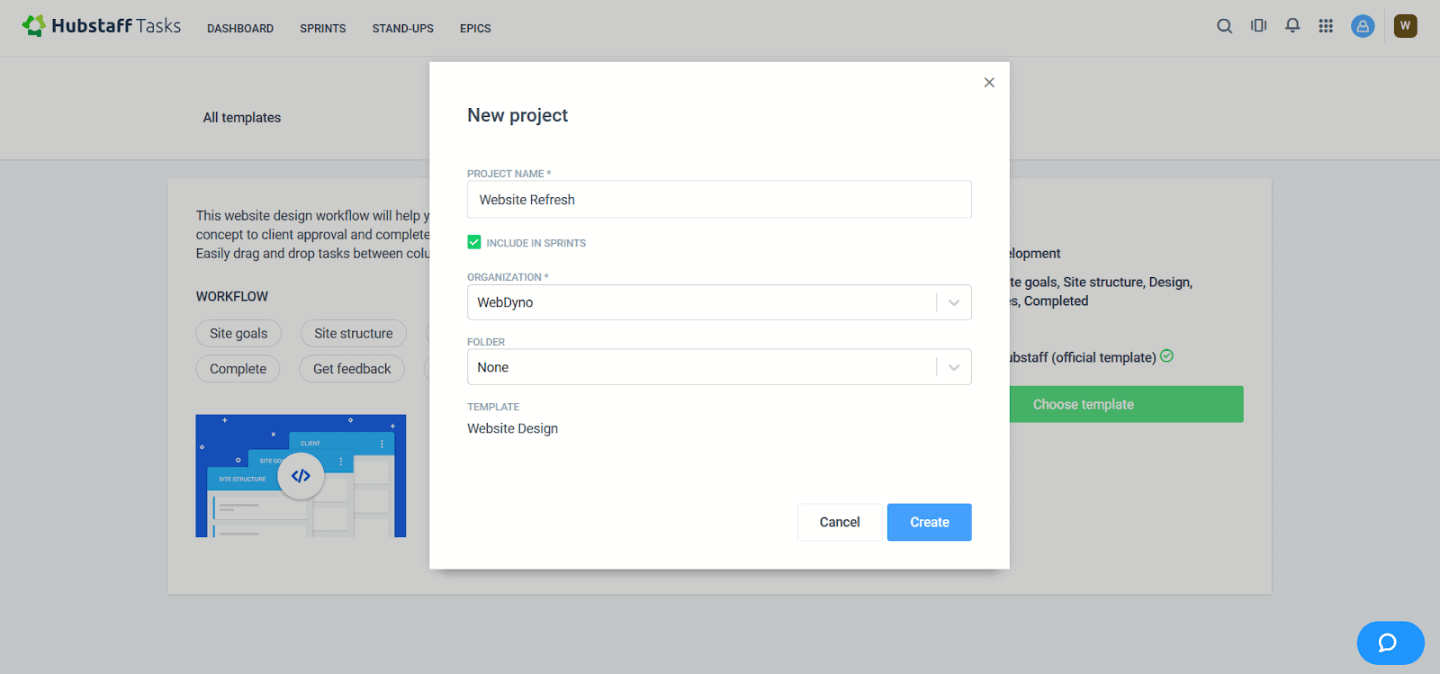
WebDyno needs to deliver a website refresh for their client. So, we will select the template Website Design by clicking “View Details” and then “Choose template.”
Give your project a name and then select “Create.”
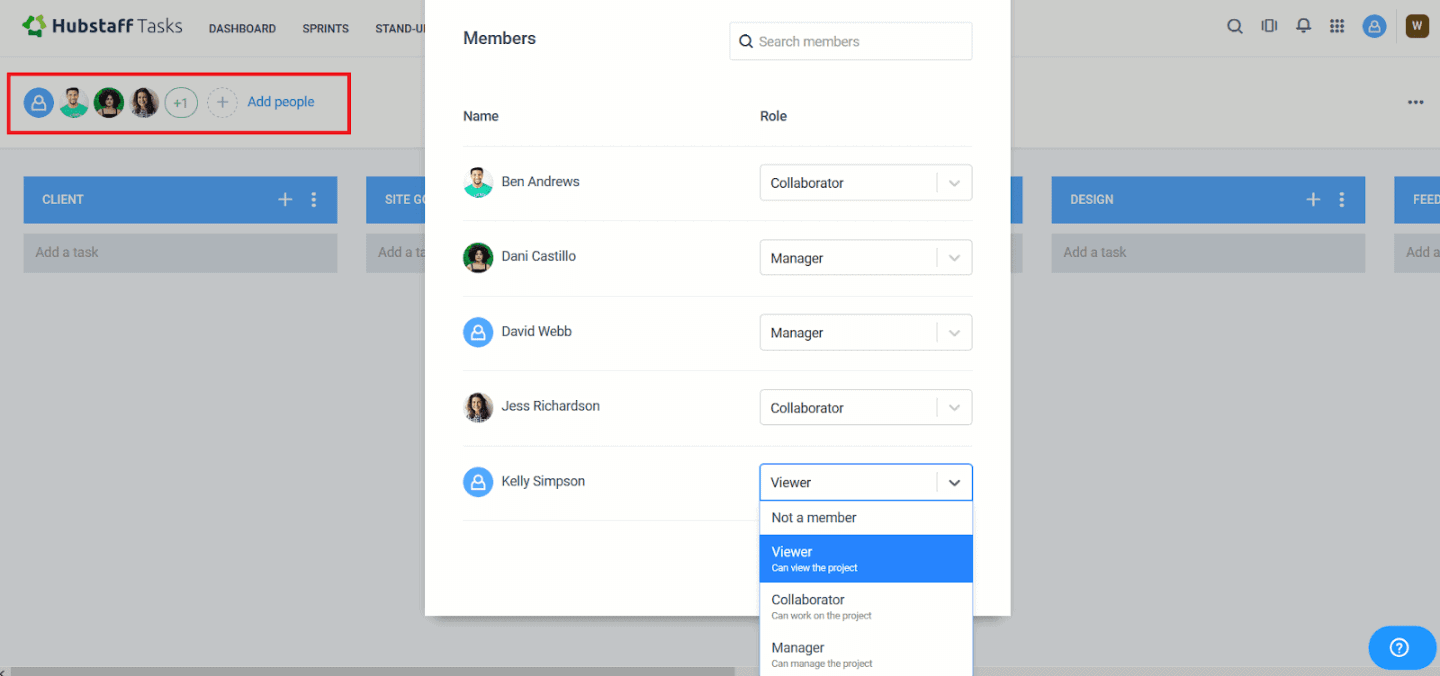
3. Add people
Click the “Add people” link from your project Dashboard to invite your team into the project.
Enter their email addresses, and they will receive a link asking them to create an account.
You can even assign roles, including who can manage, collaborate with, and view the project.
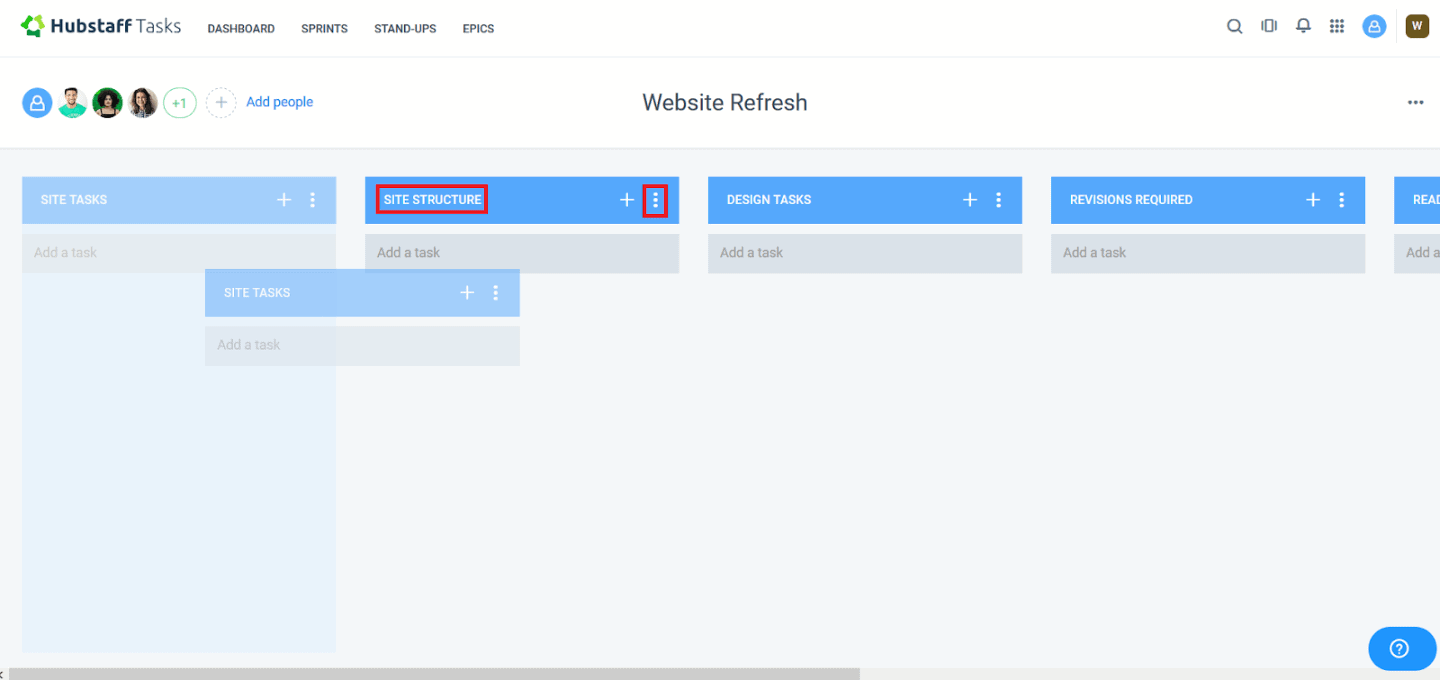
4. Organize lists
You can create, delete, and customize lists all with the click of the mouse. Select the list name to rename one. For more settings, click the three-dot icon and “List Settings.”
To change the order of your workflow, drag and drop your list to where you want it.
5. Add tasks
Now, it is time to start inputting your WBS tasks and subtasks.
Click “Add a task” or the plus symbol on the appropriate list category and name your task. Click “Save” and then click the newly created task to add details.
Assign owners and followers, add attachments, create a checklist, etc. You can create a Sprint for priority tasks or assign the task to a collection of activities (an “Epic”) from within the task.
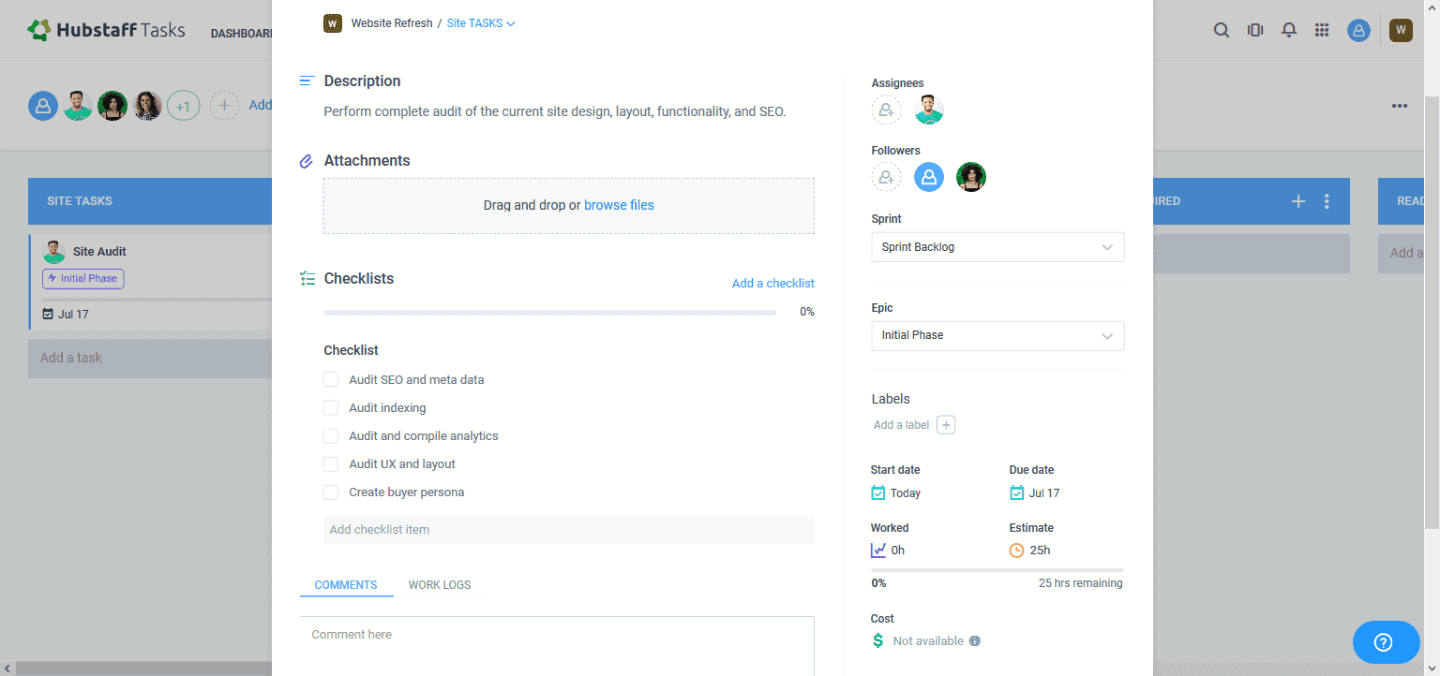
Assignees can update the task, update the checklist, and add attachments. They can also leave comments for each other.
Add labels, timetable information, and cost estimates if you have this information.
6. Progress or complete tasks
Your timeline is ready, and your team can begin!
As tasks progress from one phase to another, drag and drop them to the appropriate list.
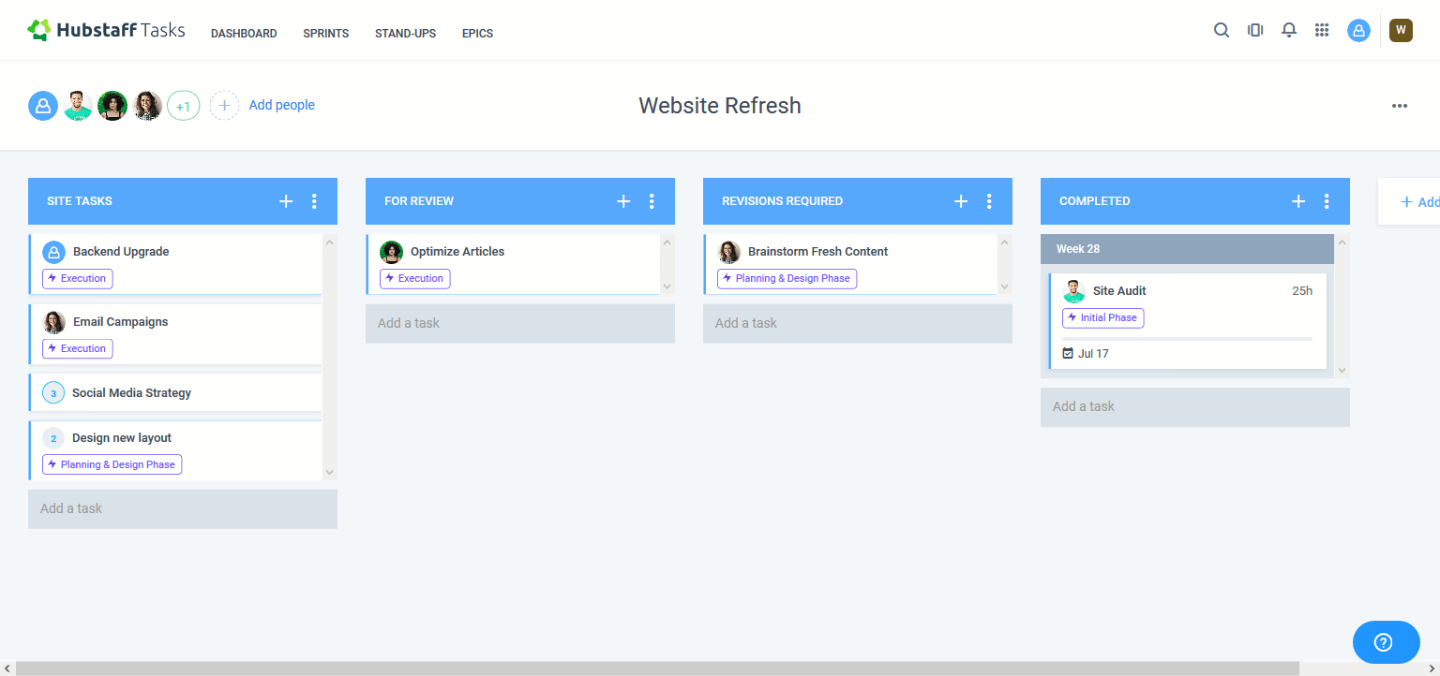
And remember to update the task assignees if someone else needs to take ownership.
If you want to request feedback from your teams, create a Stand-up by clicking “Stand-ups” at the top of the screen. You can collect these regularly to make reporting on progress even more straightforward.
Best practices and tips & tricks for project timelines
Before applying these steps to create your project timeline, here are some additional considerations to help you further.
Success with software
While you can create a timeline by other means, project management software is linked to high-performing projects.
Project timeline programs are also a proven money-saver: 66% of organizations using project management software complete projects within the initial budget.
Depending on your industry, the size and distribution of your teams, and your preferred project methodology, some programs are more suitable than others when creating your project timeline.
But whatever your project goals, you are more likely to have success using project management software.
Living deliverables
You should create a project plan to protect against scope creep. But it is possible to be flexible, as well.
After completing your project timeline, revisit your project plan with your stakeholders. Is there anything new and exciting you can add, knowing what you know now?
After staring at your project timeline for months, it can feel like it has a hold over you. Remember, it is a tool to make your job as a project manager easier. You are in charge.
There’s no such thing as too much feedback
In step 4, we mentioned establishing a culture of communication.
The more eyes you have on your project timeline, the more people can inform you how things are progressing and help resolve issues.
Using a tool like Hubstaff with the Tasks add-on is the ideal way to keep your teams talking, yourself informed, and your project on track.
Looking for more practical advice like this?
Subscribe to the Hubstaff blog for the best recommendations, advice, and trends.
Most popular
How to Spot and Manage Work Overload Before Your Best People Burn Out
Work overload occurs when the demands placed on an employee or team exceed their available resources, leading to stress, burnout,...
Workplace Productivity Statistics in 2026: What the Numbers Say
For many businesses, having the ability to maximize output without compromising quality gives them a major edge over their competi...
Time Doctor vs. ActivTrak: Which Tool Is Right for Your Team?
Time Doctor and ActivTrak are two of the most powerful and popular time tracking solutions. Both have strong features, and both ca...
Work-Life Balance Statistics in 2026: A Global Perspective
Work-life balance has become a deciding factor in how people, especially Gen Z, choose or leave jobs. The data shows that work-lif...


![How to Identify, Define and Prioritize Business Goals in A Startup [Examples]](https://hubstaff.com/blog/wp-content/uploads/2019/04/Goals-and-Task@2x-780x390.jpg)