How to Use Hubstaff Features to Prevent Employee Burnout
- Hubstaff's time tracking limits, break enforcement, and streamlined PTO tools give managers concrete levers to prevent burnout before it impacts team health and performance.
- WHO-recognized burnout stems from unmanaged chronic stress; spotting it early through declining activity trends lets managers intervene with support before productivity and morale deteriorate.
- One firm saw a 40% rise in PTO uptake after simplifying approvals, proving that removing friction from rest and recovery directly strengthens team morale and reduces burnout risk.
Employee burnout is a word that gets casually thrown around the workplace, but when it hits, it hits badly. That’s why it’s crucial to always watch out for the signs of employee burnout.
Identifying the signs of employee burnout is only one part of the equation, though. You’ll still need a tool that can spot job burnout in its early stages — or even prevent it from happening in the first place.
Hubstaff is known as a time tracking and workforce management tool, but did you know its features also make it a strong workforce management platform to reduce burnout? Let’s discuss this.
Boost your team’s efficiency with Hubstaff's productivity tools
1. Set time tracking limits to avoid overworking
No one likes the idea of working too many hours, but it seems unavoidable at times. While you may not feel the effects of working that 50-hour week right away, keeping it up won’t do your personal life any good.
We’re not just talking about decreased work output due to mental fatigue here — research shows that overworking may lead to health problems like hypertension and depression.
Hubstaff’s Limit feature is an excellent solution to this. Set a hard cap for your employees’ working hours so they have to stop when they’ve worked enough hours for the day or week.
Some may be against the idea initially, but they’ll thank you.
Use Case: A digital marketing agency noticed a significant drop in productivity during peak campaign periods. By implementing Hubstaff’s time tracking limits, they ensured their team didn’t exceed 40 hours a week. As a result, employees felt more rested, leading to a 20% increase in overall productivity and employee retention and a 15% reduction in stress-related sick leaves.
How to set up hour limits
With Hubstaff, you can create daily, weekly, or shift limits.
- In your Hubstaff dashboard, go to People > Members.
- Click the edit icon under the Limits column of the team member.
- Set the desired limits.
- Weekly limits: Type the total number of hours they can work per week in the Recurring Weekly Limit field.
- Daily limits: Type the total number of hours they can work daily in the Recurring Daily Limit field. You can use decimal points, too (e.g., 0.5 hours is 30 minutes).
- Shift limits: Set Use shifts to set daily limits to On under Recurring Daily Limit. Then, select Create a shift. Employees will only be able to track time during shift hours.
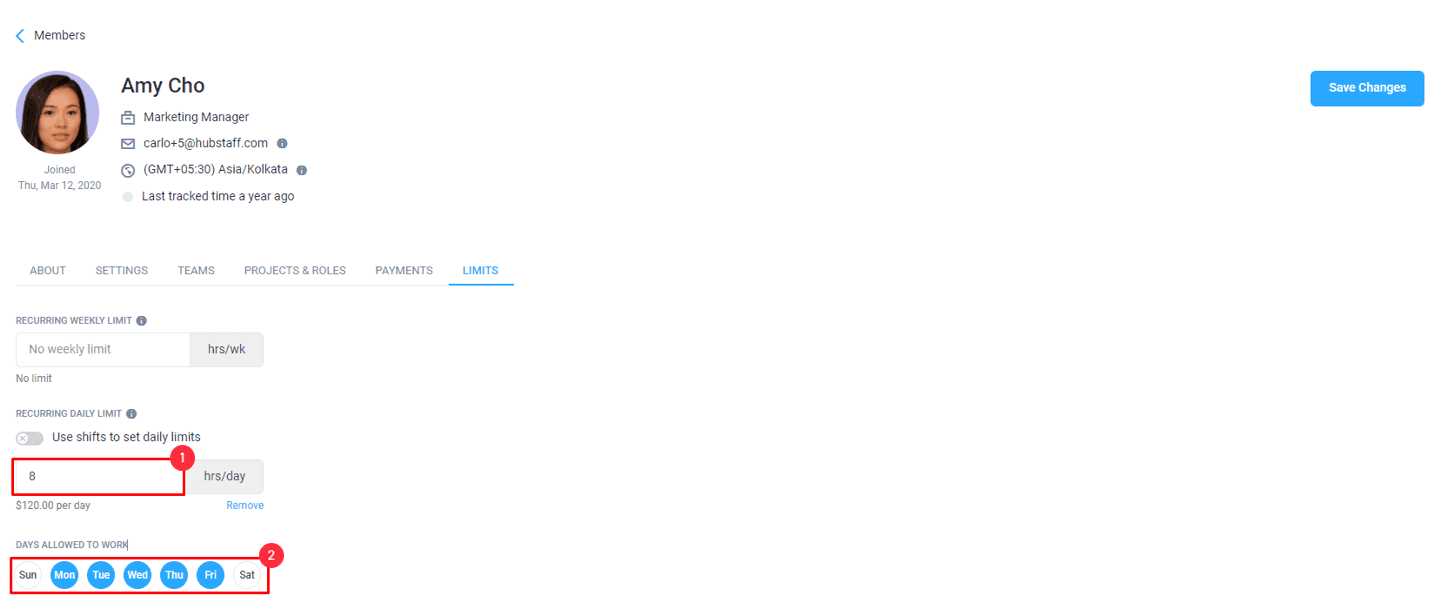
Team members will now see their limits in their timers. Hubstaff will automatically stop tracking time when they hit those limits.
2. Watch out for declining productivity trends
There’s no perfect way to measure productivity. However, you can define a baseline performance level for each employee to determine if they’re performing well or struggling. Thankfully, that’s one of the things Hubstaff excels at.
It’s important to understand that Hubstaff’s activity rates are not absolute. They may vary wildly from one employee to another, but that’s a good thing! You should only compare one employee’s activity rates with their previous scores — not those of other employees.
Think of an employee’s average activity rate as a zero point. If you notice their activity rates steadily decreasing over time, they might be getting burned out. This is your sign to step in and ask them how you can help.
Hubstaff also has an Insights add-on that includes more advanced productivity analytics that let you understand your team’s performance better.
Instead of comparing employees with very different roles, look to industry-specific activity benchmarks. You’ll also be able to see productive and unproductive apps, work-time classifications, and more. You can also track if your team spends more time on meetings than focused work.
Use case: A software development firm used Hubstaff’s activity monitoring to track an employee’s productivity. When they noticed a consistent decline, they had a one-on-one discussion and discovered the employee was experiencing burnout. They adjusted the workload and provided additional support, which led to a 25% increase in the employee’s productivity and overall well-being.
How to use Hubstaff activity rates
Hubstaff’s activity monitoring features can be turned on or off at any time. You can have different settings for each employee.
- In your Hubstaff dashboard, go to Settings & Policies > Features > Activity > Record activity.
- If you want to turn it on for all team members, toggle All Users on.
- If you want per-user settings, toggle All Users off and set your options for each employee.
Hubstaff will calculate activity levels based on employees’ keyboard and mouse activity while their timer is running. Each employee will have a different average activity level after a few weeks of tracking time regularly. Use that as a starting point.
3. Set up work breaks to allow rest between tasks
Everyone is guilty of putting off breaks to continue working at one point or another. If you aren’t, serious congratulations are in order.
All jokes aside, not taking breaks isn’t always a voluntary decision. In a study by Staples, 55% of respondents felt that they couldn’t leave their desks for a break.
The scary part is that you never know when burnout will kick in — you can be perfectly fine on the 7th hour and tapped out on the 8th. Breaks help prevent that from happening.
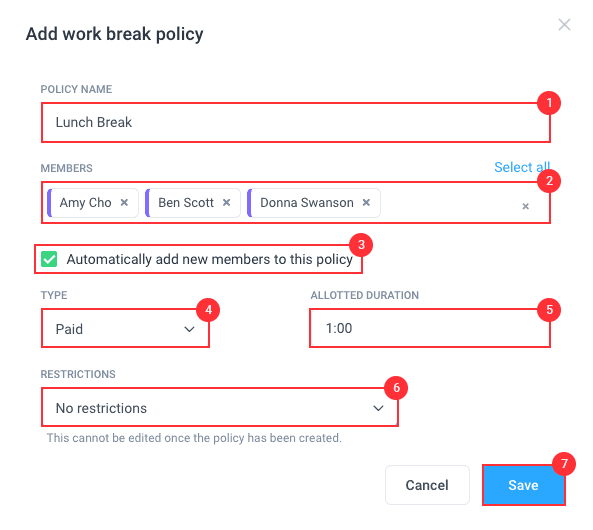
Hubstaff lets you easily implement breaks in your system with its Work Breaks feature. You can create paid breaks for employees, which they can use through the same timer they use for work.
Use Case: A customer service center introduced Hubstaff’s work breaks feature to ensure their team members took regular breaks. They noticed a significant reduction in errors and an increase in customer satisfaction after implementing regular breaks.
How to set up work breaks
- In your Hubstaff dashboard, go to Settings & Policies > Features > Work breaks.
- Click Add Policy to open the Add work break policy menu.
- Fill out all the fields and click Save.
Once you’ve set up work breaks, a break icon will appear on each team member’s timer. From there, they can “track time” to their breaks as they would to their tasks.
Once you’ve set up work breaks, a break icon will appear on each team member’s timer. From there, they can “track time” to their breaks as they would to their tasks.
4. Simplify PTO requests with the Time Off feature
While most governments legally require businesses to provide PTO, that isn’t always reflected in how employees work.
According to the Priceline Work-Life Balance Report, 18% of respondents said they felt guilty about taking time off. In the same report, 29% said their company or supervisor expects them to be “available” while on break.
These responses are indicative of a toxic culture — one that leadership must address by:
- Changing the narrative and encouraging employees to use their PTO
- Making PTO as easy to request as possible.
Hubstaff is the way to make these changes. The Time Off feature lets employees request paid time off in a few clicks. Managers are then notified by Hubstaff when someone requests time off so they can review, approve, or deny it.
Use Case: An IT consulting firm found that many employees were hesitant to take time off due to the cumbersome approval process. After implementing Hubstaff’s Time Off feature, they saw a 40% increase in PTO requests and an improvement in employee morale.
How to create a time off policy
- In your Hubstaff dashboard, go to Time off > Time off policies.
- Click Add policy to open the Add time off policy menu.
- Fill out all the fields and click Save.

You will receive an email when an employee requests paid time off, so you don’t have to look out for them constantly.
You will receive an email when an employee requests paid time off, so you don’t have to look out for them constantly.
5. Create project budgets and set notifications for better planning
You might not think of project budgeting as a task that contributes to burnout. But when you start missing deadlines, going over budget, and having unpleasant client conversations, it’s time to make a change.
As good as seasoned project managers are at communicating project delays to clients, managing expectations can be draining. The good news? You can avoid them with Hubstaff’s project budgeting capabilities.
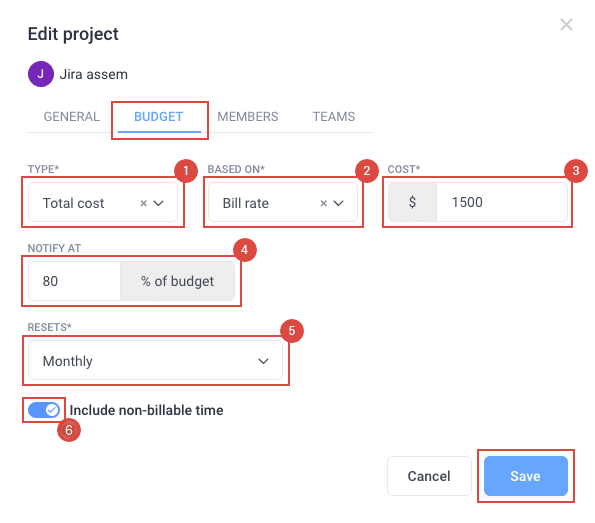
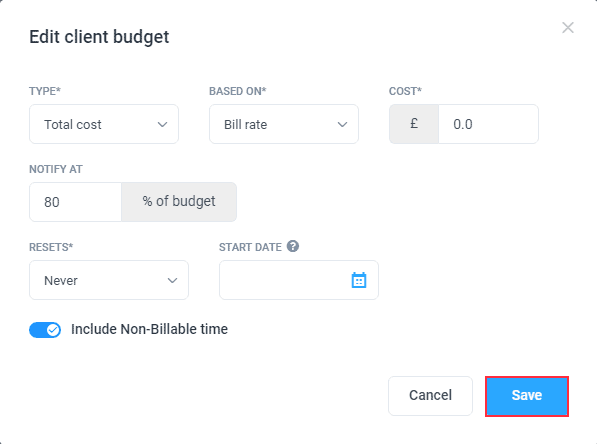
Hubstaff lets you set budgets for projects and clients and see project spend in real-time. You can also set up notifications to know when you’re close to hitting your budget. This way, you can adjust project scope and better manage expectations before it’s too late.
How to create budgets
Project budgets
- In your Hubstaff dashboard, go to Project management > Projects.
- Under the Budgets column, click the edit icon in the same row as the project to which you wish to add a budget.
- Fill out all the fields and click Save.
Client budgets
- In your Hubstaff dashboard, go to Project management > Clients.
- Under the Budgets column, click the edit icon in the same row as the client to which you wish to add a budget.
- Fill out all the fields and click Save.
Hubstaff will send you an email notification the moment you reach your specified budget percentage so that you won’t miss it.
6. Automate payroll and invoicing
Payroll and invoicing are delicate and time-consuming — especially if you’re managing an international team. It gets overwhelming to manage payroll and invoicing manually. To alleviate this pressure, automate both with Hubstaff.
Hubstaff calculates each employee’s pay based on their pay rates and total hours worked. Choose between weekly, bi-weekly, twice-a-month, or monthly pay periods and let Hubstaff do the rest. As soon as your team tracks time, you’ll have real-time updates and automated timesheets at your fingertips.
With the invoicing feature, you can effortlessly create invoices from the time you tracked. You can add automatic line items, add your own branding, and send and receive payments right from Hubstaff. Invoices are customizable and exportable for simple recordkeeping.
How to set up payroll
- In your Hubstaff dashboard, go to Financials > Payroll.
- Set up your payee account with Hubstaff Pay, PayPal, Wise, Payoneer, Gusto, or Bitwage. Team members can set up their payment details on their Hubstaff account.
- In the Payroll menu, click Add member to payroll and select the employee you wish to set up payroll for.
- In the Edit member menu, fill out all the fields and toggle Require timesheet approval on or off.* Click Save.
*If Require timesheet approval is set to on, Hubstaff will not process payments for team members whose timesheets you have not approved yet.
How to set up invoicing
- In your Hubstaff dashboard, go to Settings & Policies > Features.
- Click on the Invoices tab. This is where you’ll input the information that will appear in your invoices. Fill out all the fields and click Save.
- Time to set bill rates. Go to People > Members.
- Under the Payments column, click the edit icon to edit the user’s payment and billing information.
- Set the employee’s bill rate and click Save.
- To activate automatic invoices, go to Project management > Clients.
- Click Add Client and then go to the Invoicing tab. You can also edit details for existing clients in this window.
- In the Auto invoicing menu, click on Custom. Then, fill out all the fields and click Save.
Understanding Employee Burnout
Employee burnout is a state of physical, emotional, and mental exhaustion caused by prolonged stress and overwork. It can lead to a significant drop in productivity, morale, and overall well-being of employees. Here’s a closer look at the definition, signs, and causes of employee burnout.
Definition
Burnout is more than just occasional stress; it’s a chronic state of being worn out and feeling drained. According to the World Health Organization (WHO), burnout is a syndrome resulting from chronic workplace stress that has not been successfully managed. It is characterized by three dimensions:
- Exhaustion: Feeling tired and drained most of the time.
- Cynicism: Developing a negative, detached attitude towards your job.
- Inefficacy: Feeling incompetent and lacking achievement and productivity.
Signs of Employee Burnout
Recognizing the signs of burnout early can help in taking preventive measures. Common signs include:
- Physical symptoms: Chronic fatigue, headaches, muscle pain, and changes in sleep patterns.
- Emotional symptoms: Increased irritability, feeling of helplessness, and lack of motivation.
- Behavioral symptoms: Increased absenteeism, reduced performance, and withdrawal from responsibilities.
Causes of Employee Burnout
Understanding what causes burnout can help in developing strategies to prevent it. Common causes include:
- Excessive Workload: Constantly having too much to do without sufficient resources or support.
- Lack of Control: Feeling like you have no control over your work or the way you do it.
- Unclear Job Expectations: Not having a clear understanding of what is expected of you.
- Dysfunctional Workplace Dynamics: Working in an environment with conflict, bullying, or lack of support.
- Work-Life Imbalance: Not having enough time for personal and family life due to work demands.
Additional resources and tools for further learning
To help you understand and combat employee burnout, here are some valuable resources and tools:
- Mayo Clinic: Job Burnout: A comprehensive guide on symptoms, causes, and prevention strategies for job burnout.
- World Health Organization: Burn-out an “Occupational Phenomenon”: WHO’s definition and classification of burnout.
- American Psychological Association: Managing Burnout: Articles and resources on how to manage and prevent burnout.
- Harvard Business Review: Beating Burnout: Strategies from experts on how to overcome burnout in the workplace.
Wrapping up
All teams, regardless of size or industry, can be vulnerable to burnout at any time. That’s why managers and leaders should build work policies that enable employees to work at their best without compromising their physical and mental health.
That said, tools like Hubstaff also play an important role in keeping burnout to a minimum. Do you have any other tools you like to use to prevent burnout? Let us know in the comments.
FAQs
What is employee burnout?
Employee burnout is a state of physical, emotional, and mental exhaustion caused by prolonged and excessive stress at work. It occurs when employees feel overwhelmed, emotionally drained, and unable to meet constant demands. Burnout can lead to decreased productivity, lower morale, and various health problems. The World Health Organization (WHO) defines burnout as a syndrome resulting from chronic workplace stress that has not been successfully managed, characterized by exhaustion, cynicism, and inefficacy.
How do you fix burnout at work?
Fixing burnout at work involves several steps:
- Identify the causes: Understand what factors are contributing to the burnout, such as workload, lack of control, or workplace dynamics.
- Encourage open communication: Create a supportive environment where employees feel comfortable discussing their stress and workload.
- Implement work-life balance: Encourage employees to take breaks, use their PTO, and maintain a healthy work-life balance.
- Provide resources: Offer access to mental health resources, such as counseling or stress management programs.
- Adjust workloads: Ensure workloads are manageable and provide additional support or redistribute tasks if necessary.
- Recognize and reward: Acknowledge employees’ hard work and provide positive reinforcement to boost morale.
What are the five symptoms of burnout?
The five common symptoms of burnout include:
- Chronic fatigue: Feeling constantly tired and lacking energy.
- Irritability and frustration: Increased sensitivity to stress and irritability towards colleagues and work tasks.
- Lack of motivation: Decreased interest and enthusiasm for work-related activities.
- Decreased performance: Lower productivity and a sense of inefficacy in completing tasks.
- Physical symptoms: Headaches, muscle pain, and changes in sleep patterns.
What does employee burnout look like?
Employee burnout can manifest in various ways, including:
- Behavioral changes: Increased absenteeism, reduced participation in team activities, and withdrawal from responsibilities.
- Emotional signs: Feeling overwhelmed, helpless, and detached from work.
- Cognitive difficulties: Trouble concentrating, forgetfulness, and indecisiveness.
- Physical symptoms: Frequent headaches, gastrointestinal issues, and changes in appetite and sleep patterns.
Most popular
How to Spot and Manage Work Overload Before Your Best People Burn Out
Work overload occurs when the demands placed on an employee or team exceed their available resources, leading to stress, burnout,...
Workplace Productivity Statistics in 2026: What the Numbers Say
For many businesses, having the ability to maximize output without compromising quality gives them a major edge over their competi...
Time Doctor vs. ActivTrak: Which Tool Is Right for Your Team?
Time Doctor and ActivTrak are two of the most powerful and popular time tracking solutions. Both have strong features, and both ca...
Work-Life Balance Statistics in 2026: A Global Perspective
Work-life balance has become a deciding factor in how people, especially Gen Z, choose or leave jobs. The data shows that work-lif...